上回和大家分享了如何製作collection View,今天要和大家介紹顏色APP中使用到Table View的部分,一樣會先介紹基本設定再和大家分享顏色APP介面中有使用到的部分!
先新增一個View Controller (此處取名為通知Scene)在View Controller裡面加入Table View,class選擇NoticeViewController.swift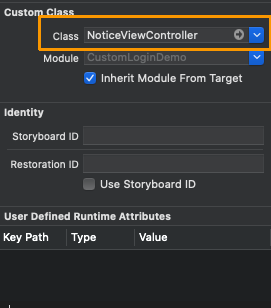
在Table View裡面加入Table View cell,class選擇NoticeTableViewCell.swift並設定identifier為”notice_cell”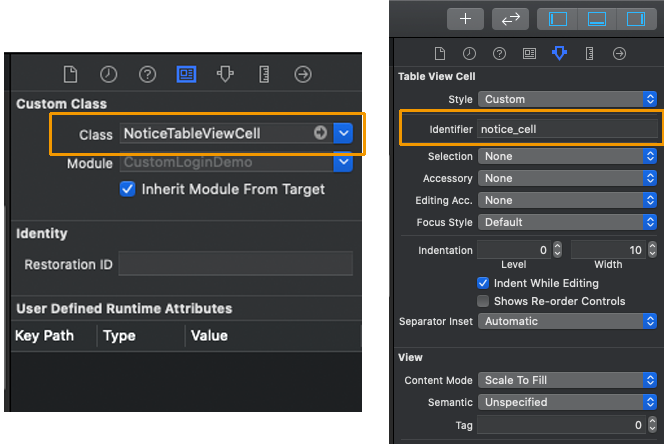
在Table View cell內加入所需的物件
通知共有兩種
- 朋友傳貼圖通知
- 好友邀請通知(需要確認和拒絕按鈕)
需要淺藍色背景色塊、照片、好友名字、通知內容、按鈕x2六個物件
加入一個背景色塊可快速讓每個Table View cell中間有空白間隔不會全部連在一起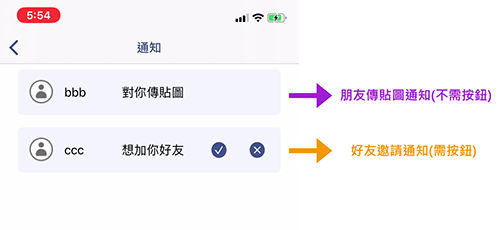
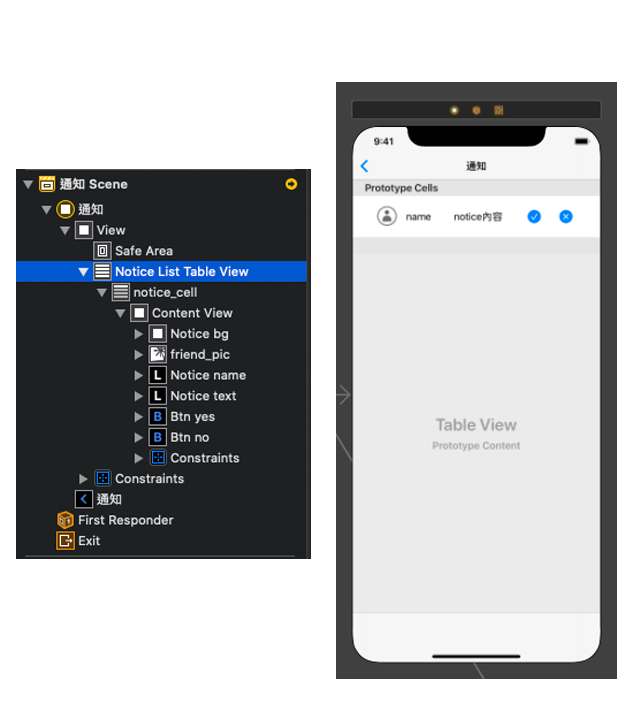
從Row Height設定Table View cell的高度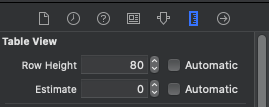
(NoticeTableViewCell.swift檔案)
將物件連到對應的變數中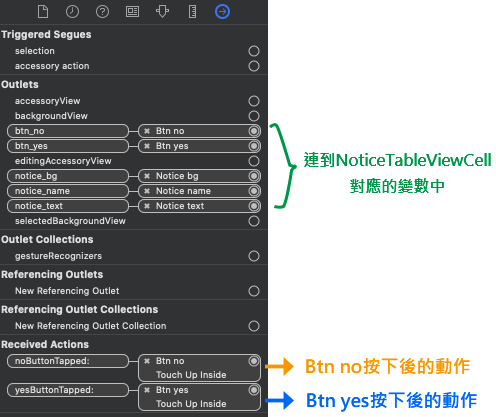
class NoticeTableViewCell: UITableViewCell {
    var noticeViewController : NoticeViewController?
    @IBOutlet weak var notice_name: UILabel!
    @IBOutlet weak var notice_text: UILabel!
    @IBOutlet weak var btn_yes: UIButton!
    @IBOutlet weak var btn_no: UIButton!
    @IBOutlet weak var notice_bg: UIView!
    override func awakeFromNib() {
        super.awakeFromNib()
        // Initialization code
        btn_no.tintColor = UIColor(hexString: "#3D538B")
        btn_yes.tintColor = UIColor(hexString: "#3D538B")
    }

    override func setSelected(_ selected: Bool, animated: Bool) {
        super.setSelected(selected, animated: animated)

    }
    //按下確認按鈕後進行的事件,連到btn_yes
     @IBAction func yesButtonTapped(_ sender: Any) {

            noticeViewController?.addFriendList(cell: self)
            noticeViewController?.deleteCell(cell: self)

        }
    //按下拒絕按鈕後進行的事件,連到btn_no
        @IBAction func noButtonTapped(_ sender: Any) {

            noticeViewController?.deleteCell(cell: self)

        }
}
(NoticeViewController.swift檔案) 要繼承UITableViewDelegate, UITableViewDataSource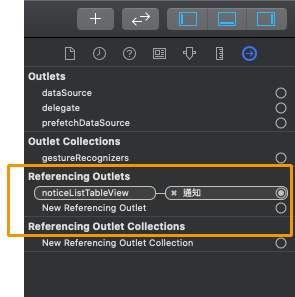
//連到UITableView
@IBOutlet weak var noticeListTableView: UITableView!

override func viewDidLoad() {
        super.viewDidLoad()
		// Table View的dataSource、delegate要連給self
        noticeListTableView.delegate = self
        noticeListTableView.dataSource = self
}

    //朋友列表部分
    func numberOfSections(in tableView: UITableView) -> Int {
        // #warning Incomplete implementation, return the number of sections
        return 1
    }

    func tableView(_ tableView: UITableView, numberOfRowsInSection section: Int) -> Int {
        //cell數量
        return friendID.count
    }

    func tableView(_ tableView: UITableView, cellForRowAt indexPath: IndexPath) -> UITableViewCell {
        let cell = tableView.dequeueReusableCell(withIdentifier: "notice_cell", for: indexPath) as! NoticeTableViewCell
//預設不讓按鈕出現
        cell.btn_yes.alpha = 0
        cell.btn_yes.isEnabled = false
        cell.btn_no.alpha = 0
        cell.btn_no.isEnabled = false
        db.collection("users").document(friendID[indexPath.row]).getDocument {(document,error) in

            if error == nil{

                if document != nil && document!.exists{
			//好友名稱
                    cell.notice_name.text = document!.data()?["nickname"] as? String
                    //背景圓角設定
cell.notice_bg.layer.masksToBounds = true
                    cell.notice_bg.layer.cornerRadius = 6
					//背景顏色
                    cell.notice_bg.backgroundColor = UIColor(hexString: "#F1F4FC")
                }
            }
        }

        db.collection("users").document(userID).collection("friends").document("noticeList").getDocument {(document,error) in

    //當為好友邀請時讓按鈕出現
            if (document!.data()?[self.friendID[indexPath.row]] as? String)!.compare("0-0").rawValue == 0{
                cell.btn_yes.alpha = 1
                cell.btn_yes.isEnabled = true
                cell.btn_no.alpha = 1
                cell.btn_no.isEnabled = true
                cell.notice_text.text = "想加你好友"
            }
			//當為傳貼圖通知時不讓按鈕出現
            else if (document!.data()?[self.friendID[indexPath.row]] as? String)!.compare("1").rawValue == 0{
                cell.btn_yes.alpha = 0
                cell.btn_yes.isEnabled = false
                cell.btn_no.alpha = 0
                cell.btn_no.isEnabled = false

                cell.notice_text.text = "對你傳貼圖"
            }
        }

        cell.noticeViewController = self

        return cell
    }

//接受、拒絕好友邀請時呼叫的function
//(有關Firebase的部分在此不做說明)

    //拒絕,刪除cell(有關Firebase的部分在此不做說明)
func deleteCell(cell:UITableViewCell) {

        if let deletionIndexPath = noticeListTableView.indexPath(for: cell){
            db.collection("users").document(userID).collection("friends").document("noticeList").updateData([friendID[deletionIndexPath.row]: FieldValue.delete()]){error in
                if error != nil{
                    print("Error updating")
                }
            }

            db.collection("users").document(friendID[deletionIndexPath.row]).collection("friends").document("noticeList").updateData([userID: FieldValue.delete()]){error in
                if error != nil{
                    print("Error updating 2")
                }
            }
            friendID.remove(at: deletionIndexPath.row)
            noticeListTableView.deleteRows(at: [deletionIndexPath], with: .automatic)
        }
    }
    //新增好友(有關Firebase的部分在此不做說明)
func addFriendList(cell:UITableViewCell){

        if let deletionIndexPath = noticeListTableView.indexPath(for: cell){
                                              db.collection("users").document(userID).collection("friends").document("FriendList").setData([friendID[deletionIndexPath.row]: ""], merge: true){ (error) in
                    if error != nil{
                        print("Error updating 3")
                    }
                } db.collection("users").document(friendID[deletionIndexPath.row]).collection("friends").document("FriendList").setData([userID: ""], merge: true){ (error) in
                if error != nil{
                    print("Error updating 4")
                }
            }
        }
}
Table View和Collection View基本設定方式其實大同小異,上回Collection View是介紹如何使用程式碼製作,Table View要使用程式碼開發方法也是相似的,明天將要和大家分享APP中其他運用到Table View的實際例子,別錯過囉~
