在上回瞭解了Table View基本設定後緊接著和大家分享在顏色 Countenance APP後所應用到的部分,Table View常見使用方式有通知、資料列表等,能夠應用的地方非常多,有了它讓APP開發更快速更方便產生需要的頁面。
(Table View及Table View Cell的基本設定請參考上回)

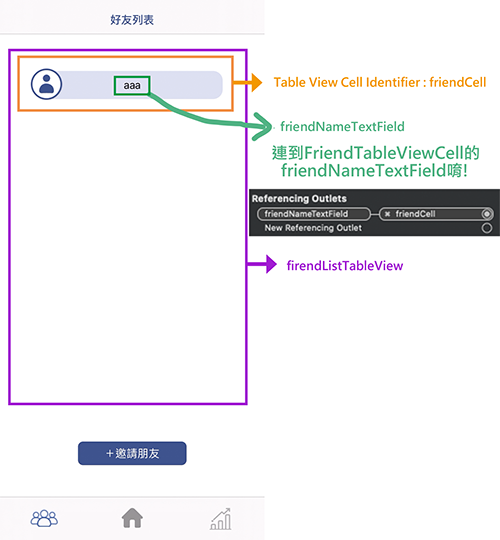
Table View Cell Identifier : friendCell
(FriendsViewController.swift) 記得繼承UITableViewDelegate, UITableViewDataSource喔!
//firendListTableView連到Storyboard的TableView
@IBOutlet weak var firendListTableView: UITableView!
override func viewDidLoad() {
    firendListTableView.delegate = self
    firendListTableView.dataSource = self
   //設定TableView的背景色為透明
    firendListTableView.backgroundColor = UIColor.clear
}
override func viewWillAppear(_ animated: Bool) {
        //當頁面重新載入時更新Table view
        firendListTableView.reloadData()
}
//FriendList Section數量
    func numberOfSections(in tableView: UITableView) -> Int {
        return 1
    }
//cell數量
    func tableView(_ tableView: UITableView, numberOfRowsInSection section: Int) -> Int {
        return friendID.count
    }

    func tableView(_ tableView: UITableView, cellForRowAt indexPath: IndexPath) -> UITableViewCell {
        let cell = tableView.dequeueReusableCell(withIdentifier: "friendCell", for: indexPath) as! FriendTableViewCell
        cell.friendNameTextField.backgroundColor = UIColor(hexString: "#DAE0F0")
        cell.friendNameTextField.textAlignment = .center
        cell.friendNameTextField.layer.masksToBounds = true
        cell.friendNameTextField.layer.cornerRadius = 15.0
//以下請參考Firebase系列文章
        db.collection("users").document(friendID[indexPath.row]).getDocument {(document,error) in

            if error == nil{

                if document != nil && document!.exists{
                    //載入Firebase資料設定cell文字內容
                    cell.friendNameTextField.text = document!.data()?["nickname"] as? String
                }
            }
        }
        cell.friendViewController = self

        return cell
    }

//UITextField相關設定
extension FriendsViewController: UITextFieldDelegate{
    func textFieldShouldReturn(_ textField: UITextField) -> Bool {
        self.view.endEditing(true)

        return true
    }

    override func touchesBegan(_ touches: Set<UITouch>, with event: UIEvent?) {

        self.view.endEditing(true)
    }
}

(FriendTableViewCell.swift)
記得繼承UITableViewCell喔!

class FriendTableViewCell: UITableViewCell {

    var friendViewController: FriendsViewController?

    @IBOutlet weak var friendNameTextField: UILabel!

    override func awakeFromNib() {
        super.awakeFromNib()
    }

    override func setSelected(_ selected: Bool, animated: Bool) {
        super.setSelected(selected, animated: animated)
        if (selected) {
          //選中時改變背景色
            friendNameTextField.backgroundColor = UIColor(hexString: "#E9F1F6")
        } else {
          //未選中時改變背景色
            friendNameTextField.backgroundColor = UIColor(hexString: "#DAE0F0")
        }
    }

}

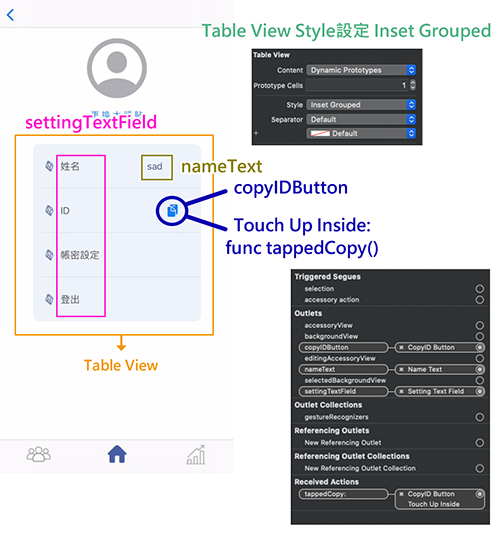
Table View Cell Identifier : settingCell (settingViewController.swift)
這裡的Table View 的外型有點不太一樣,因為我設定Table View style為Inset Grouped,所以看起來會有一整塊的感覺。老話一句,要記得繼承UITableViewDelegate, UITableViewDataSource喔!
@IBOutlet var tableView: UITableView!
//每格的名稱
let option = ["姓名","ID","帳密設定","登出"]
override func viewDidLoad() {
        super.viewDidLoad()
        tableView.delegate = self
        tableView.dataSource = self
        tableView.isScrollEnabled = false
    }
func tableView(_ tableView: UITableView, didSelectRowAt indexPath: IndexPath) {
        //按下登出(indexPath.row == 3)
        if (indexPath.row == 3){
            do {
                try Auth.auth().signOut()
                //回到初始頁面
                let ViewController = self.storyboard?.instantiateViewController(identifier: Constants.Storyboard.ViewController) as? UINavigationController

                self.view.window?.rootViewController = ViewController
                self.view.window?.makeKeyAndVisible()

            }catch{
                print(error)
            }
        }
    }
    func  numberOfSections(in tableView: UITableView) -> Int {
        return 1
    }
    func tableView(_ tableView: UITableView, numberOfRowsInSection section: Int) -> Int {
        return option.count
    }

    func tableView(_ tableView: UITableView, cellForRowAt indexPath: IndexPath) -> UITableViewCell {
        let cell = tableView.dequeueReusableCell(withIdentifier: "settingCell", for: indexPath) as! settingTableViewCell
        cell.selectedBackgroundView = selectedBackgroundView
        cell.backgroundColor = UIColor(hexString: "#E9F1F6")
        cell.nameText.textColor = UIColor(hexString: "#3D538B")
        //載入姓名
        if(indexPath.row == 0){

            let context = CoreDataManager.shared.persistentContainer.viewContext

            let fetchRequest = NSFetchRequest<User>(entityName: "User")
            fetchRequest.fetchLimit = 1
            fetchRequest.predicate = NSPredicate(format: "firestoreID == %@", userID)

            do{
                let Userexist = try context.fetch(fetchRequest)

                cell.nameText.text = Userexist[0].nickName

            }catch let fetchError{
                print("Failed to fetch User: \(fetchError)")
                cell.nameText.text = ""
            }
        }else{
            cell.nameText.text = ""
        }
        //ID欄則不顯示姓名,顯示按鈕
        if(indexPath.row == 1){
            cell.nameText.alpha = 0
        }else{
            cell.copyIDButton.isEnabled = false
            cell.copyIDButton.alpha = 0
        }

        cell.settingTextField.textColor = UIColor(hexString: "#4A4A4A")
        cell.settingTextField.text = option[indexPath.row]
        return cell
    }
(settingTableViewCell.swift)
記得繼承UITableViewCell喔!
class settingTableViewCell: UITableViewCell {

    var settingViewController : settingViewController?

    let db = Firestore.firestore()
    let userID = Auth.auth().currentUser!.uid
    var firebaseID = ""
    //連到Storyboard對應的元件上
    @IBOutlet weak var settingTextField : UILabel!
    @IBOutlet weak var nameText: UILabel!
    @IBOutlet weak var copyIDButton: UIButton!
    override func awakeFromNib() {
        super.awakeFromNib()
        copyIDButton.tintColor = UIColor(hexString: "#3D538B")
    }

    override func setSelected(_ selected: Bool, animated: Bool) {
        super.setSelected(selected, animated: animated)
    }
//按下複製按鈕時
    @IBAction func tappedCopy(_ sender: Any) {
        let context = CoreDataManager.shared.persistentContainer.viewContext

        let fetchRequest = NSFetchRequest<User>(entityName: "User")
        fetchRequest.fetchLimit = 1
        fetchRequest.predicate = NSPredicate(format: "firestoreID == %@", userID)

        do{
            let Userexist = try context.fetch(fetchRequest)

            firebaseID = Userexist[0].firestoreID!

        }catch let fetchError{
            print("Failed to fetch User: \(fetchError)")
        }

        UIPasteboard.general.string = firebaseID
        print("Button tapped")
    }
}
Table View具有非常大的彈性空間,在Table View Cell 可以依據需求及喜好放入各種的元件來組成你心目中最佳的Table View介面,例如:每個Cell中間想留白就可以在Table View Cell中加入不填滿整個Cell的UIView並設定背景色,看起來就會像有留白,Table View就像某獅文具一樣讓你盡情發揮想像力跟創造力做出各式各樣的介面,希望這篇文章能給大家提供一些靈感~
