
首先 App.vue 內這裡新增事件 <h1 @click="showLoginClick">IT幫幫忙 - 鐵人賽 30 天
接著導覽列 內新增一條指向 /login 的連結,並且新增相應的 data 和 methods :
App.vue...
<template>
  <div id="app">
    <b-container fluid class="hero" ref="hero">
      <b-row>
        <b-col cols="12">
          <div class="hero--chooseHero">
            <div class="hero--chooseHero__content">
              <h1 @click="showLoginClick">IT幫幫忙 - 鐵人賽 30 天</h1>
              <p @click="showUser">自討苦吃</p>
            </div>
          </div>
        </b-col>
      </b-row>
    </b-container>

    <b-navbar type="dark" variant="dark">

      <!-- 這邊使用 BV 支援 <router-link to=...>的元件 -->
      <b-navbar-nav>
        <b-nav-item to="/">Home</b-nav-item>
        <b-nav-item to="/about">About Me</b-nav-item>
        <b-nav-item to="/login" v-if="loginShow">登入</b-nav-item>
      </b-navbar-nav>

      <!-- 這邊使用 BV navbar 的搜尋框元件,後面用以搜尋文章 -->
      <b-navbar-nav class="ml-auto">
        <b-nav-form>
          <b-form-input size="sm" class="mr-sm-2" placeholder="Search"></b-form-input>
          <b-button size="sm" class="my-2 my-sm-0" type="submit">Search</b-button>
        </b-nav-form>
      </b-navbar-nav>
    </b-navbar>

    <!-- 負責顯示所有內容 -->
    <router-view/>

  </div>
</template>

<script>
export default {
  name: 'App',
  data () {
    return {
      loginShow: false,
      loginClick: 0
    }
  },
  methods: {
    showLoginClick () {
      this.loginClick++
      if (this.loginClick > 2) {
        this.loginShow = true
        setTimeout(() => {
          this.loginClick = 0
          this.loginShow = false
        }, 3000)
      }
    },

    // 此方法用來測試現在使用者,綁定在首頁大圖 p 元素上
    showUser () {
      var user = firebase.auth().currentUser
      var name, email, photoUrl, uid, emailVerified

      if (user != null) {
        name = user.displayName
        email = user.email
        photoUrl = user.photoURL
        emailVerified = user.emailVerified
        uid = user.uid
        console.log({
          name,
          email,
          photoUrl,
          emailVerified,
          uid
        })
      } else {
        console.log('使用者以登出', user)
      }
    }
  }
}

</script>
看見 showLoginClick 方法可以讓我們點 h1 標籤內容到三下後顯示登入口,3s 後熄滅

然後去設定 router index.js,多加一個 login 的部分
router/index.js...
const routes = [
  {
    path: '/',
    name: 'Home',
    component: Home
  },
  {
    path: '/about',
    name: 'About',
    // route level code-splitting
    // this generates a separate chunk (about.[hash].js) for this route
    // which is lazy-loaded when the route is visited.
    component: () => import(/* webpackChunkName: "about" */ '../views/About.vue')
  },
  {
    path: '/login',
    name: 'Login',
    component: () => import('../views/Login.vue')
  }
]
接著再準備畫面和相對應的方法們,新增位置是在 views 下的 Login.vue 檔案 :
Login.vue ...
<template>
  <b-container class="pageLogin">
    <b-row class="my-3">
      <b-col sm="3">
        <label>請輸入帳號:</label>
      </b-col>
      <b-col sm="9">
        <b-form-input v-model="account"></b-form-input>
      </b-col>
    </b-row>
    <b-row class="my-3">
      <b-col sm="3">
        <label>請輸入密碼:</label>
      </b-col>
      <b-col sm="9">
        <b-form-input type="password" v-model="password"></b-form-input>
      </b-col>
    </b-row>
    <b-row>
      <b-col sm="3" class="status">請選擇登入或註冊: </b-col>
      <b-col sm="9">
        <div class="status">
          <span @click="setStatus(1)" :class="{ active: setActive }">登入</span>
          <span @click="setStatus(2)" :class="{ active: !setActive }">註冊</span>
          <input v-model="inOrUp" type="text" style="display: block;">
        </div>
      </b-col>
    </b-row>
    <c-button variant="primary" @click.native="submit">送出</c-button>
  </b-container>
</template>

<script>
import cButton from '../components/CButton.vue'
import { firebase } from '../Model/FirebaseModel'

firebase.auth().onAuthStateChanged(function (user) {
  if (user) {
    // User is signed in.
    var displayName = user.displayName
    var email = user.email
    var emailVerified = user.emailVerified
    var photoURL = user.photoURL
    var isAnonymous = user.isAnonymous
    var uid = user.uid
    var providerData = user.providerData
    // ...
    console.log('使用者資訊: ', {
      displayName,
      email,
      emailVerified,
      photoURL,
      isAnonymous,
      uid,
      providerData
    })
  } else {
    // User is signed out.
    // ...
  }
})

export default {
  name: 'Login',
  data () {
    return {
      types: [
        'email',
        'password'
      ],
      setActive: true,
      inOrUp: 1,
      account: '',
      password: ''
    }
  },
  components: {
    cButton
  },
  mounted () {
    this.setStatus.prevStatus = 1
  },
  methods: {
    setStatus (status) {
      console.log(status)
      this.inOrUp = status
      if (status !== this.setStatus.prevStatus) this.setActive = !this.setActive
      this.setStatus.prevStatus = status
    },
    submit () {
      console.log([this.account, this.password, this.inOrUp])
      switch (this.inOrUp) {
        case 1:
          firebase.auth().signInWithEmailAndPassword(this.account, this.password)
          .then(() => {
            console.log('登入成功')
            this.$router.push('/backend')
          }).catch(function (error) {
            // Handle Errors here.
            var errorCode = error.code
            var errorMessage = error.message
            console.error(errorCode, errorMessage)
          })
          break
        case 2:
          firebase.auth().createUserWithEmailAndPassword(this.account, this.password)
          .then(() => {
            console.log('註冊成功')
          }).catch(function (error) {
            // Handle Errors here.
            var errorCode = error.code
            var errorMessage = error.message
            console.error(errorCode, errorMessage)
          })
          break
        default:
          break
      }
    }
  }
}
</script>

<style lang="scss" scoped>
.pageLogin {
  padding: 2rem;
}

.status {
  padding: 1rem;
  & > span {
    user-select: none;
    cursor: pointer;
    margin: .5rem 1rem .5rem 0;
    padding: .5rem;
    border-radius: 5px;

    &:hover {
      background-color: #ccc;
    }
  }
}

.active {
  background-color: #595;
  color: white;
}
</style>
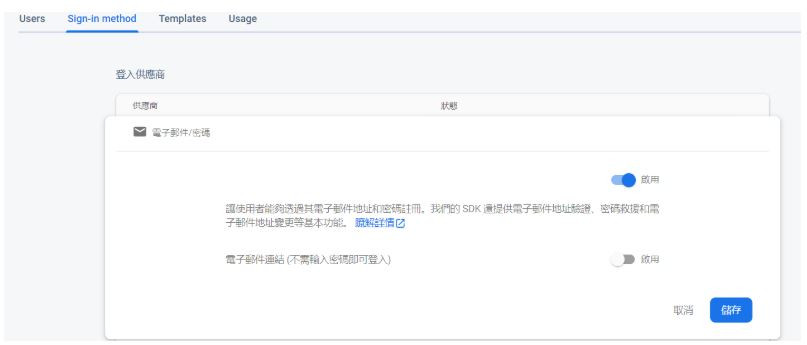
進入 Firebase 控制台專案中,左側 bar 點 Authentication 進來這邊,點擊如圖顯示的頁籤,找到電子郵件的選項把它開啟,接著就可以來準備登入登出了,開啟功能後要記得到 Users 去新增一個 email 和 密碼 做為一個使用者,這樣後面登入 Call Firebase 的方法才能順利運作。
接著我有把前幾天模仿 BV 的 button 拿過來這邊用,在 components 資料夾下新增一個 CButton.vue檔案,有點多此一舉,可以直接用 BV 的 <b-button>就好,啊我只是想用啦不然都做了也是浪費哈哈。
CButton.vue ...
<template>
  <button type="button" class="btn" :class=" 'btn-' + dynamicClass" >
    <slot></slot>
  </button>
</template>

<script>
export default {
  name: 'CButton',
  props: {
    variant: {
      type: String,
      default: 'normal'
    }
  },
  computed: {
    dynamicClass () {
      return this.variant
    }
  }
}
</script>

<style lang="scss" scoped>
.btn {
  border-radius: 5px;
  color: white;
  padding: .375rem .75rem;
  border: 1px solid transparent;
  box-shadow: 0 1px 1px 0px black;
}

// 定義各色塊
// 預設 = #6c757d , success = #28a745 , primary = #007bff , danger = #dc3545

.btn-normal {
  background-color: #6c757d;
}

.btn-success {
  background-color: #28a745;
}

.btn-primary {
  background-color: #007bff;
}

.btn-danger {
  background-color: #dc3545;
}
</style>
基本畫面和功能現在可以來測試看看,目前,現在錯誤的部分是文章 id 重複的部分,我們後面再改,現在點選註冊,輸入我們的帳號密碼,如果格式皆正確將會 console 註冊成功,當然這是暫時的做法,等我們功能慢慢完善後,我們會把錯誤的 catch 改成更好的處理方式。
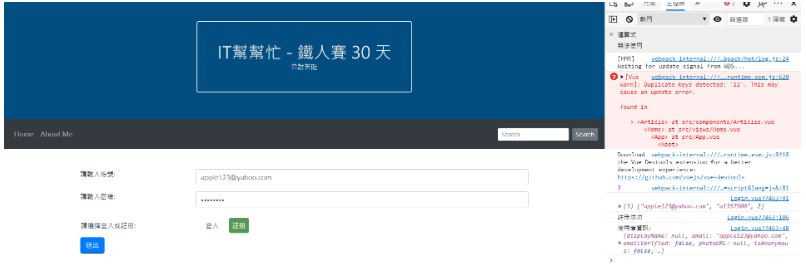
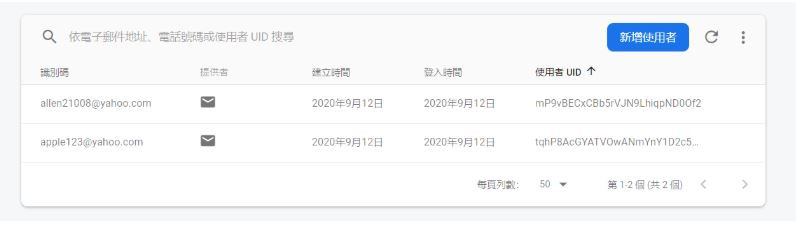
看到顯示註冊成功,現在去我們的 Firebase 專案內看 Authentication,看見我們剛剛輸入資訊成功註冊了。
在註冊成功的 console 下補上這行,這樣之後註冊成功後就能和登入一樣自動導向後台介面。
this.$router.push('/backend')
之後先隨便在 views 下開個 Backend.vue,並先準備一個登出 method 並帶入 Firebase 模組提供的方法。
Backend.vue...
<template>
  <b-container>
    <b-row>
      <b-col>
        這裡是後台待開發
      <b-navbar-nav>
        <b-nav-item to="/" @click="signOut">登出</b-nav-item>
      </b-navbar-nav>
      </b-col>
    </b-row>
  </b-container>
</template>

<script>
import { firebase } from '../Model/FirebaseModel'
export default {
  name: 'Backend',
  data () {
    return {}
  },
  methods: {
    signOut () {
      firebase.auth().signOut().then(function () {
        // Sign-out successful.
        console.log('登出成功')
      })
    }
  }
}
</script>
router index.js 也記得新增
const routes = [
  {
    path: '/',
    name: 'Home',
    component: Home
  },
  {
    path: '/about',
    name: 'About',
    // route level code-splitting
    // this generates a separate chunk (about.[hash].js) for this route
    // which is lazy-loaded when the route is visited.
    component: () => import(/* webpackChunkName: "about" */ '../views/About.vue')
  },
  {
    path: '/login',
    name: 'Login',
    component: () => import('../views/Login.vue')
  },
  {
    path: '/backend',
    name: 'Backend',
    component: () => import('../views/Backend.vue')
  }
]
做到這邊,你擁有了一個基本的註冊後,登入登出的功能。並且在登入登出的過程中,可以點擊"自討苦吃",來測試現在的登入者,看是否有正確顯示現在的登入者,之後,我們就可以找時間再來製作一個 "個人資料編輯頁面" 並使用其他的相關方法來實作。
沒事也可以逛逛我們其他團隊成員的文章啦 ~~
eien_zheng: 前端小嘍嘍的Golang學習旅程_The journey of learning Golang 系列
PollyPO技術: 前端設計轉前端工程師-JS踩坑雜記 30 天 系列
阿電: 忍住不打牌位,只要30天VueJS帶你上A牌 系列
喬依司: 實作經典 JavaScript 30 系列

 iThome鐵人賽