在介紹完基本的 Node、Topic、Message 後,再來便是實做 Publisher 與 Subscriber 囉。今天我們會介紹使用 Python 來撰寫 Publisher 的方法,以下進入正題:
首先進到 beginner_tutorial/src/ ,並建立新檔案 talker.py:
roscd beginner_tutorial/src/
touch talker.py
接著,在裡面輸入以下程式碼:
#!/usr/bin/env python
# license removed for brevity
import rospy
from std_msgs.msg import String

def talker():
  pub = rospy.Publisher('chatter', String, queue_size=10)
  rospy.init_node('talker', anonymous=True)
  rate = rospy.Rate(10) # 10hz
  while not rospy.is_shutdown():
    hello_str = "hello world %s" % rospy.get_time()
    rospy.loginfo(hello_str)
    pub.publish(hello_str)
    rate.sleep()

if __name__ == '__main__':
  try:
    talker()
  except rospy.ROSInterruptException:
    pass
詳細解析一下程式碼:
#!/usr/bin/env python
這一行程式碼其實在 DAY7 就有簡單提到了。假設我們在檔案中加入此行註釋,那麼在 Terminal 上輸入 ./[file_name] 就可以直接執行檔案!換言之,我們可以使用 ./ 取代在 Terminal上輸入 python [file_name] 的 python。
import rospy
from std_msgs.msg import String
這兩行表示我們於檔案中匯入了 rospy 以及 std_msgs.msg 當中的 String。兩者的功用在於,假設我們想利用 Python 寫出 ROS node 相關的指令時,就必須 import rospy;from std_msgs.msg import String 則和上面提到的 Message 格式有關,表示我們可以使用 String 這個 Message 格式在 Topics 之間交換資料。
def talker():
  pub = rospy.Publisher('chatter', String, queue_size=10)
  rospy.init_node('talker', anonymous=True)
  rate = rospy.Rate(10) # 10hz
  while not rospy.is_shutdown():
    hello_str = "hello world %s" % rospy.get_time()
    rospy.loginfo(hello_str)
    pub.publish(hello_str)
    rate.sleep()
這邊定義了 talker 這個函式的內容,因此會稍微冗長一點:
首先,第2行設定了 Node 與 Topic 之間的關係,原函式定義為 rospy.Publisher(topic_name, msg_type, queue_size),表示該 Node 可針對 [topic_name] 發布格式為 [msg_type] 的 Message,[queue_size] 是設定最多可儲存幾筆 Message,以避免任何 Subscriber 來不及接收 Message。
第3行初始化名稱為 talker 的這個 Node,[anonymous] 則針對需要同時執行多個該 Node 時所設定,由於 ROS當中 Nodes 的名稱不可重複,若有重複名稱的 Node 被執行時,較早執行的 Node 會被關閉。因此初始化 Node 時如果設定 [anonymous=True],執行檔案時系統會自動在 Node 名稱後加上亂數,如此即可輕易創建多個不同名稱但功能相同的 Nodes。
第4行設定了迴圈間隔的頻率,通常會與第9行的 ros.sleep() 同時使用。rospy.Rate(10) 表示每 0.1秒作1次迴圈,也就是說 ros.Rate() 內的參數表示的是頻率,單位為赫茲(Hz),至於 ros.sleep() 這邊以下圖來解釋:假設每作一次迴圈只需要0.07秒,但因為 ros.Rate() 設定為 10,則 ros.sleep() 會使該 Node 等待0.03秒後再執行下個迴圈,以此類推。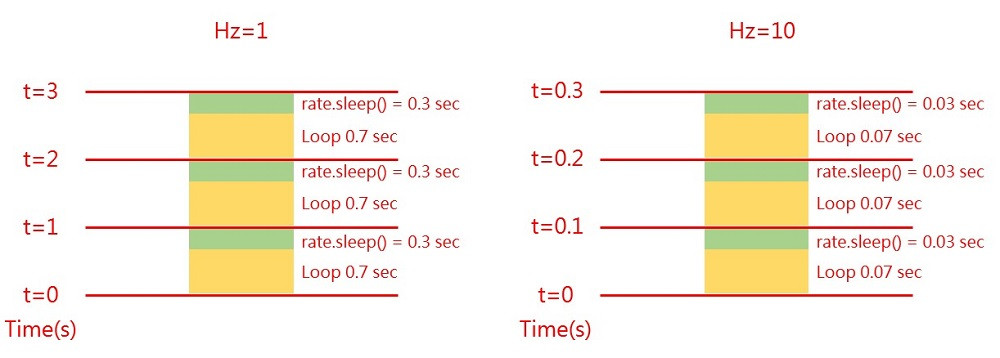
第5行 rospy.is_shotdown() 也在 DAY7 介紹過了,利用 while not 即可達到程式關閉前會持續進行該迴圈的結果。
第6行是將字串 "hello world" 和時間存進 hello_str 當中,第7行則是將 hello_str 的內容印到螢幕並寫入 ROS log 裡。
第8行 pub.publish(hello_str),便是使用第2行提到的功能,將 hello_str 這個 Message 發佈至 Topic 上。
if __name__ == '__main__':
  try:
    talker()
  except rospy.ROSInterruptException:
    pass
最後一段程式碼的用意在於,倘若今天該檔案是自己被執行時(例 ./talker.py),則執行takler()這個函式;若該檔案是被當成一個 class ,import 到其他檔案中時,則不執行任何動作。
建置 Publisher 的程式並不複雜,其實只要釐清 Node 需要向 Topic 發布什麼 Message 以及 Message 的格式,剩餘的其實就只要根據需求添加其他功能而已。例如本次程式碼中的 rospy.loginfo(hello_str) 其實也沒什麼多大的用意。最主要的還是要知道 pub.publish(hello_str) 當中,hello_str 即為 Subscriber 所需的 Message 即可!明天我們則會開始介紹如何同樣透過 Python 建置一個 Subscriber,以及這個 Subscriber 在接收到 Message 後應該做什麼事,請各位敬請期待。


 iThome鐵人賽