大家好,昨天我們稍微講解了一下在筆者團隊的研究中所需的前置步驟,那麼今天我們就來進入程式碼的部分吧!
#!/usr/bin/env python

import math
from robot_control_class import RobotControl

robotcontrol = RobotControl()

t = 1
stop = False
while t >= 0:

  scan = robotcontrol.get_laser_full()
  left = min(scan[20:159])
  right = min(scan[200:339])
  d = right - left
  print("d = ", d)

  left_pos = scan.index(left)
  right_pos = scan.index(right)

  pos = 180 - (left_pos + right_pos) / 2
  modify_pos = math.radians(pos)

  left_slant_pos = left_pos - 20
  right_slant_pos = right_pos + 20

  left_slant = scan[left_slant_pos]
  right_slant = scan[right_slant_pos]

  left_side = math.sqrt( left**2 + left_slant**2 - 2 * left * left_slant * math.cos(math.pi / 9))
  left_angle = math.asin( left_slant / left_side * math.sin(math.pi / 9))
  left_angle = math.pi / 2 - left_angle

  right_side = math.sqrt( right**2 + right_slant**2 - 2 * right * right_slant * math.cos(math.pi / 9))
  right_angle = math.asin( right_slant / right_side * math.sin(math.pi / 9))
  right_angle = math.pi / 2 - right_angle

  modify_angle = (right_angle + left_angle) / 2
  angle = round(math.degrees(modify_angle))


  if stop == False :

    if (d > 0.2 and d <= 0.75) :

      if (modify_angle < 0) :
        print("modify angle=", -angle)
        robotcontrol.turn_and_move("counter_clockwise", 0.5, modify_angle)

      else :
        print("modify angle=", angle)
        robotcontrol.turn_and_move("clockwise", 0.5, modify_angle)

    elif (d < -0.2 and d >= -0.75):

      if (modify_angle > 0) :
        print("modify angle=", angle)
        robotcontrol.turn_and_move("clockwise", 0.5, modify_angle)

      else :
        print("modify angle=", -angle)
        robotcontrol.turn_and_move("counter_clockwise", 0.5, modify_angle)

    elif (d > 0.75) :
      modify_angle += math.pi / 18
      print("modify angle=" , angle)
      robotcontrol.turn_and_move("clockwise", 0.5, modify_angle)

    elif (d < -0.75) :
      modify_angle += math.pi / 18
      print("modify angle=", -angle)
      robotcontrol.turn_and_move("counter_clockwise", 0.5, modify_angle)

    else :
      print("modify pos=", pos)
      robotcontrol.turn_and_move("clockwise", 0.5, modify_pos)

  else :

    if t <= 8 :
      x = 0.5 - t * 0.0625
      print("slow down , modify pos=", pos)
      robotcontrol.turn_and_move("clockwise", x, modify_pos)

    else :
      print("stop")
      robotcontrol.turn_and_move("clockwise", 0, 0)

  t = t + 1

  if t > 10:
    t  = 1
    stop = not stop
首先,我們先看到以下這段
  scan = robotcontrol.get_laser_full()
  left = min(scan[20:159])
  right = min(scan[200:339])
  d = right - left
  print("d = ", d)

  left_pos = scan.index(left)
  right_pos = scan.index(right)

  pos = 180 - (left_pos + right_pos) / 2
  modify_pos = math.radians(pos)
這邊就是剛剛提到的找出左右兩側的最短距離(left, right),以及最短距離對應的角度(left_pos, right_pos),範圍取20~159以及200~339只是為了約略選出自走車左側與右側的雷射掃描範圍。變數 pos 算出來的就是目前的前行方向相對於隧道中線的角度。(以下圖為例,假設左側角度為80度、右側為260度,pos 之值為10,表示目前的前行方向在中線左側10度),由於 waffle 的角速度單位為 rad/s,因此下一行再將 pos 轉換為弧度。變數 d 用來判斷目前自走車的位置是偏中線左側還是右側。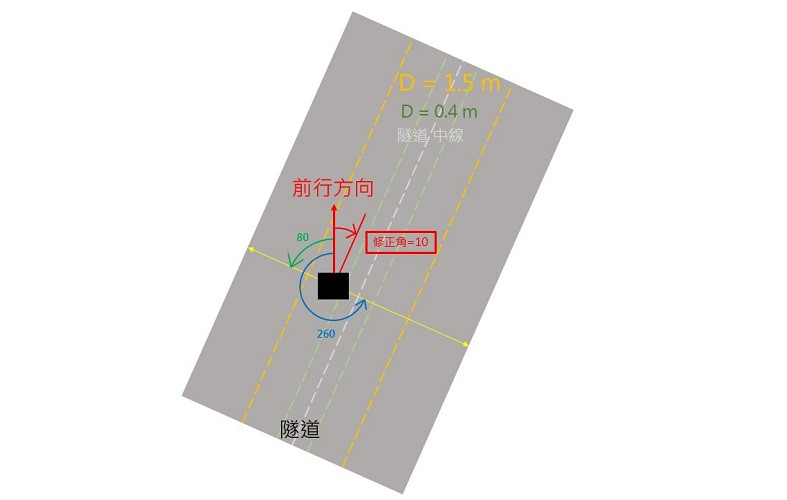
  left_slant_pos = left_pos - 20
  right_slant_pos = right_pos + 20

  left_slant = scan[left_slant_pos]
  right_slant = scan[right_slant_pos]

  ...

  modify_angle = (right_angle + left_angle) / 2
  angle = round(math.degrees(modify_angle))
這一大串的意義在於因為幾次模擬下來,透過 modify_pos 所修正的幅度較小,當自走車行進到彎道處時偶爾就會來不及跟上彎道的曲率而撞牆,因此筆者團隊決定再利用兩斜邊來找出一修正角。雖然過程有點冗長但其實只是大量的三角函數關係,為節省篇幅這邊就先不解釋。但值得注意的是,modify_pos 之值有正負之分,但 modify_angle 的值皆為正值,是因為過程中使用 asin 的關係,因此在使用時需要注意。
在講解一大串的 if 判斷式之前,我們先來看看外面的部分:
t = 1
stop = False
while t >= 0:

...

  if stop == False :

  ...

  else :

    if t <= 8 :
      x = 0.5 - t * 0.0625
      print("slow down , modify pos=", pos)
      robotcontrol.turn_and_move("clockwise", x, modify_pos)

    else :
      print("stop")
      robotcontrol.turn_and_move("clockwise", 0, 0)

  t = t + 1

  if t > 10:
    t  = 1
    stop = not stop
由於筆者團隊之研究主題為自走車搭配點雲雷達掃描隧道,因此希望自走車每走一段路程後便能夠停下來,所以便利用了 bool 來判斷當前是否需要停下。可以看到初始之 stop 為 False,每當執行一次迴圈,變數 t 便會+1,直到大於10時便會變換 stop 當中的 bool 值。當 stop 為 True 時,便會將前行速度的參數值 x 逐漸減少至0,達到讓自走車停下的效果。
至於為什麼不直接在第一個 else 當中使用函式 stop_robot(self) 呢?這是因為筆者團隊發現每次執行函式 stop_robot(self) 後,自走車在接近停下時就會神秘的抖動一下,導致自走車的前行方向偏離隧道中線非常多,甚至有時候會直接轉頭過去面向隧道牆壁。筆者團隊試過調整 class 當中的各項參數值、修改函式等等,但還是沒辦法解決這個現象,實在是讓筆者團隊相當頭痛,因此想出這個讓自走車逐漸停下的方法,實際測試後也確實與原本執行 stop_robot(self) 還要好很多。當然或許還有某些地方是筆者團隊所疏漏的,因此目前在這部分就只能先以此方法來作為解決方案,待日後詳細釐清原因後或許就能改善此現象。
接下來就進入 if 判斷式當中的內容了,但如果要以文字慢慢解釋每一行也不容易,因此這邊筆者就以下圖來解釋: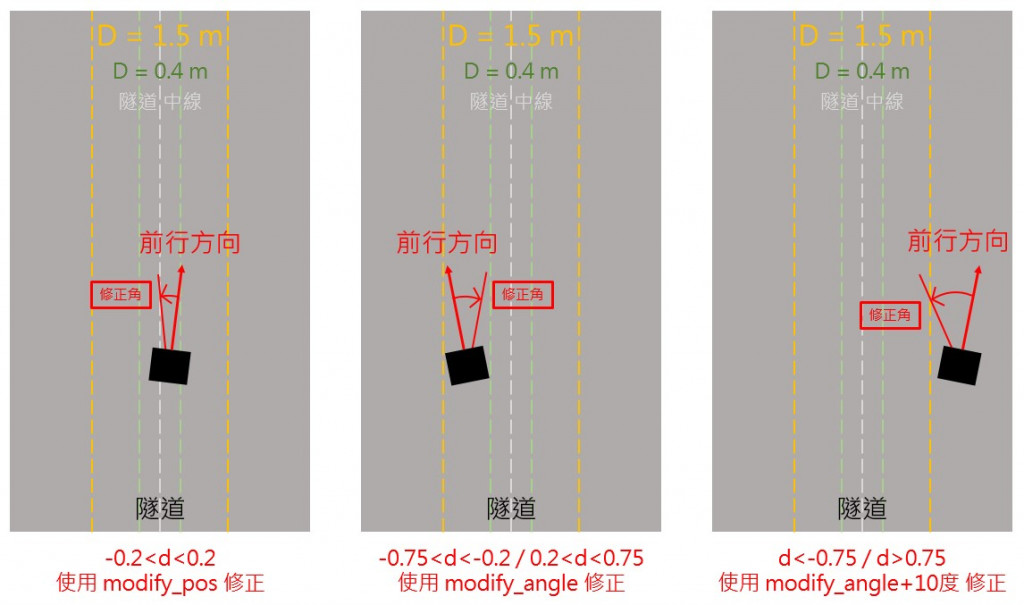
在 if 判斷式當中可以看到每個條件式都與 d 有關,這是因為要讓自走車判斷當前與隧道的相對位置,若是為圖中左側的情形,就視為當前隧道為筆直段,使用 modify_pos 修正;至於中間所代表的則為已偏離中線許多,將隧道視為彎道段,使用 modify_angle 進行修正;右側則代表已偏離隧道中線非常多,因此將 modify_angle +10度後進行修正,達到快速回到中線之效果。後方將 modify_angle 轉成角度僅是作為輸出到 Terminal 上時較好讀懂度數而已。
至於在部分 elif 下還有再以 modify_angle 做為判斷的 if 函式,可由下圖來解釋: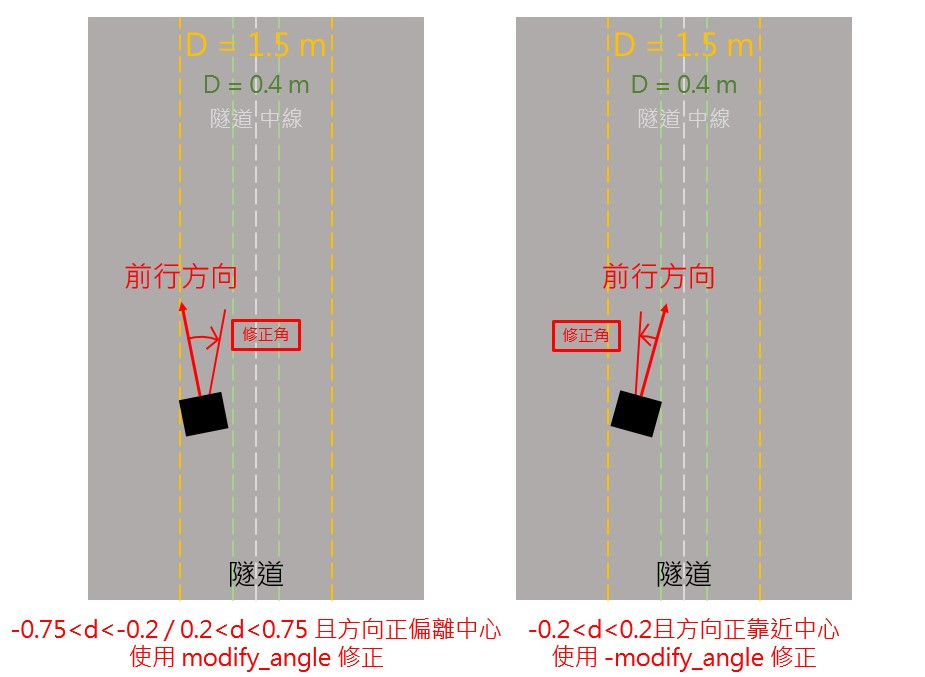
其實最主要就是在判斷當前自走車是駛離還是修正,我們可以簡單用上圖來描述不細分方向的結果:若自走車呈左側之情形,也就是正駛離中心線的情形,由於 d 判斷出目前在中線左側,若函式中統一使用 "clockwise" 做修正的話,那麼確實會將前行方向往中線修正。但如果今天已經進入了右側之情形,照理說已經符合預期的修正沒錯,但由於上方所提到的 modify_angle 皆為正值,因此自走車還會繼續順時針前進,那麼就會使前行方向再度偏離隧道中線,接著進入中線右側之修正式,再過度修正,如此反覆。這樣會讓自走車本身的行進路線呈S型,使整體路徑變長且更耗費能源,因此針對前行方向再次做細分的優化是有必要的。
程式碼大致就介紹到這邊,實際執行程式後,自走車就會慢慢的走出隧道啦!但由於隧道本身太長加上 waffle 的行走速度不快,因此筆者在最後就只放上 waffle 隧道中行走中的圖片,可以看到 Terminal 上持續列印出變數 d 、修正角度 modify_pos 或者 modify_angle 以及停下時的各種字串。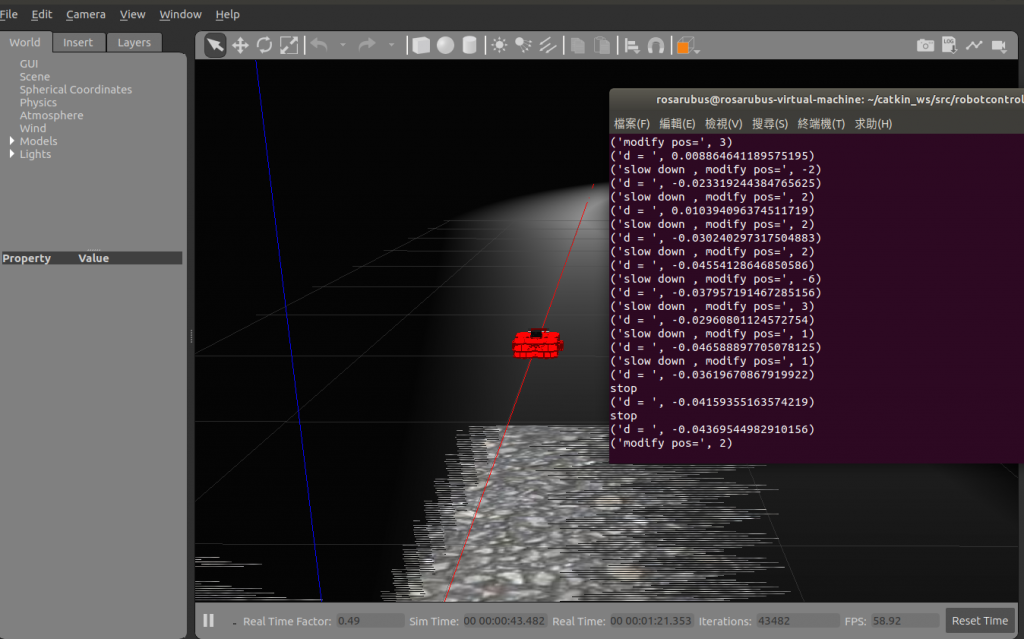
這兩天介紹了控制隧道內自走車的研究,整體來說比較不像是教學而是解說筆者團隊的研究成果,雖然可能還有很多地方做得不夠好需要再更加優化,但願能與更多更瞭解更 ROS 架構的前輩們有交流的機會。對於不熟悉 ROS 的讀者來說,相信也能從這兩天的介紹當中多少學到一些 ROS 的相關知識。明天要介紹的內容同樣也是與 Gazebo 有關,講述的是如何在 Gazebo 當中獲取機器人的相對座標資訊,請各位敬請期待!


 iThome鐵人賽