昨天我們介紹了建置 Publisher 的寫法,但除了 Publisher 之外我們還需要一個 Subscriber 才能夠完成 data 的交流,因此今天將介紹以 Python 撰寫 Subscriber 的方法,並實際執行這兩個 Node,以下進入正題:
同樣的,在 beginner_tutorial/src/ 當中建立新檔案 listener.py:
roscd beginner_tutorial/src/
touch talker.py
並輸入以下程式碼:
#!/usr/bin/env python
import rospy
from std_msgs.msg import String

def callback(data):
  rospy.loginfo(rospy.get_caller_id() + "I heard %s", data.data)

def listener():

  # In ROS, nodes are uniquely named. If two nodes with the same
  # name are launched, the previous one is kicked off. The
  # anonymous=True flag means that rospy will choose a unique
  # name for our 'listener' node so that multiple listeners can
  # run simultaneously.

  rospy.init_node('listener', anonymous=True)
  rospy.Subscriber("chatter", String, callback)

  # spin() simply keeps python from exiting until this node is stopped
  rospy.spin()

if __name__ == '__main__':
listener()
詳細解析一下程式碼:在此與 Publisher 重複的部分就省略了。
def callback(data):
rospy.loginfo(rospy.get_caller_id() + "I heard %s", data.data)
第1行定義了 callback(data) 這個函式,每當接收到 data 時,就執行下一行的 rospy. rospy.loginfo(),rospy.get_caller_id 就是找出發佈訊息到主題的 Node名稱。
def listener():

  # In ROS, nodes are uniquely named. If two nodes with the same
  # name are launched, the previous one is kicked off. The
  # anonymous=True flag means that rospy will choose a unique
  # name for our 'listener' node so that multiple listeners can
  # run simultaneously.

  rospy.init_node('listener', anonymous=True)
  rospy.Subscriber("chatter", String, callback)
第一行為定義 listener 這個函式,基本上註釋的部分就是昨天介紹 Publisher 時所提到的 anonymous 的功用,這邊就不再重複解釋。
最後一行 rospy.Subscriber 與 Publisher 當中的 rospy.Publisher 很類似,但這邊原函式定義為 rospy.Subscriber(topic_name, msg_type, function_name),表示該 Node 訂閱了名稱為 [topic_name] 的 Topic,格式為 [msg_type],[function_name] 則表示當接收到 Topic 上的 Message 時就呼叫該函式。
  # spin() simply keeps python from exiting until this node is stopped
  rospy.spin()
第二行為直到我們將 Node 關閉前,避免 Node 被系統關閉掉,也就是說讓 listener 這個 Node 可以持續訂閱 Topic。
以上就是使用 Python 撰寫 Subscriber 的方法,接著,讓我們來實際執行自己所撰寫的 Publisher 與 Subscriber 吧!
為了方便起見,讓我們先更改 talker.py 與 listener.py 的權限:
chmod +x talker.py
chmod +x listener.py
首先開啟 roscore,並且執行 talker.py 與 listener.py: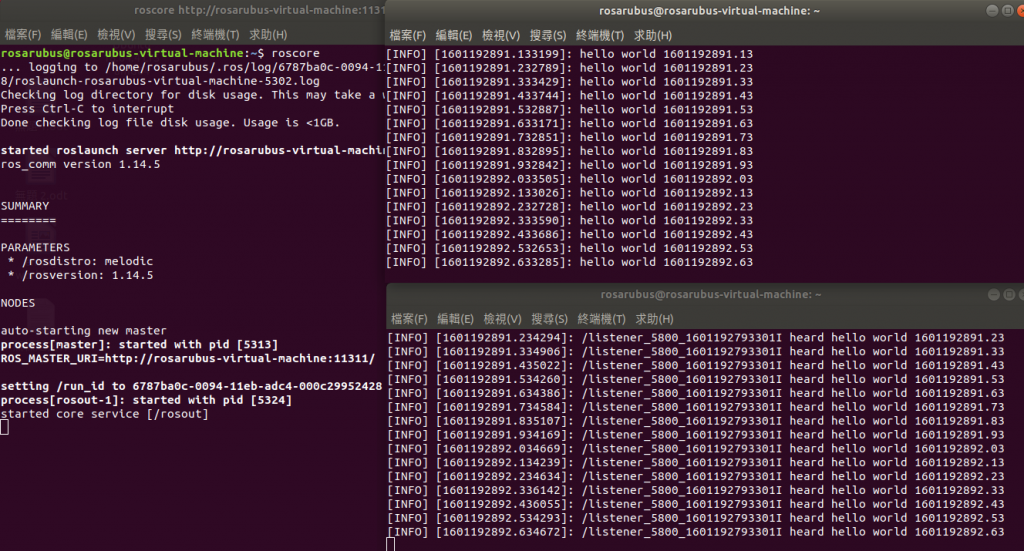
再來我們就來看看 Topic 的詳細資訊,使用 rostopic list 確認 Topic 名稱,並以 rostopic info [topic_name] 查看有哪些 Nodes 發布或訂閱這個 Topic: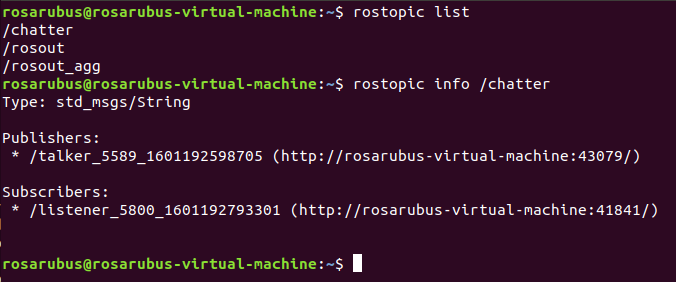
可以看到我們所建立的 Publisher 以及 Subscriber 中有我們所建立的 talker 與 listener,而其後的亂數就是當初設定 anonymous=True 時所產生,避免有相同名稱的 Node 被建立;若設定 anonymous=False 則只會顯示 talker 與 listener。
最後我們再利用 rqt_graph 來清楚顯示當前的 ROS 架構: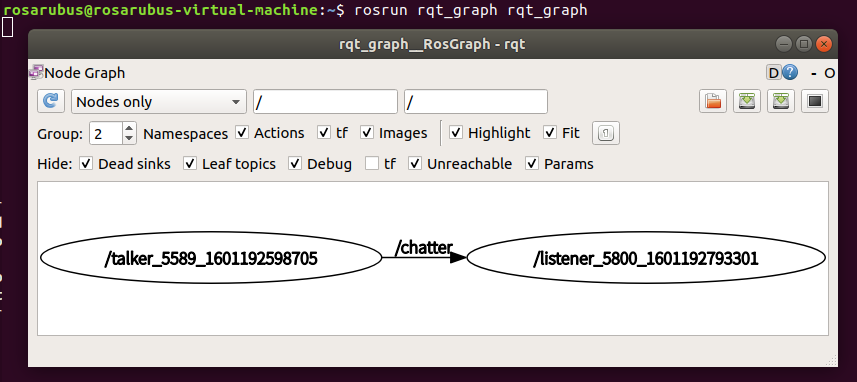
這兩天介紹了 Publisher 以及 Subscriber 的撰寫與執行,基本上在撰寫 Publisher 與 Subscriber 時最關鍵的就是掌握 rospy.Publisher() 和 rospy.Subscriber() 的用法,以及根據需求引用相關模組 (rospy、 time、 math等等)、 設定 rospy.Rate() 等等參數以及釐清 Node 應該傳送什麼樣的 Message 與其格式。
經過這幾天對ROS基礎架構的詳細說明,相信大家都有理解了吧,沒有理解的話就再多看幾遍又會懂了XD。接著會大致介紹ROS架構中的 Serivces 和 Parameters ,詳細內容就請期待明天的文章吧。大家明天見~


 iThome鐵人賽