上一篇介紹完如何往內層傳送資料,
看完往內層傳資料,我們再來看看由內層往外層傳送資料。
在Vue中一般來說只有提供向內層傳送資料的功能。
不過因應各種開發情況,我們可能會用到向外傳送資料的情形。
為此我們可能會透過使用 emit,或是自製 event bus,甚至使用到vuex套件....等方式,
讓我們可以從內層向外傳遞資料。
(這邊僅介紹 emit)
emit,原本是用來提供讓我們自訂觸發事件(Custom Events)的函式。
我們可透過這個函式來幫我們實現子傳父的功能
childComponent2.vue
childComponent2.vue輸入下方程式碼<template>
<div>
<button @click='ClickEvent'> {{title}} </button>
</div>
</template>
<script>
export default {
name:'childComponent2',
data: function () {
return {
title: "Emit",
count: 0,
}
},
methods: {
ClickEvent:function(){
this.count ++;//count 計數 累加一
this.$emit('childemit',this.count)//觸發 childEmit這個事件,帶參數count
}
},
}
</script>
<style>
</style>
template:
<template>
  <img alt="Vue logo" src="./assets/logo.png">
  <child2 @childemit='EmitListener'></child2>
</template>
script:
<script>
import childComponent2 from './components/childComponent2'
export default {
  name: 'App',
  components: {
    child2:childComponent2,
  },
  methods:{
    EmitListener:function(data){
      alert(data)
    }
  }

}
</script>
npm run serve

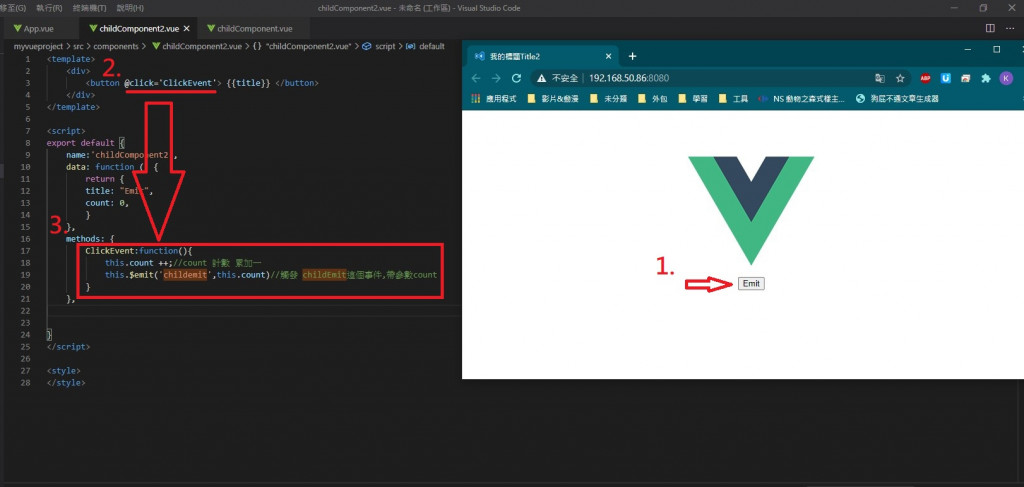
當按下Emit的時候會觸發click事件,然後執行ClckEvent這個function,
並且透過 this.$emit() 連帶觸發childemit這個事件。

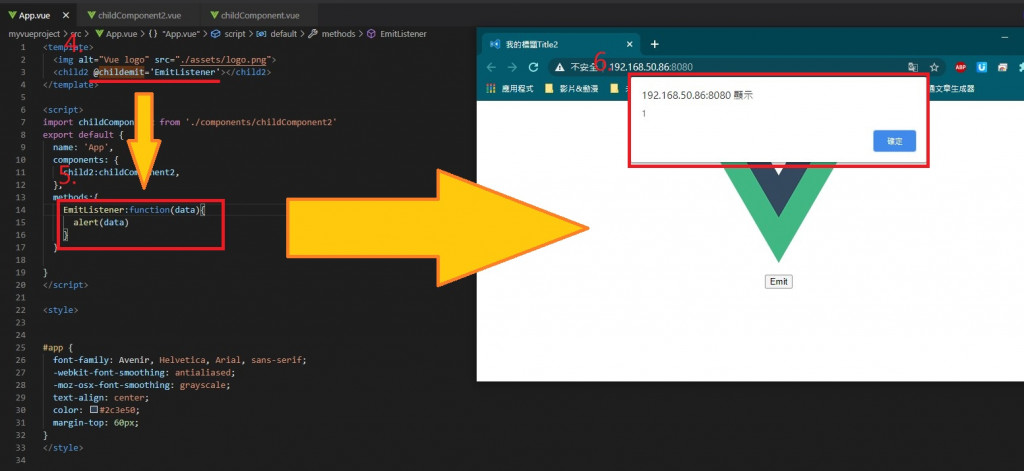
當監聽到 childemit這個事件被觸發之後,然後執行EmitListener這個function,
在畫面上跳出警示(alert),顯示data的資料(與childComponent2裡面的count資料相同)
這樣就能達到 子組件 -> 父組件 的資料傳遞。
因為這次運作的流程比較複雜一點,所以做了個程式的流程圖,
希望大家能更容易了解他運作的原理。
我們會在下一篇介紹到這篇所提到 event bus 和 如何達到資料的雙向綁定。
