延續上一篇的 IoT Device 透過連接字串註冊到 IoT Hub,並且傳送模擬資料,可是單純透過連接字串註冊的話,安全性明顯會稍微低一點,所以也提供其他憑證的註冊方式,例如: X.509、TPM,使用這兩個方式相對起來會比連接字串的要來安全一點,那我們就直接開始吧!
準備
首先下載範例程式碼
git clone https://github.com/Azure/azure-iot-sdk-c.git
進入腳本目錄
cd azure-iot-sdk-c-master/tools/CACertificates/
修改腳本權限
chmod 700 certGen.sh
產生Root憑證跟中繼憑證
./certGen.sh create_root_and_intermediate
再來到IoT Hub的憑證頁,點擊新增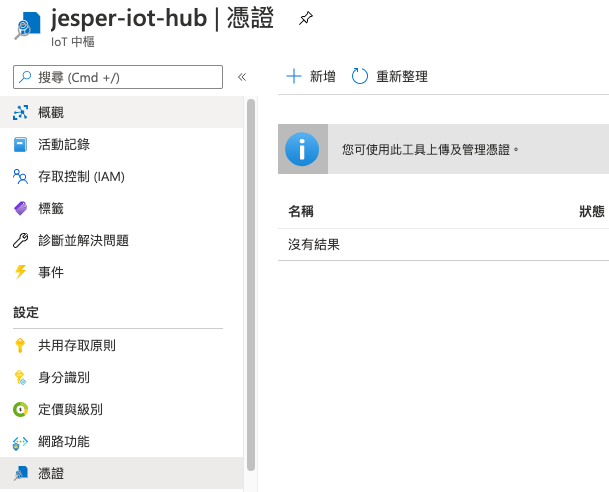
接下來上傳你的Root憑證,按下儲存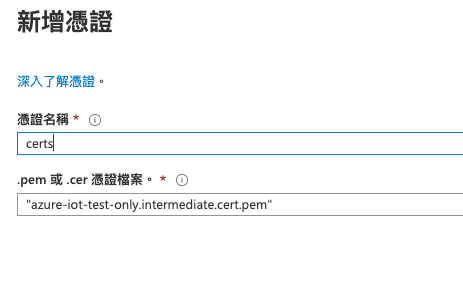
就可以看到憑證已經建立了,接下來點擊它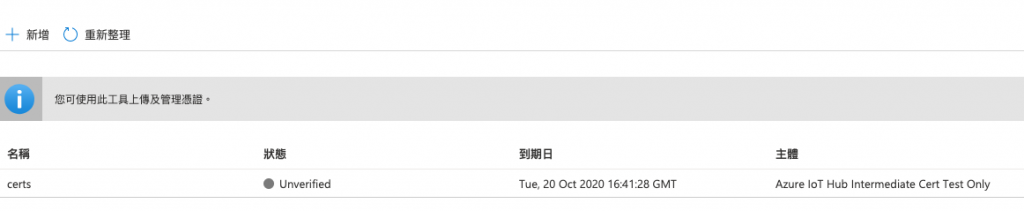
就可以看到憑證的詳細資料,按下產生驗證碼,並且複製,輸入指令
./certGen.sh create_verification_certificate {your-verify-code}
接著上傳剛創立好的verification-code.cert.pem就可以了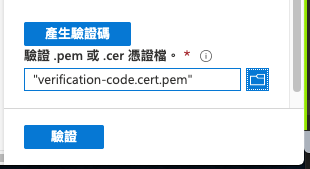
就可以看到狀態已經Verified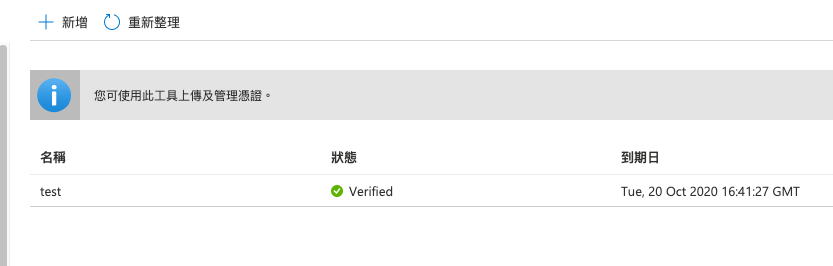
再來我們可以透過指令建立裝置憑證
./certGen.sh create_device_certificate mydevice
然後到IoT Hub的IoT裝置頁,點擊新增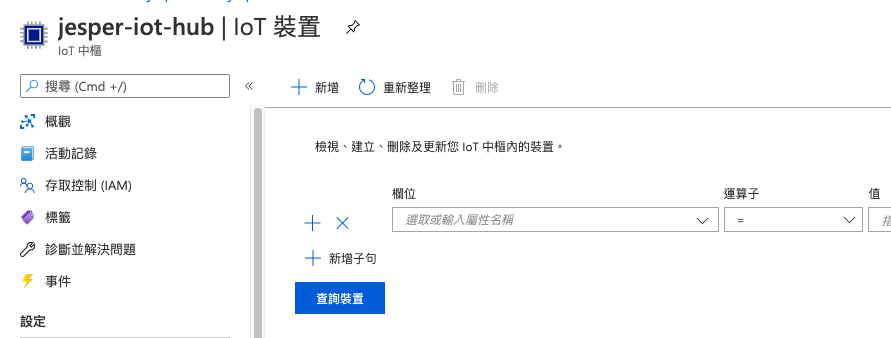
選擇已簽署的 X.509 CA,並且按下儲存
接著下載NodeJS的範例程式碼
git clone https://github.com/Azure/azure-iot-sdk-node
進入應用程式目錄
cd azure-iot-sdk-node-master/provisioning/device/samples/
安裝依賴
npm install
修改register_x509.js
register_x509.js
填入
// Copyright (c) Microsoft. All rights reserved.
// Licensed under the MIT license. See LICENSE file in the project root for full license information.

'use strict';

var fs = require('fs');
var Protocol = require('azure-iot-device-mqtt').Mqtt;
// Uncomment one of these transports and then change it in fromConnectionString to test other transports
// var Protocol = require('azure-iot-device-amqp').AmqpWs;
// var Protocol = require('azure-iot-device-http').Http;
// var Protocol = require('azure-iot-device-amqp').Amqp;
var Client = require('azure-iot-device').Client;
var Message = require('azure-iot-device').Message;

// String containing Hostname and Device Id in the following format:
//  "HostName=<iothub_host_name>;DeviceId=<device_id>;x509=true"
var deviceConnectionString = process.env.DEVICE_CONNECTION_STRING;
var certFile = process.env.PATH_TO_CERTIFICATE_FILE;
var keyFile = process.env.PATH_TO_KEY_FILE;
var passphrase = "1234" // Key Passphrase if one exists.

// fromConnectionString must specify a transport constructor, coming from any transport package.
var client = Client.fromConnectionString(deviceConnectionString, Protocol);

var connectCallback = function (err) {
  if (err) {
    console.error('Could not connect: ' + err.message);
  } else {
    console.log('Client connected');
    client.on('message', function (msg) {
      console.log('Id: ' + msg.messageId + ' Body: ' + msg.data);
      // When using MQTT the following line is a no-op.
      client.complete(msg, printResultFor('completed'));
      // The AMQP and HTTP transports also have the notion of completing, rejecting or abandoning the message.
      // When completing a message, the service that sent the C2D message is notified that the message has been processed.
      // When rejecting a message, the service that sent the C2D message is notified that the message won't be processed by the device. the method to use is client.reject(msg, callback).
      // When abandoning the message, IoT Hub will immediately try to resend it. The method to use is client.abandon(msg, callback).
      // MQTT is simpler: it accepts the message by default, and doesn't support rejecting or abandoning a message.
    });

    // Create a message and send it to the IoT Hub every second
    var sendInterval = setInterval(function () {
      var windSpeed = 10 + (Math.random() * 4); // range: [10, 14]
      var temperature = 20 + (Math.random() * 10); // range: [20, 30]
      var humidity = 60 + (Math.random() * 20); // range: [60, 80]
      var data = JSON.stringify({ deviceId: 'myFirstDevice', windSpeed: windSpeed, temperature: temperature, humidity: humidity });
      var message = new Message(data);
      message.properties.add('temperatureAlert', (temperature > 28) ? 'true' : 'false');
      console.log('Sending message: ' + message.getData());
      client.sendEvent(message, printResultFor('send'));
    }, 2000);

    client.on('error', function (err) {
      console.error(err.message);
    });

    client.on('disconnect', function () {
      clearInterval(sendInterval);
      client.removeAllListeners();
      client.open(connectCallback);
    });
  }
};

 var options = {
   cert : fs.readFileSync(certFile, 'utf-8').toString(),
   key : fs.readFileSync(keyFile, 'utf-8').toString(),
   passphrase: passphrase
 };

// Calling setOptions with the x509 certificate and key (and optionally, passphrase) will configure the client transport to use x509 when connecting to IoT Hub
client.setOptions(options);
client.open(connectCallback);

// Helper function to print results in the console
function printResultFor(op) {
  return function printResult(err, res) {
    if (err) console.log(op + ' error: ' + err.toString());
    if (res) console.log(op + ' status: ' + res.constructor.name);
  };
}
再來執行後就可以看到已經傳送成功了
再來我們再去VScode的Azure IoT Hub看,確實有收到訊息了!!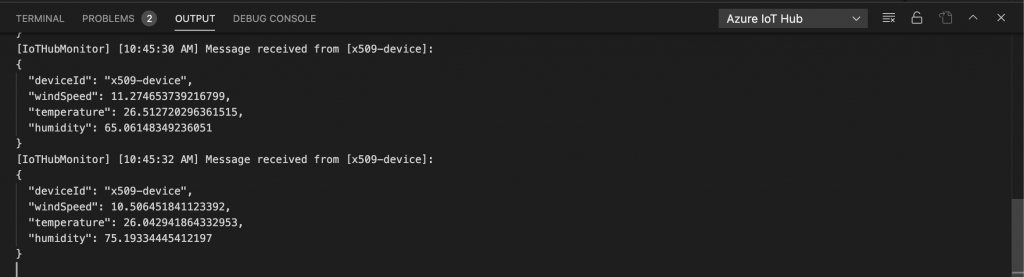
那透過上面的方式,我們就可以用X.509的憑證註冊到 Azure IoT Hub 並且可以傳送資料到Azure IoT Hub,但現在又會有一個疑問了,啊那我是不是每次想要註冊裝置,我都要去IoT Hub新增裝置啊?那會不會太麻煩了一些,這邊Azure也有提出解決方式 - Azure Device Provision Service,讓我們期待下一篇的到來吧!!


 iThome鐵人賽