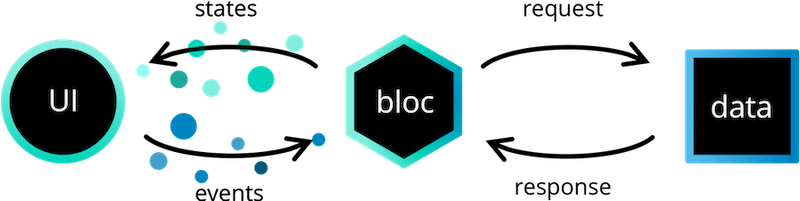
Bloc繼承了Cubit,也就是說Bloc能使用Cubit的API 方法,但不同的是,相對於Cubit是透過調用自身定義的函數觸發emit方法來更新狀態,Bloc是透過傳入事件,並會把傳入的事件轉換成要傳出的狀態
bloc傳入事件時即會觸發onEvent,bloc就會開始去更改狀態transformEvents傳遞,transformEvents會用asyncExpand來確保事件傳遞的順序,但是也可以覆寫它來處理要傳遞的事件mapEventToState來負責響應傳遞來的事件而產生狀態transformTransitions傳遞狀態,並可以覆寫,來更改要輸出的狀態onTransition,其中包含當前狀態、事件、下一個狀態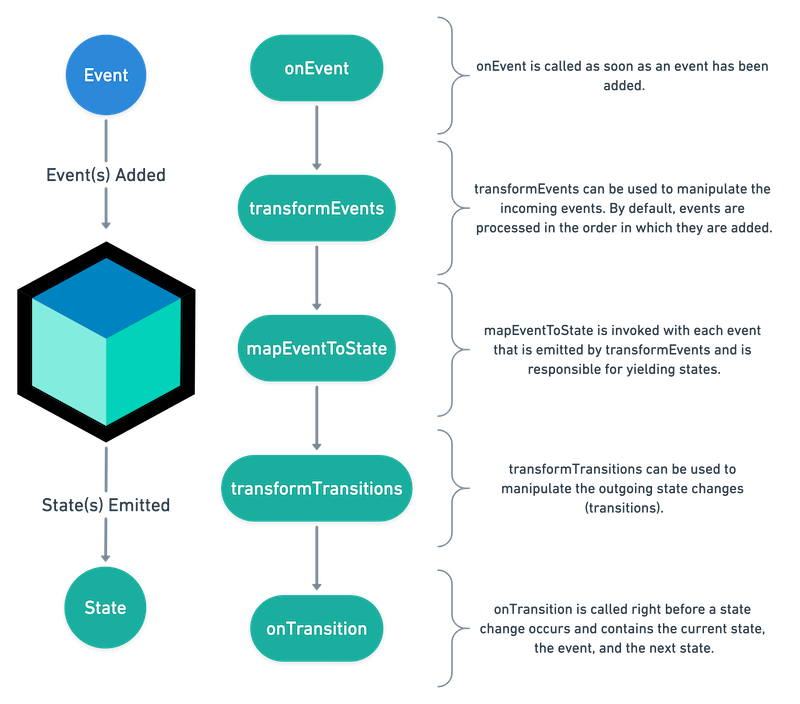
import 'package:bloc/bloc.dart';

// 建立一個事件來傳遞給我們的 CounterBloc 做響應
enum CounterEvent { increase }

// 建立一個Bloc,來處理傳遞來的 CounterEvent 事件轉換成 int 狀態
class CounterBloc extends Bloc<CounterEvent, int> {
  //CounterBloc 狀態初始值為 0
  CounterBloc() : super(0);

  //Bloc 的抽象方法,每個建立的Bloc 都必須實作,當傳入一個 CounterEvent 事件進來 CounterBloc,mapEventToState 會依傳遞來的事件,產出對應的狀態
  @override
  Stream<int> mapEventToState(CounterEvent event) async* {
    switch (event) {

      case CounterEvent.increase:
        yield state + 1;
        break;
    }
  }
  //如果Bloc 產生的下一個狀態與當前狀態一樣,則不會發生任何轉換,也不會對Stream 的狀態進行任何改變
}
main.dart:
import 'CounterBloc.dart';

void main() async {
  //建立一個CounterBloc 物件
  CounterBloc bloc = CounterBloc();

  //印出現在 CounterBloc 物件的狀態
  print(bloc.state); // 印出 0

  //傳入一個 CounterEvent.increase 事件給CounterBloc,來更新狀態
  bloc.add(CounterEvent.increase);

  // 等一個event-loop 的 iteration,確保事件有被Bloc 執行
  await Future.delayed(Duration.zero);

  print(bloc.state); // 印出 1

  // 使用完把CounterBloc 物件關閉
  bloc.close();
}
因為Bloc 繼承了 Cubic,它一樣可覆寫onChange以及onError方法,另外Bloc還可以覆寫onEvent以及onTransition等方法
enum CounterEvent { increase }

class CounterBloc extends Bloc<CounterEvent, int> {
  CounterBloc() : super(0);

  @override
  Stream<int> mapEventToState(CounterEvent event) async* {
    switch (event) {
      case CounterEvent.increase:
        yield state + 1;
        break;
    }
  }

  @override
  void onEvent(CounterEvent event) {
    print(event);
    super.onEvent(event);
  }

  @override
  void onChange(Change<int> change) {
    print(change);
    super.onChange(change);
  }

  @override
  void onTransition(Transition<CounterEvent, int> transition) {
    print(transition);
    super.onTransition(transition);
  }

  @override
  void onError(Object error, StackTrace stackTrace) {
    print('$error, $stackTrace');
    super.onError(error, stackTrace);
  }
}
main.dart:
import 'CounterBloc.dart';

void main() async {
  CounterBloc bloc = CounterBloc();

  print(bloc.state);

  bloc.add(CounterEvent.increase);
  bloc.add(CounterEvent.makeError);

  await Future.delayed(Duration.zero);

  print(bloc.state);

  bloc.close();
}
/*印出
0
onEvent:CounterEvent.increase
onEvent:CounterEvent.makeError
onTransition:Transition { currentState: 0, event: CounterEvent.increase, nextState: 1 }
onChange:Change { currentState: 0, nextState: 1 }
onError:Exception: test, ...
1
*/
BlocObserver一樣可以對每個Bloc,進行管理,統一覆寫行為
import 'package:bloc/bloc.dart';

class SimpleBlocObserver extends BlocObserver {
  @override
  void onEvent(Bloc bloc, Object event) {
    print('SimpleBlocObserver onEvent:$bloc, $event');
    super.onEvent(bloc, event);
  }

  @override
  void onTransition(Bloc bloc, Transition transition) {
    print('SimpleBlocObserver onTransition:$bloc, $transition');
    super.onTransition(bloc, transition);
  }

  @override
  void onError(Cubit cubit, Object error, StackTrace stackTrace) {
    print('SimpleBlocObserver onError:$cubit, $error, $stackTrace');
    super.onError(cubit, error, stackTrace);
  }

  @override
  void onChange(Cubit cubit, Change change) {
    print('SimpleBlocObserver onChange:$cubit, $change');
    super.onChange(cubit, change);
  }
}
main.dart:
import 'package:bloc/bloc.dart';

import 'CounterBloc.dart';
import 'SimpleBlocObserver.dart';

void main() async {
  // 設定我們的 observer
  Bloc.observer = SimpleBlocObserver();

  CounterBloc bloc = CounterBloc();

  print(bloc.state);

  bloc.add(CounterEvent.increase);
  bloc.add(CounterEvent.makeError);

  await Future.delayed(Duration.zero);

  print(bloc.state);

  bloc.close();
}
/*印出
0
onEvent:CounterEvent.increase
SimpleBlocObserver onEvent:Instance of 'CounterBloc', CounterEvent.increase
onEvent:CounterEvent.makeError
SimpleBlocObserver onEvent:Instance of 'CounterBloc', CounterEvent.makeError
onTransition:Transition { currentState: 0, event: CounterEvent.increase, nextState: 1 }
SimpleBlocObserver onTransition:Instance of 'CounterBloc', Transition { currentState: 0, event: CounterEvent.increase, nextState: 1 }
onChange:Change { currentState: 0, nextState: 1 }
SimpleBlocObserver onChange:Instance of 'CounterBloc', Change { currentState: 0, nextState: 1 }
onError:Exception: test, ...
SimpleBlocObserver onError:Instance of 'CounterBloc', Exception: test, ...
1
*/
為一個flutter 的widget,它需要傳入Bloc和builder參數來處理構建控件用來響應新的狀態
例如:
BlocBuilder<CounterBloc, int>(
  builder: (context, state) {
    //依狀態顯示對應的畫面
    return Text('count:$state');
  },
);
可以對BlocBuilder設定條件,決定是否要重新建構畫面
BlocBuilder<CounterBloc, int>(
  buildWhen: (previousState, state) {
    // return true/false to determine whether or not
    // to rebuild the widget with state
    // 回傳true會呼叫builder重建畫面,false就會略過
    return state != -1;
  },
  builder: (context, state) {
    //依狀態顯示對應的畫面
    return Text('count:$state');
  },
);
為flutter 的widget,可以將Bloc給它widget tree下的子控件使用
可以使用BlocProvider創建新的cubit,這些cubit可供子控件使用
BlocProvider(
  create: (BuildContext context) => BlocA(),
  child: ChildA(),
);
可以使用BlocProvider向子控件提供現有的cubit
BlocProvider.value(
  value: BlocProvider.of<BlocA>(context),
  child: ScreenA(),
);
在子控件ChildA 或 ScreenA,可以通過以下方式取得BlocA
// with extensions
context.bloc<BlocA>();

// without extensions
BlocProvider.of<BlocA>(context)
將多個BlocProvider 合併成一個widget
BlocProvider<BlocA>(
  create: (BuildContext context) => BlocA(),
  child: BlocProvider<BlocB>(
    create: (BuildContext context) => BlocB(),
    child: BlocProvider<BlocC>(
      create: (BuildContext context) => BlocC(),
      child: ChildA(),
    )
  )
)
變為:
MultiBlocProvider(
  providers: [
    BlocProvider<BlocA>(
      create: (BuildContext context) => BlocA(),
    ),
    BlocProvider<BlocB>(
      create: (BuildContext context) => BlocB(),
    ),
    BlocProvider<BlocC>(
      create: (BuildContext context) => BlocC(),
    ),
  ],
  child: ChildA(),
)
為一個flutter 的widget,與BlocBuilder類似,需要傳入Bloc和builder參數,差別在於BlocListener是監聽狀態的變化,可設計每次更新狀態時,所要執行的動作,例如:顯示SnackBar或顯示Dialog等
例如:
BlocListener<BlocA, BlocAState>(
  listener: (context, state) {
    // do stuff here based on BlocA's state
  },
  child: Container(),
)
可以對BlocListener設定條件,決定是否要執行動作
BlocListener<BlocA, BlocAState>(
  listenWhen: (previousState, state) {
    // return true/false to determine whether or not
    // to call listener with state
    // 回傳true會執行動作,false就會略過
  },
  listener: (context, state) {
    // do stuff here based on BlocA's state
  },
  child: Container(),
)
將多個BlocListener合併成一個widget
BlocListener<BlocA, BlocAState>(
  listener: (context, state) {},
  child: BlocListener<BlocB, BlocBState>(
    listener: (context, state) {},
    child: BlocListener<BlocC, BlocCState>(
      listener: (context, state) {},
      child: ChildA(),
    ),
  ),
)
變為:
MultiBlocListener(
  listeners: [
    BlocListener<BlocA, BlocAState>(
      listener: (context, state) {},
    ),
    BlocListener<BlocB, BlocBState>(
      listener: (context, state) {},
    ),
    BlocListener<BlocC, BlocCState>(
      listener: (context, state) {},
    ),
  ],
  child: ChildA(),
)
同時有builder以及listener,能夠依狀態的更新,可以同時構建控件,又能設計更新狀態時,所要執行的動作
BlocConsumer<BlocA, BlocAState>(
  listener: (context, state) {
    // do stuff here based on BlocA's state
    // 執行動作
  },
  builder: (context, state) {
    // return widget here based on BlocA's state
    // 重新構建控件
  }
)
可以對BlocConsumer設定條件,決定是否要執行動作以及是否要重新構建控件
BlocConsumer<BlocA, BlocAState>(
  listenWhen: (previous, current) {
    // return true/false to determine whether or not
    // to invoke listener with state
    // 回傳true會執行動作,false就會略過
  },
  listener: (context, state) {
    // do stuff here based on BlocA's state
  },
  buildWhen: (previous, current) {
    // return true/false to determine whether or not
    // to rebuild the widget with state
    // 回傳true會呼叫builder重建畫面,false就會略過
  },
  builder: (context, state) {
    // return widget here based on BlocA's state
  }
)
為flutter widget,在開發中,經常需要使用到父widget 或 再更上層的祖先widget 的資料,此時RepositoryProvider就可以對子控件們提供資料倉儲,子控件們可以很方便的通過RepositoryProvider.of<T>(context)取得資料,用法類似於BlocProvider,但是BlocProvider用於提供bloc,而RepositoryProvider用於提供資料倉儲
RepositoryProvider(
  create: (context) => RepositoryA(),
  child: ChildA(),
);
可以通過以下方式取得RepositoryA
// with extensions
context.repository<RepositoryA>();

// without extensions
RepositoryProvider.of<RepositoryA>(context)
將多個RepositoryProvider控件(widgets)合併為一個widget
RepositoryProvider<RepositoryA>(
  create: (context) => RepositoryA(),
  child: RepositoryProvider<RepositoryB>(
    create: (context) => RepositoryB(),
    child: RepositoryProvider<RepositoryC>(
      create: (context) => RepositoryC(),
      child: ChildA(),
    )
  )
)
變為:
MultiRepositoryProvider(
  providers: [
    RepositoryProvider<RepositoryA>(
      create: (context) => RepositoryA(),
    ),
    RepositoryProvider<RepositoryB>(
      create: (context) => RepositoryB(),
    ),
    RepositoryProvider<RepositoryC>(
      create: (context) => RepositoryC(),
    ),
  ],
  child: ChildA(),
)
範例
counter_bloc.dart:
import 'package:bloc/bloc.dart';

enum CounterEvent { increase, decrease }

class CounterBloc extends Bloc<CounterEvent, int> {
  CounterBloc() : super(0);

  @override
  Stream<int> mapEventToState(CounterEvent event) async* {
    switch (event) {
      case CounterEvent.decrease:
        yield state - 1;
        break;
      case CounterEvent.increase:
        yield state + 1;
        break;
    }
  }
}
counter_page.dart:
import 'package:bloc_tutorial/counter_bloc.dart';
import 'package:flutter/material.dart';
import 'package:flutter_bloc/flutter_bloc.dart';

class CounterPage extends StatelessWidget {
  @override
  Widget build(BuildContext context) {
    final CounterBloc counterBloc = BlocProvider.of<CounterBloc>(context);

    return Scaffold(
      appBar: AppBar(title: Text('Counter')),
      body: BlocBuilder<CounterBloc, int>(
        builder: (context, count) {
          return Center(
            child: Text(
              '$count',
              style: TextStyle(fontSize: 24.0),
            ),
          );
        },
      ),
      floatingActionButton: Column(
        crossAxisAlignment: CrossAxisAlignment.end,
        mainAxisAlignment: MainAxisAlignment.end,
        children: <Widget>[
          Padding(
            padding: EdgeInsets.symmetric(vertical: 5.0),
            child: FloatingActionButton(
              child: Icon(Icons.add),
              onPressed: () {
                counterBloc.add(CounterEvent.increase);
              },
            ),
          ),
          Padding(
            padding: EdgeInsets.symmetric(vertical: 5.0),
            child: FloatingActionButton(
              child: Icon(Icons.remove),
              onPressed: () {
                counterBloc.add(CounterEvent.decrease);
              },
            ),
          ),
        ],
      ),
    );
  }
}
main.dart:
import 'package:flutter/material.dart';
import 'package:flutter_bloc/flutter_bloc.dart';

import 'counter_bloc.dart';
import 'counter_page.dart';

void main() {
  runApp(MyApp());
}

class MyApp extends StatelessWidget {
  @override
  Widget build(BuildContext context) {
    return MaterialApp(
      debugShowCheckedModeBanner: false,
      title: 'Flutter Bloc Demo',
      home: BlocProvider(
        create: (BuildContext context) => CounterBloc(),
        child: CounterPage(),
      ),
    );
  }
}


 iThome鐵人賽