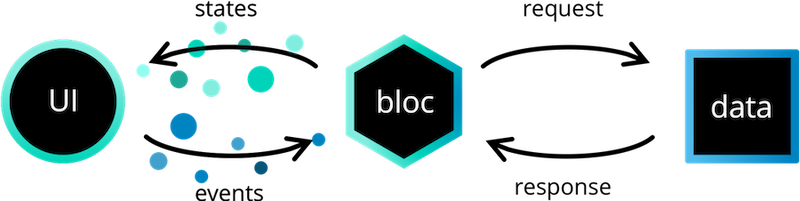
我們可以把App程式架構分成三層,來使用Bloc,分別是:
主要負責處理app 要使用到的資料,像是對資料庫做存取、對伺服器下api 等非同步的資料處理
可以被分為兩部分:
Data Provider
用於提供資料,像是資料庫,通常會提供對資料的 新增、刪除、修改、讀取的方法
例如:
class DataProvider {
    Future<RawData> readData() async {
        // Read from DB or make network request etc...
    }
}
Repository
資料倉儲,用於與商業邏輯層 ( Business Logic ) 做溝通,讓商業邏輯層能取得 Data Provider 所提供的資料
例如:
class Repository {
    final DataProviderA dataProviderA;
    final DataProviderB dataProviderB;

    Future<Data> getAllDataThatMeetsRequirements() async {
        final RawDataA dataSetA = await dataProviderA.readData();
        final RawDataB dataSetB = await dataProviderB.readData();

        final Data filteredData = _filterData(dataSetA, dataSetB);
        return filteredData;
    }
}
我們可以在 Data 層,透過多個 Data Provider 取得所需的資料,並可對這些資料進行處理轉換成我們所要的資料,再提供方法讓商業邏輯層可以取得結果
即我們Bloc 所在的層,主要負責接受 Presentation 層傳來的事件,依事件去做處理,並生成新的狀態來給Presentation 層使用,可透過依賴一個或多個 repository 來取得所需要的資料
class BusinessLogicComponent extends Bloc<MyEvent, MyState> {
    final Repository repository;

    Stream mapEventToState(event) async* {
        if (event is AppStarted) {
            try {
                final data = await repository.getAllDataThatMeetsRequirements();
                yield Success(data);
            } catch (error) {
                yield Failure(error);
            }
        }
    }
}
Bloc 和 Bloc 之間的交流
每個Bloc 都有一個狀態流 (Stream),其他 bloc 可以訂閱該狀態流,以便對bloc 的狀態變化做出反應
例如:
MyBloc可以依賴於OtherBloc,並且可以響應OtherBloc中的狀態改變而add事件
(為了避免內存洩漏,在MyBloc的close覆寫來關閉StreamSubscription)
class MyBloc extends Bloc {
  final OtherBloc otherBloc;
  StreamSubscription otherBlocSubscription;

  MyBloc(this.otherBloc) {
    otherBlocSubscription = otherBloc.listen((state) {
        // React to state changes here.
        // Add events here to trigger changes in MyBloc.
    });
  }

  @override
  Future<void> close() {
    otherBlocSubscription.cancel();
    return super.close();
  }
}
主要負責依一個或多個bloc 的狀態進行畫面的渲染,並且處理使用者輸入和app 生命週期事件
例如:
class PresentationComponent {
    final Bloc bloc;

    PresentationComponent() {
        bloc.add(AppStarted());
    }

    build() {
        // render UI based on bloc state
    }
}
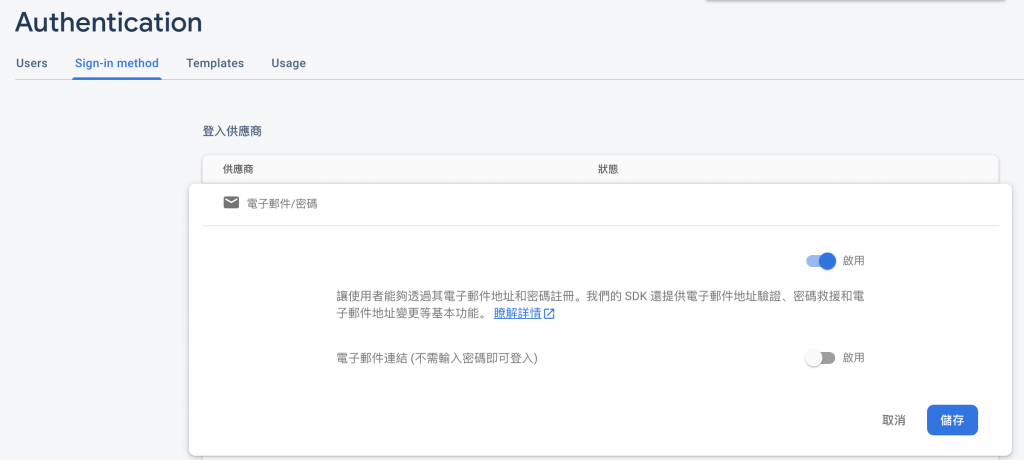
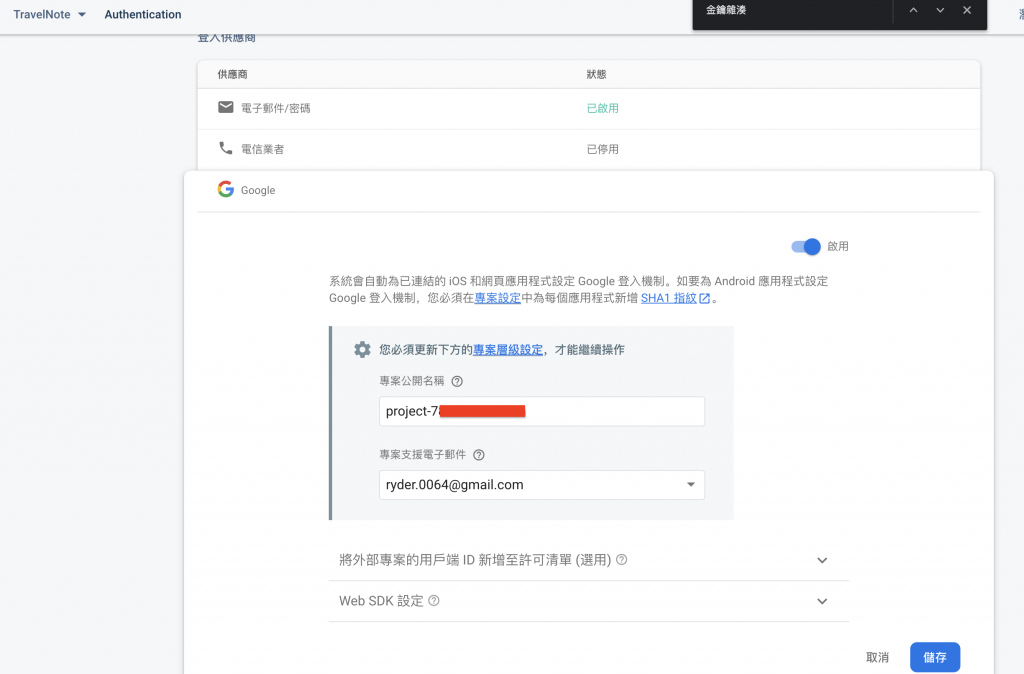
啟用我們之後專案需要的功能,我們先把原本範例的twitter先拿掉
記得按前面Day16 Firebase說的,在Android 專案下加入憑證
首先我們去 FACEBOOK for Developers,設置新的Facebook應用程式
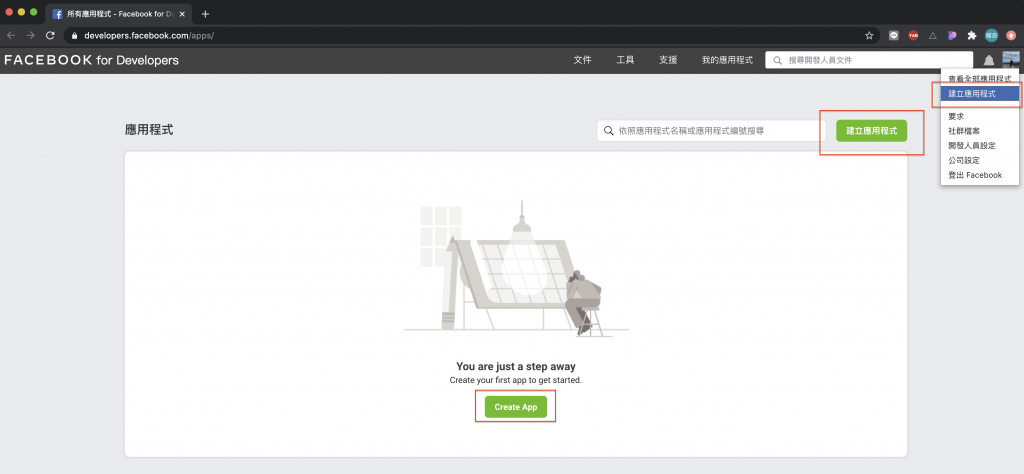
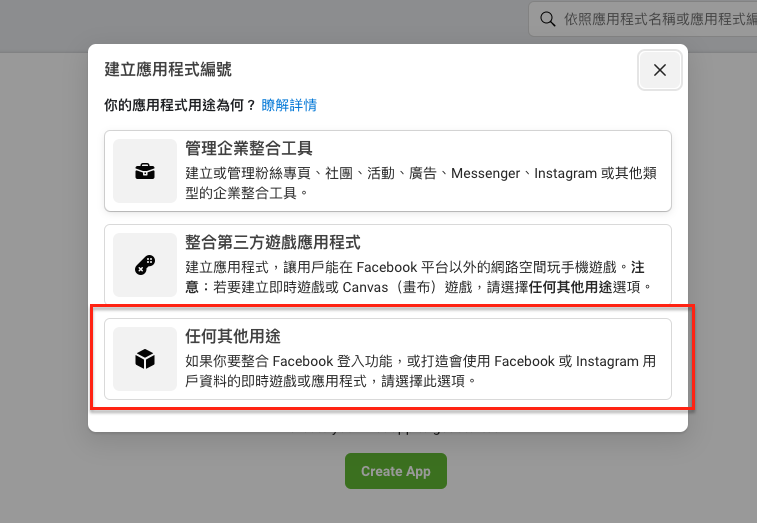
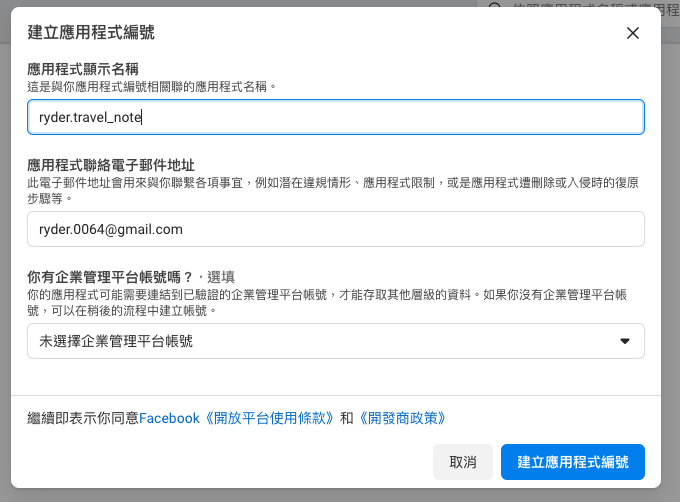
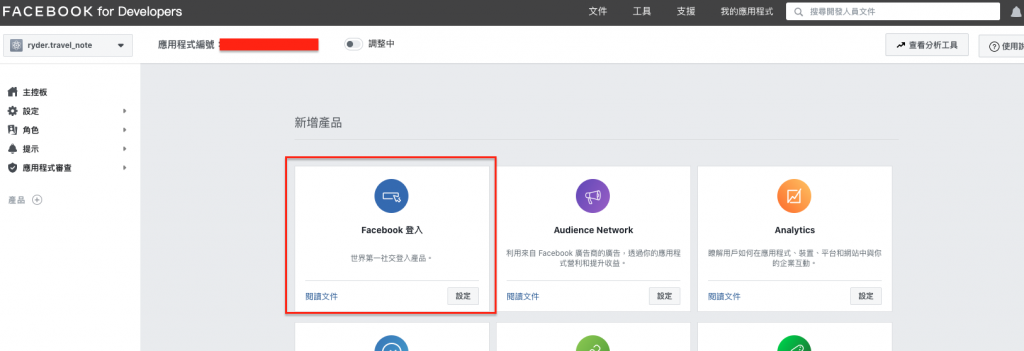
建立完應用程式後,我們開始配置 Facebook 登入,按下設定
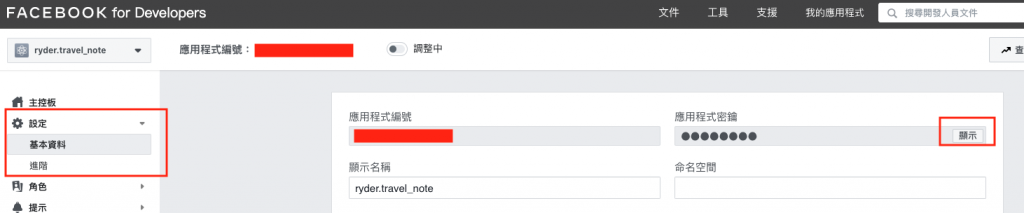
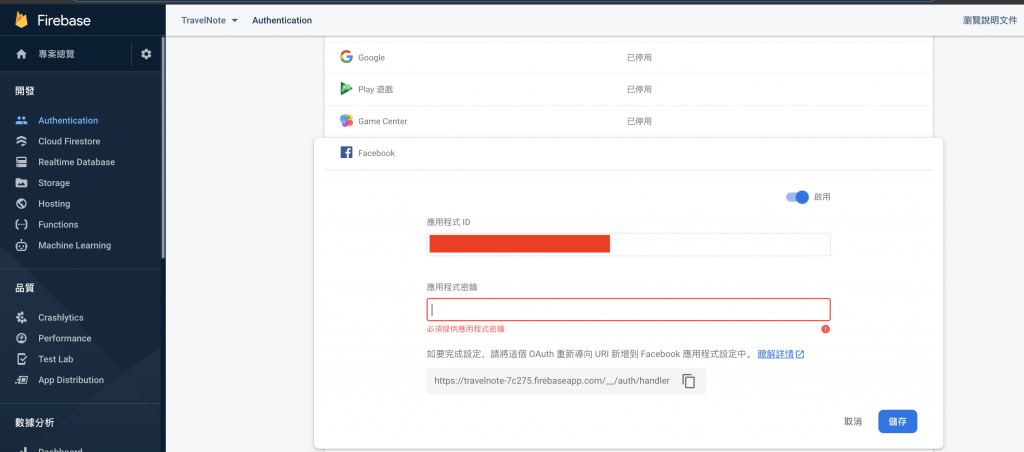
這時我們先去設定中的基本資料,拿到我們的應用程式密鑰,按下顯示並被內容複製起來
回到 Firebase Authentication 要啟用Facebook的的地方,先填上剛剛建立的應用程式 ID,再把複製到的密鑰,應用程式密鑰上,即可儲存
然後我們複製 OAuth 重新導向 URI
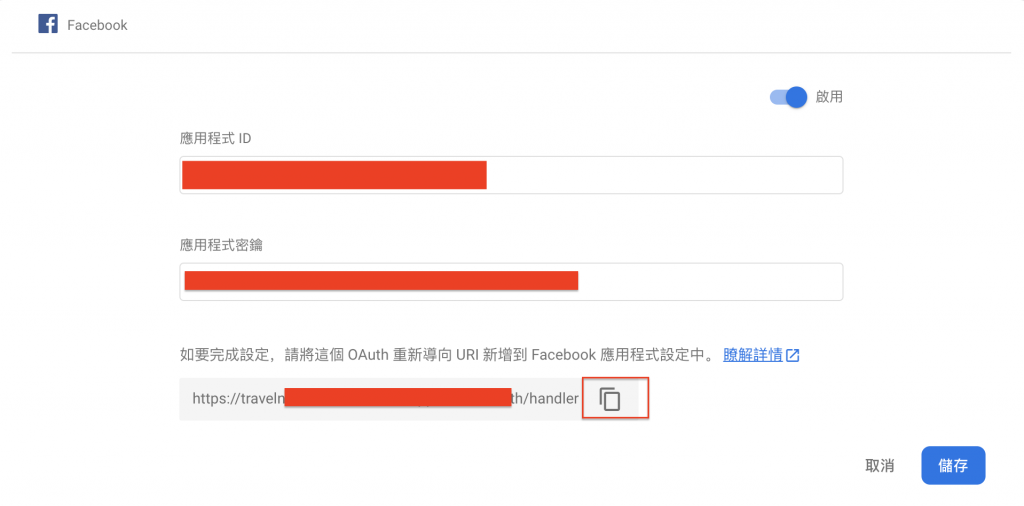
並回到 Facebook for developers 對 Facebook 登入 進行設定,在 有效的 OAuth 重新導向 URI 貼上剛剛複製的 URI ,就完成Firebase Authentication 啟用FB的設定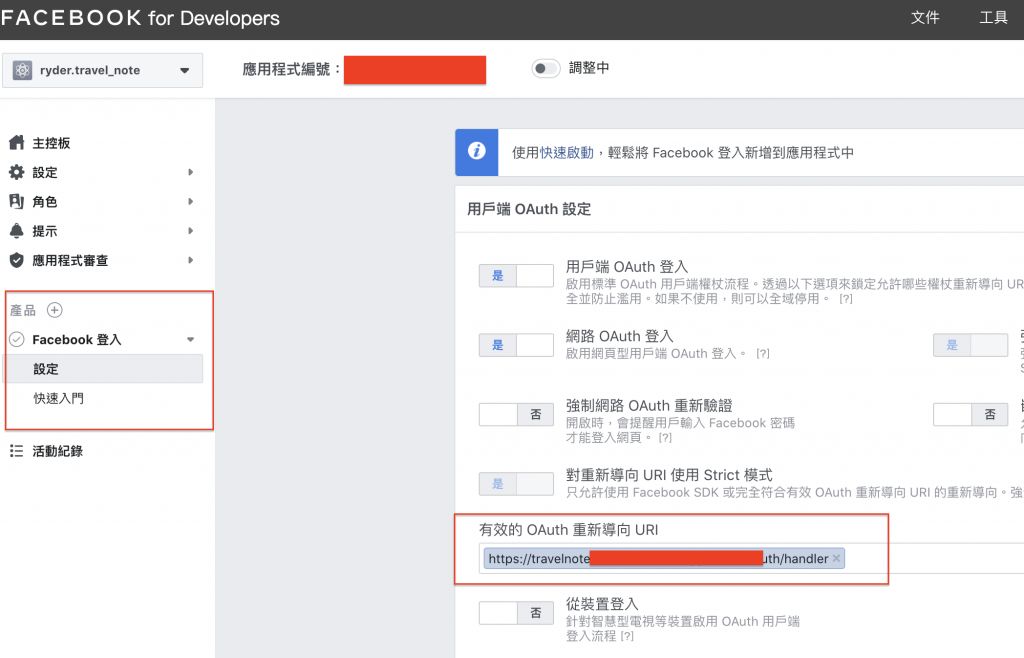
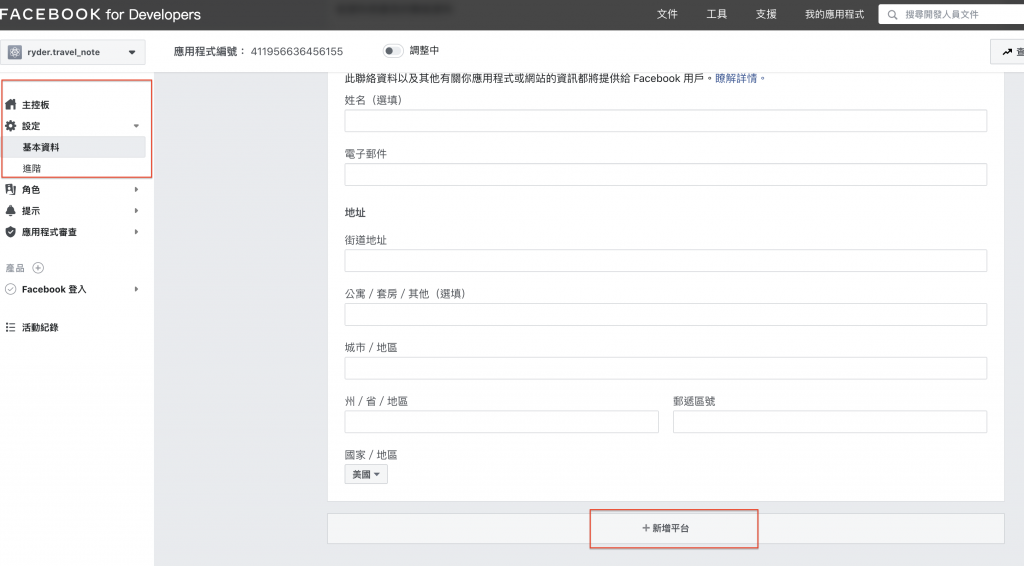
最後我們回到FACEBOOK for Developers 的設定→基本資料,滑至底部,新增iOS 和 android 平台即可
其中 android 需要 金鑰雜湊,此時對終端機下指令:
keytool -exportcert -alias androiddebugkey -keystore ~/.android/debug.keystore | openssl sha1 -binary | openssl base64
輸入要的密碼後即會產生金鑰,在將其複製貼上即可

按下儲存就完成了


 iThome鐵人賽