昨天分享完intent的使用方法,今天分享intent+bundle的方法將輸入的資料送到另一個Second.Activity裡,在Second.Activity顯示剛才輸入的資料。
bundle主要用於傳遞資料,傳遞的資料類型可以是boolean、byte、int、long、float、double、string。
activity_main.xml設計
<LinearLayout
        android:layout_width="match_parent"
        android:layout_height="match_parent"
        android:orientation="vertical">
        <TextView
            android:layout_width="match_parent"
            android:layout_height="wrap_content"
            android:gravity="center"
            android:textColor="#2196F3"
            android:text="謎語"
            android:textSize="40sp"/>
        <TextView
            android:layout_width="match_parent"
            android:layout_height="wrap_content"
            android:layout_marginTop="20dp"
            android:text="五個兄弟,住在一起,名字不同,高矮不齊。"
            android:textSize="30sp"/>
        <TextView
            android:layout_width="match_parent"
            android:layout_height="wrap_content"
            android:textColor="#000000"
            android:text="猜一個器官"
            android:textSize="30sp"/>
        <EditText
            android:id="@+id/edt1"
            android:layout_width="match_parent"
            android:layout_height="wrap_content"
            android:layout_marginTop="50dp"
            android:paddingLeft="10dp"
            android:hint="請輸入文字"
            android:textSize="20sp"/>
        <LinearLayout
            android:layout_width="match_parent"
            android:layout_height="wrap_content"
            android:orientation="horizontal"
            android:layout_marginTop="200dp">
        <Button
            android:id="@+id/btn1"
            android:layout_width="match_parent"
            android:layout_height="wrap_content"
            android:layout_marginTop="40dp"
            android:text="click"
            android:textSize="20sp" />
        </LinearLayout>
    </LinearLayout>
activity_second.xml設計,新增一個TextView作為結果顯示
<LinearLayout
        android:layout_width="match_parent"
        android:layout_height="match_parent"
        android:orientation="vertical">
        <TextView
            android:id="@+id/tv1"
            android:layout_width="match_parent"
            android:layout_height="50dp"
            android:textSize="40sp"
            android:gravity="center"/>
    </LinearLayout>
MainActivity程式設計
package com.example.newtest;

import ...
public class MainActivity extends AppCompatActivity {
    //宣告元件
    private Button btn1;
    private EditText edit1;
    @Override
    protected void onCreate(Bundle savedInstanceState) {
        super.onCreate(savedInstanceState);
        setContentView(R.layout.activity_main);
        //取得控制元件
        btn1 = (Button) findViewById(R.id.btn1);
        edit1 = (EditText) findViewById(R.id.edt1);
        //設置Button監聽事件
        btn1.setOnClickListener(new View.OnClickListener() {
            @Override
            public void onClick(View view) {
                String answer = edit1.getText().toString();
                if (TextUtils.isEmpty(answer)) {
                    Toast.makeText(MainActivity.this, "答案不能空白", Toast.LENGTH_SHORT).show();
                } else {
                    Intent intent = new Intent();
                    intent.setClass(MainActivity.this, Second.class);
                    Bundle bundle = new Bundle();
                    bundle.putString("answer", edit1.getText().toString());
                    intent.putExtras(bundle);
                    startActivity(intent);
                }
            }
        });
    }
}
在監聽事件裡,新增字串,再用TextUtils.isEmpty(answer)方法判斷假如字串answer是空字串,則顯示"答案不能空白",否則新增要傳送到Second.Activity的資料
 btn1.setOnClickListener(new View.OnClickListener() {
            @Override
            public void onClick(View view) {
                String answer = edit1.getText().toString();
                if (TextUtils.isEmpty(answer)) {
                    Toast.makeText(MainActivity.this, "答案不能空白", Toast.LENGTH_SHORT).show();
                } else {
                    Intent intent = new Intent();
                    intent.setClass(MainActivity.this, Second.class);
                    Bundle bundle = new Bundle();
                    bundle.putString("answer", edit1.getText().toString());
                    intent.putExtras(bundle);
                    startActivity(intent);
                }
            }
        });
Second.Activity程式設計
在onCreate()方法裡,取得bundle物件,並將儲存在bundle的資料顯示於tv1
Bundle bundle=getIntent().getExtras();
String ans=bundle.getString("answer");
tv1 =(TextView)findViewById(R.id.tv1);
tv1.setText(ans);
成果圖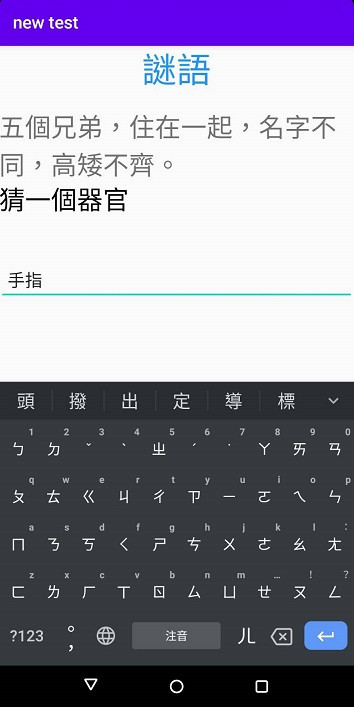


 iThome鐵人賽