Hi!我是SingYo,謝謝你點進來看這個系列!
這是我第一次參加鐵人賽。
其實說30個前端「任務」有點籠統,較精確的說法會像是UI元件(UI component),我會在這個月內完成30個元件的開發。而這30個UI元件的idea主要是來參考50 Projects In 50 Days這套課程。
上述課程內容是用原生JS撰寫,但我會另外改寫成Vue 3.0 Composition API版本,最後把所有的元件放在一個專案裡做呈現。專案主要是透過Vite + Vue 3 + Tailwindcss 2.2來開發。
本系列文章的標題並不會用第幾天來陳列,而是每個元件的序數,比方說#1是A元件、#2是B元件。但基本上我會在每一天都分享一個元件,但Vue版本部分不一定會同步。因此有時候文章標題會出現不同的序數。待整個系列挑戰完成了,我會一一把同一個組件的不同版本編輯到同一篇。(抱歉在閱讀上不這麼友善..)
原本要在 自我挑戰組 開始這個系列,但因為主題是跟modern web有關,想想還是從這裡開始,內容部分若有什麼疏漏和觀念錯誤之處,還請看倌們不吝指教。感謝!
這次專案的主要開發工具如下:
Vite(啟動、打包速度很快)
tailwindcss(覺得jit模式用起來很舒服)
Vue 3(vue-router, vuex)
step1. 安裝Vue3、Vite
npm init @vitejs/app 30WidgetsMarathon
cd 30WidgetsMarathon
npm install
npm run dev
終端機截圖: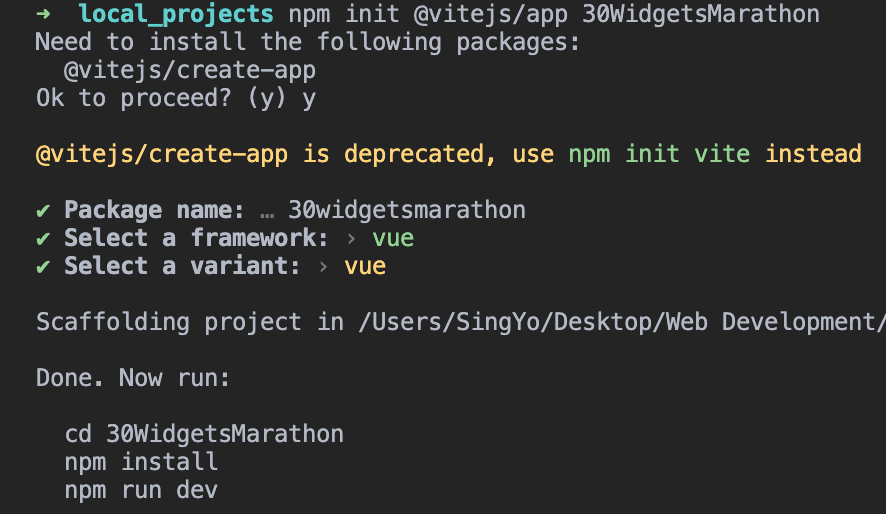
step2. 安裝tailwind css
npm i -D tailwindcss@latest postcss@latest autoprefixer@latest
npx tailwindcss init -p // 產生config.js檔
這裡的postCSS可以透過js加入css,而autoprefixer是用來為css屬性加上各個瀏覽器的前綴。
step.4 於/src/assets底下建立index.css,將tailwindcss引入
/* index.css */
@tailwind base;
@tailwind components;
@tailwind utilities;
step.4 安裝vue-router
npm i vue-router@4
step.5 於src新增router資料夾,並建立index.js
// src/router/index.js
import { createRouter, createWebHistory } from 'vue-router'
import Home from '/src/components/Home.vue'
const routes = [
  {
    // 設定根路徑
    path: '/',
    name: 'Home',
    component: Home
  }
]
const router = createRouter({
  history: createWebHistory(),
  routes
})

export default router
於src/main.js引入router/index.js和index.css
// src/main.js
import { createApp } from 'vue'
import App from './App.vue'

// 新增
import router from './router'
import './index.css'

// 掛載Vue前先使用router
createApp(App).use(router).mount('#app')
in src/components/Home.vue
<template>
  <Header>
     <!-- 可以在[]中輸入自定義數值,代表just in time mode 設定成功 -->
    <p class="text-center bg-blue-800 text-red-50 text-[30px]">30 Widgets Marathon</p>
  </Header>
</template>

<script>
</script>

<style scoped>
</style>
step6. 重整入口檔案 src.App.vue
<template>
	<!-- 在這裡就可以直接使用tailwindcss -->
  <div class="m-4">
  <!-- 設定第一層component的路徑模板,作為route的進入點 -->
    <router-view />
  </div>
</template>
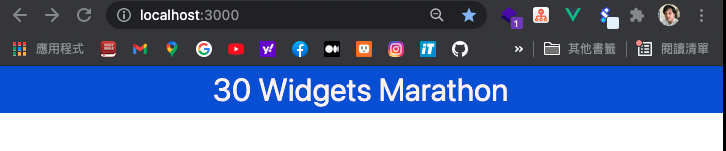
此時的畫面,代表tailwindcss jit mode運作正常。
詳細專案架構,請查看GitHub Repo
前端難民一枚,曾做過雜誌編輯、音響店店長,是兩個孩子的父親。(老大開學了,終於 T_T)