
我們了解到 Angular app 是由無數個大大小小的 Component 所組成的,所以就會常常需要使用將 Component 嵌套,一個大個 Component 中包含了 10 個小的 Component 之類的,那麼讓資料在父子層 Component 之間傳遞就非常重要,要實現這個功能就需要使用到 Angular 中的 @Input() 和 @Output()。
@Input() 是讓父層更新子層 Component 中的數據,相反的 @Output() 是為讓子層向父層 Component 發送數據的。
下面我們會做一個簡單的例子來實際使用與講解如使用 @Input() 與 @Output()。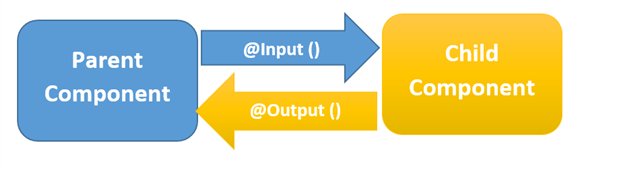
大概知道了 Angular 是如何讓父子層 Component 之間傳遞數據的,接下來我們使用一個小小的例子來講解與操作這個功能吧。
首先我們先透過 Angular CLI 建立兩個父子層關係的 Component。
ng generate component parent
ng generate component child
創建完後,我們將在 parent.component.html 中加入 child.component .ts 中的 selector,建立兩個 Component 的父子層關係。
<!-- parent.component.html -->
<p>parent component works!</p>
<hr>
<app-child-component></app-child-component>
我們打開網頁的開發模式,來確認一下 DOM 是不是確實有將兩個 Component 建立為父子層關係。
首先第一步我們要在 child.component.ts 中使用 @Input() 裝飾器,先把他透過 import 從 @angular/core 中引用進來然後使用它。
import { Component, Input } from '@angular/core';  // (1)

@Component({
  selector: 'app-child-component',
  templateUrl: './child.component.html'
})
export class ChildComponent {
  @Input() item = ''; // (2)
  constructor() { }
}
可以看到我們使用了 @Input() 裝飾了 ChildComponent 中的 item 這個 property, 雖然在上面的例子中是將他初始化為 string,但是不代表使用 @Input() 裝飾的 property 只能是字串型態,他可以是任一種資料型態,代表著這個 property 來自父層。
接下來我們將這個 property 放在 child.component.html 中讓我們可以觀察他的變化。
<!-- child.component.html  -->
<p>child component works!</p>

<div>Today's item: {{ item }}</div>
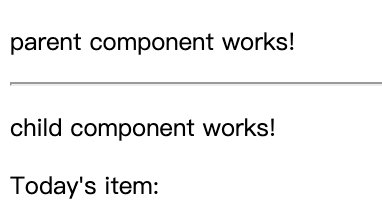
在畫面中我們會看到我們打上的 Today's item 後面並沒有東西(因為父層還沒傳資料下來啊~
接下來我們來在父層的 HTML 中綁定屬性:
import { Component } from '@angular/core';

@Component({
  selector: 'app-parent-component',
  templateUrl: './parent.component.html'
})
export class ParentComponent {
  constructor() { }
  currentItem = 'Television';  // defind a property
}
<app-child-component [item]="currentItem"></app-child-component>
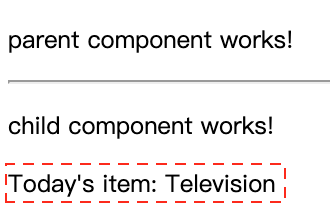
在畫面中可以看到原本 Today's item 後面什麼都沒有的卻顯示了來自 parent.component.ts 中的 property 內容,這就是透過 @Input( ) 將父層的資料傳遞給子層。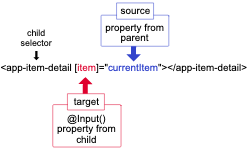
上面的圖已看到,[ ] 中的目標是你在子層使用 @Input() 裝飾的 property,而 source (等好右邊的部分) 是父層要提供給子層數據的名稱,也就是在父層中為了要傳遞給子層數值所定義的 property。
我們在 Lifecycle 中有提到,ngOnChange() 被調用的條件,除了 Component 剛被創建出來的第一次調用之外,其他的每一次都是在當有 input binding 發生改變時會被調用,這代表著如果父層要向下傳遞的 property 發生改變時,就會觸發子層的 ngOnChange()。
講解完如何透過 @Input() 將父層的數據傳給子層後,接下來介紹如何透過 @Output() 讓子層的數據傳遞給父層。
首先 @Output() 裝飾器它可以讓子層的 property 標記成為數據可以傳遞給父層的入口,子層透過使用被 @Output() 裝飾的 property 觸發 event 來通知父層數據已經被更改了,要觸發事件這個子層的 property 必須是 "EventEmitter" 型別,他可以從 '@angular/core' 中引入,下面我們一樣會用一個小例子舉例並講解。
我們在 child 中設置一個可以點擊一個 <button> 來觸發 EventEmitter,並將數據傳遞給父層。
import { Component, Output, EventEmitter } from '@angular/core';  // (1)

@Component({
  selector: 'app-child-component',
  templateUrl: './child.component.html',
  styleUrls: ['./child.component.css']
})
export class ChildComponent {
  @Output() newItemEvent = new EventEmitter<boolean>();  // (2)
  constructor() { }

  parentValueChange(value: boolean) {  // (3)
    this.newItemEvent.emit(value);
  }
}
接著我們來更改 child.component.html 的內容,我們新增兩個 <button> 讓使用者可以對這兩個物件進行操作
<!-- child.component.html  -->
<p>child component works!</p>

<div class="button">
    <button (click)="parentValueChange(true)">+</button>
    <button (click)="parentValueChange(false)">-</button>
</div>
我們將畫面中的兩個 button 都綁定一個 click event,當點擊 + 這個按鍵就會觸發並將 true 做為參數傳給 parentValueChange,反之傳 false。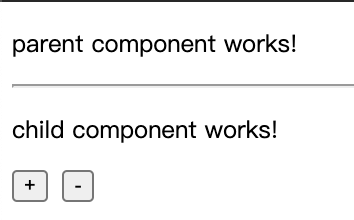
接著我們在父層中添加一個 property 讓我們可以透過子層操控這個屬性。
import { Component } from '@angular/core';

@Component({
  selector: 'app-parent-component',
  templateUrl: './parent.component.html'
})
export class ParentComponent {
  constructor() { }
  counterValue = 0;

  addOrSub(event: boolean) {       // (1)
    if (event) {
      this.counterValue++;
    } else {
      this.counterValue--;
    }
  }
}
接著在 parent.component.html 中將 method 綁定到 child's event 上,讓子層的事件可以觸發到父層的 method。
<!-- parent.component.html -->
<p>parent component works!</p>
<div>parent component property counter: {{counterValue}}</div>

<hr>
<app-child-component (newItemEvent)="addOrSub($event)"></app-child-component>

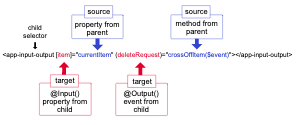
如同 @Input() 一樣,在 () 內的是在子層利用 @Output() 裝飾的 property,因為他是一個 event,所以當子層觸發 event 後會將子層更改的值透過 event 傳遞給父層的 method,而 source( 等號右邊 ) 是父層定義用來接子層傳上來數值的 method。
當你要對同一個子層同時使用 @Input() 和 @Output() 時,可以使用 Tow-way Binding [()],就可以不用像上面一樣寫得這麼長了,這個方法會在之後詳細講解。
介紹完 @Input() 與 @Output() 後,接著要來介紹 @ViewChild() 這個東西,他的存在是因為在 Angular 中父層 Component 無法訪問到子層的 Component,因為每個 Component 都是一個個獨立的 Class instance,所以在沒有互相連接的情況下是不能訪問到子層的 property 和 method,所以當開發時遇到這類型的狀況時,需要將子層 Component 作為 ViewChild inject 給父層,在下面舉一個簡單的例子。
首先先在 child.component.ts 新增一個 property 與 method,讓使用者點擊畫面的 button 時可以加減這個值。
import { Component } from '@angular/core';

@Component({
  selector: 'app-child-component',
  templateUrl: './child.component.html',
  styleUrls: ['./child.component.css']
})
export class ChildComponent {
  childCounter = 0;       // (1)
  constructor() { }

  parentValueChange(value: boolean) {     // (2)
    if (value) {
      this.childCounter++;
    } else {
      this.childCounter--;
    }
  }

  childCounterValue() {                   // (3)
    return this.childCounter;
  }
}
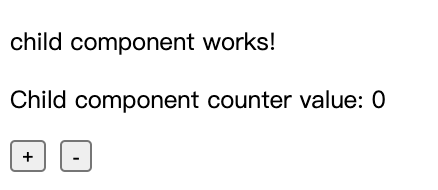
接著我們在 child.component.html 中新增兩個 <button> 並將我們的 childCounter 顯示出來。
<!-- child.component.html  -->
<p>child component works!</p>

<p>Child component counter value: {{childCounter}}</p>
<div class="button">
    <button (click)="parentValueChange(true)">+</button>
    <button (click)="parentValueChange(false)">-</button>
</div>
接著我們在父層在 '@angular/core' 中引入 ViewChild 並將他綁定在子層上
import { Component, AfterViewInit, ViewChild } from '@angular/core';  // (1)
import { ChildComponent } from '../child/child.component';            // (2)

@Component({
  selector: 'app-parent-component',
  templateUrl: './parent.component.html'
})
export class ParentComponent implements AfterViewInit {
  @ViewChild('childComponent')                                        // (3)
  childComponent!: ChildComponent;

  constructor() { }
  counterValue = 0;

  ngAfterViewInit() {}

  getChildCounterValue() {                                            // (4)
    this.counterValue = this.childComponent.childCounterValue();      // (5)
  }
}
接著我們在 parent.compoent.html 中新增一個 <button>,當使用這點擊時觸發將子層的 property 賦值給父層的 property 並將他顯示出來。
<!-- parent.component.html -->
<p>parent component works!</p>
<div>Get child component counter value: {{counterValue}}</div>
<button (click)="getChildCounterValue()">Get child value</button>
<hr>
<app-child-component #childComponent></app-child-component>
可以看到當我們更改了子層的 property 後, 我們點擊了父層的 button 後,父層的 component 透過利用 ViewChild inject 到 parent.component.ts 的方法直接獲得了子層中的 method,並將內容賦予在父層的 property 上。
要注意的是,當要用這個方法獲得子層的 property 或 method 時,需要在 ngAfterViewInit( ) 結束之後才拿得到,因為需要 Angular 需要完整的初始化完自身 Component 和 sub-component 的 view 之後才能拿到 sub-component 的內容,這點要非常注意。
在本篇章中介紹了如何透過 @Input( ) 進行從父層傳遞資料給子層的動作,也介紹了如何使用 @Output( ) 將子層的事件向上傳遞給父層, Component 之間的溝通再開發 Angular app 之間是非常重要的,所以一定要知道該如何使用,最後也介紹了如何將 sub-component inject 給父層,讓父層可以直接調用到 sub-component 的 property 和 method,下一篇要來介紹 ng-content,就是將一個 component 投影到另一個 component 上,那我們就下一篇再見吧。
想請問筆者大大一些問題:
為什麼在使用 @ViewChild 裝飾器時,後方的 childComponent!: ChildComponent 中的 childComponent 要加上 !
另外想詢問在 <app-child-component> 上的 #childComponent 是什麼用途QQ
感謝您!
因為屬性沒有初始值會報錯(因為這個屬性可能會是 null 或 undefined),簡單來說,加上驚嘆號代表告訴 TypeScript 我保證這個屬性一定有值。
#的部分是模板引用變數,你可以參考:https://angular.tw/guide/template-reference-variables
了解了!!感謝大大:D

 iThome鐵人賽