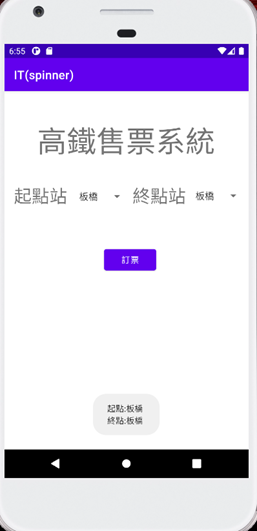
Spinner有快速選擇選單中項目的功能,是個很常用的選擇工具,不過spinner的撰寫有很多種方法,以下就簡單示範幾種實現的方法和效果。

Spinner的重點無疑是裡面的資料,那麼要怎麼將資料存入呢?
<resources>
    <string-array name="station">
        <item>南港</item>
        <item>台北</item>
        <item>板橋</item>
        <item>新竹</item>
        <item>苗栗</item>
        <item>台中</item>
        <item>彰化</item>
        <item>雲林</item>
        <item>嘉義</item>
        <item>台南</item>
        <item>左營</item>
    </string-array>
</resources>
有兩種將以上資料放入Spinner的方法。
public class MainActivity extends AppCompatActivity {
    Boolean firstTime=true;
    Spinner sp1,sp2;
    @Override
    protected void onCreate(Bundle savedInstanceState) {
        super.onCreate(savedInstanceState);
        setContentView(R.layout.activity_main);
        sp1 = (Spinner)findViewById(R.id.spinner);
        sp2 = (Spinner)findViewById(R.id.spinner2);
        ArrayAdapter adapter1 = ArrayAdapter.createFromResource(this
                ,R.array.station,android.R.layout.simple_dropdown_item_1line);
        sp1.setAdapter(adapter1);
        sp1.setOnItemSelectedListener(new AdapterView.OnItemSelectedListener() {
            @Override
            public void onItemSelected(AdapterView<?> parent, View view, int position, long id)
            {
                if (firstTime){
                    firstTime = false;
                    //沒有這個的話Toast會打印一次還沒選擇的狀態
                }
                else{
                    Toast.makeText(view.getContext(),parent.getSelectedItem().toString(),
                                        Toast.LENGTH_SHORT).show();
                }
            }
            @Override
            public void onNothingSelected(AdapterView<?> parent) {
                            //沒選擇項目的話,要做的事寫在這。
            }
        });
    }
    public void order(View v){
        String [] station =getResources().getStringArray(R.array.station);
        int start = sp1.getSelectedItemPosition();
        int end = sp2.getSelectedItemPosition();
        Toast.makeText(this,"起點:"+station[start]+"終點:"+station[end],Toast.LENGTH_SHORT)
        .show();
    }
}
可以分別在onItemSelected()和onNothingSelected()內設計選擇時和沒選擇時的功能。

Spinner就講到這邊,謝謝大家!![]()
