Listview是個能裝載多個view的列表元件,在資料的展示時很常被使用。Listview還有個很重要的觀念,就是使用Adapter配適器,其實在上一篇的Spinner中也有使用到Adapter,不過沒有仔細講解到Adapter的功能,其實Adapter是個在配適資料和版面很常見的工具,我會在下面的例子中透過程式碼來接續解釋它的功能。
<androidx.constraintlayout.widget.ConstraintLayout
xmlns:android="http://schemas.android.com/apk/res/android"
xmlns:app="http://schemas.android.com/apk/res-auto"
xmlns:tools="http://schemas.android.com/tools"
android:layout_width="match_parent"
android:layout_height="match_parent"
tools:context=".MainActivity">
<TextView
android:id="@+id/textView"
android:layout_width="wrap_content"
android:layout_height="wrap_content"
android:layout_marginStart="140dp"
android:layout_marginLeft="140dp"
android:layout_marginTop="20dp"
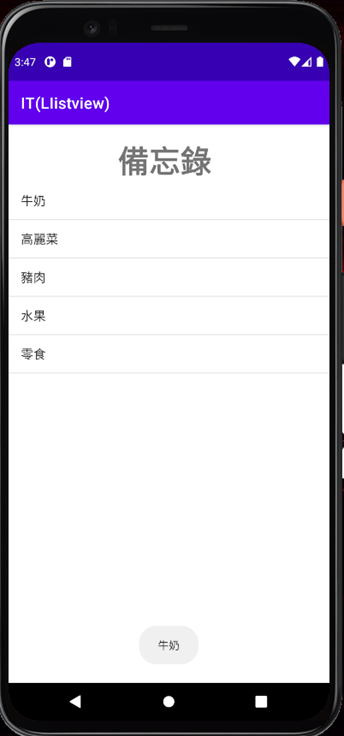
android:text="備忘錄"
android:textSize="40sp"
android:textStyle="bold"
app:layout_constraintStart_toStartOf="parent"
app:layout_constraintTop_toTopOf="parent" />
<ListView
android:id="@+id/lv1"
android:layout_width="match_parent"
android:layout_height="0dp"
app:layout_constraintBottom_toBottomOf="parent"
app:layout_constraintTop_toBottomOf="@+id/textView"
app:layout_constraintVertical_bias="0.0"
tools:layout_editor_absoluteX="-16dp" />
</androidx.constraintlayout.widget.ConstraintLayout>
public class MainActivity extends AppCompatActivity {
    private ListView lv1;
    String data[]={"牛奶","高麗菜","豬肉","水果","零食"};
    @Override
    protected void onCreate(Bundle savedInstanceState) {
        super.onCreate(savedInstanceState);
        setContentView(R.layout.activity_main);

        lv1=(ListView)findViewById(R.id.lv1);
        ArrayAdapter<String> adapter = new ArrayAdapter<String>
                                       (this,android.R.layout.simple_list_item_1,data);
        lv1.setAdapter(adapter);
        lv1.setOnItemClickListener(new AdapterView.OnItemClickListener() {
            @Override
            public void onItemClick(AdapterView<?> parent, View view, int position, long id) {
                Toast.makeText(MainActivity.this,data[position],Toast.LENGTH_SHORT).show();
            }
        });
    }
}
今天Listview就講到這邊,謝謝大家~