在應用的後端,我們已經解決了以下幾個問題:
最後還有兩個問題待解決:跨來源資源共用與自動啟動。跨來源資源共用 (Cross-Origin Resource Sharing, CORS) 是指當使用者代理請求一個不是目前文件來源,例如來自於不同網域(domain)、通訊協定(protocol)或通訊埠(port)的資源時,會建立一個跨來源 HTTP 請求(cross-origin HTTP request)。這種情況最常發生在手機應用 WebView 的方式來開發,通常很多號稱跨手機平台開發的框架就是利用 WebView 來進行開發,開發者只要撰寫 HTML + JavaScript + CSS 的網頁語法,只要封裝在 WebView 的元件裡,就可以輕鬆的佈署到不同的裝置,如 iPhone, 安卓上。但是這樣的網頁設計就會涉及到跨來源資源共用 (CORS) 的問題,因為手機端的網頁通常是 http://127.0.0.1/index.html 或是 file:///index.html ,而我們所設計的 RESTful API 卻是 http://[EC2_IPv4]/imgUpload/ ,很明顯的,網域就截然不同。
以下我們簡單撰寫一個例子來測試,並將這個檔案分別放置到 EC2 以及自己的電腦上,來觀察它的運行結果。下圖是我們代碼的部份內容,可以看出第一部分是設定上傳的欄位名稱為 fileUpload;第二部分是透過 POST 的方式,指定呼叫特定的 RESTful API;第三部分則是針對回應的結果進行分析並顯示。
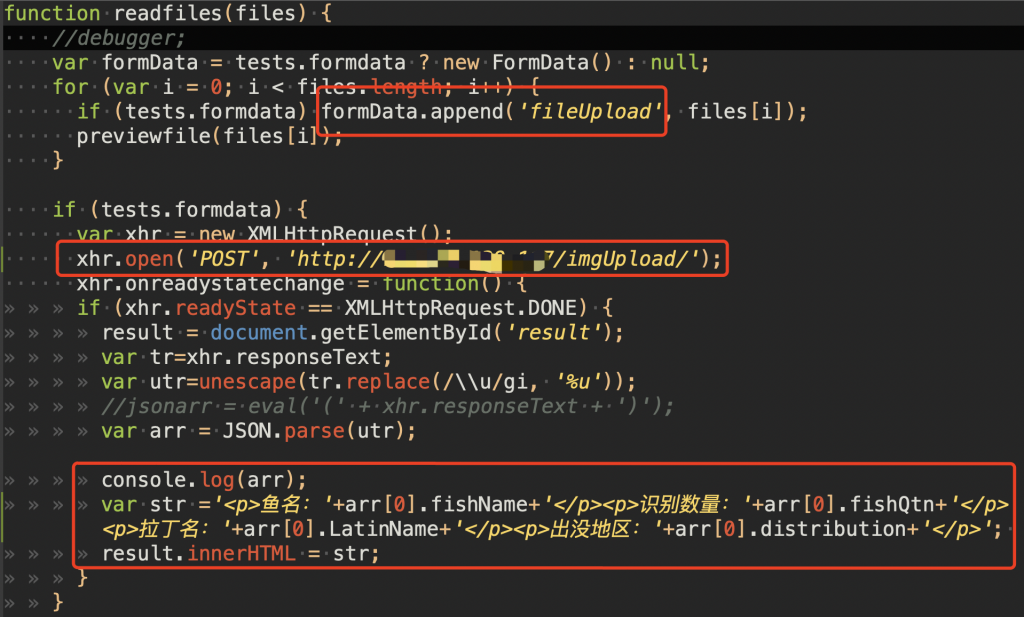
圖 1、 上傳圖片的部分 JavaScript 代碼
接著透過終端機或是 putty 連線到 EC2 ,在 upload 這個目錄下建立這個上傳圖片的測試網頁 fishrecog.html ,完整代碼置於附錄中,記得先啟動 uwsgi 這個程序,方可存取 RESTful API 。
# 切換到正確的目錄
cd /home/ec2-user/fishRecognition/fishsite
# 啟用 uwsgi,方可存取 RESTful API
uwsgi --ini uwsgi.ini
# 這是靜態網頁的所在目錄
cd upload/
# 創建測試網頁文件
vi fishrecog.html
下圖中,可以看到,當拖拉一張圖到指定的虛線方塊時,就會呼叫 impUpload 這個 RESTful API,並在圖片下方顯示出回應的結果。
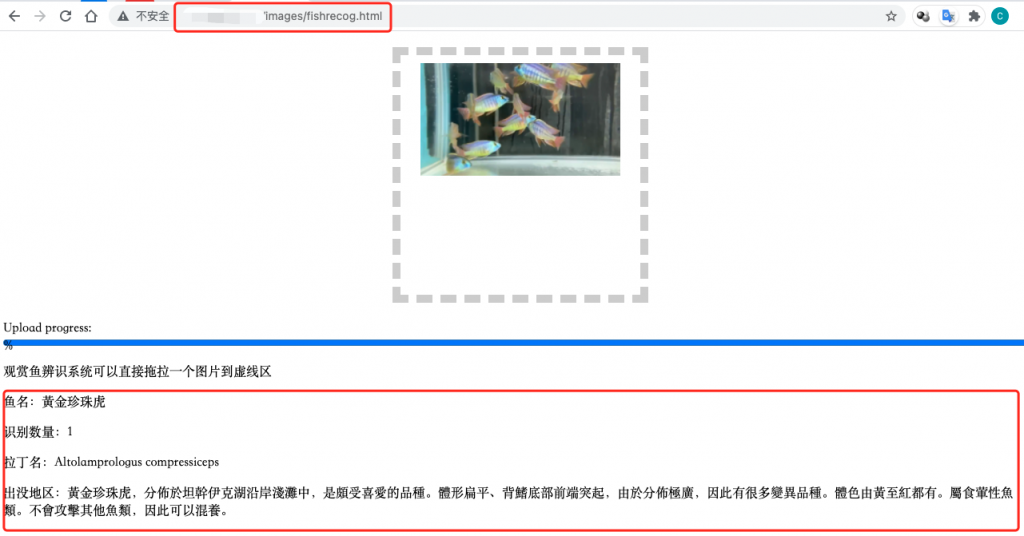
圖 2、 EC2 上的測試網頁結果
但是當我們把一樣的網頁透過本地的方式 (file:///[LOCALPATH]/fishrecog.html) 打開時。同樣的操作卻沒有任何回應回傳回來,打開 Chrome 的開發者工具,在 Console 視窗下就可以看到錯誤原因就是 CORS 所造成,而 CORS 的安全限制是瀏覽器所造成,當發生 CORS 請求時,瀏覽器會詢問伺服器是否支援,若不支援,就會發出錯誤訊息。
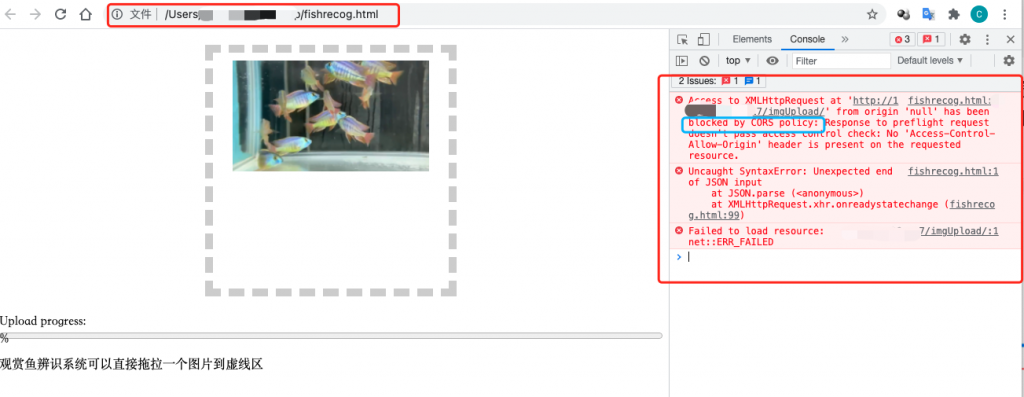
圖 3、 本地主機上的測試網頁結果
所以必須要在 Django 中打開 CORS 的存取限制,打開 settings.py 設定一個中間件,由中間件來回應 CORS 的請求,如下圖所示。
fishsite/settings.py
MIDDLEWARE = [
    'django.middleware.security.SecurityMiddleware',
    'django.contrib.sessions.middleware.SessionMiddleware',
    'django.middleware.common.CommonMiddleware',
    'django.middleware.csrf.CsrfViewMiddleware',
    'django.contrib.auth.middleware.AuthenticationMiddleware',
    'django.contrib.messages.middleware.MessageMiddleware',
    'django.middleware.clickjacking.XFrameOptionsMiddleware',
    'fishsite.cors.CorsMiddleware',
]

圖 4、 在 settings.py 中新增中間件設定
新增中間件文件
關於 CORS 的請求,可以分成下列兩種:
預檢內容如下:
Access-Control-Request-Method = GET, POST, ...
Access-Control-Request-Headers = text/plain,text/html, ...
相關實作代碼如下。
fishsite/cors.py
from django.utils.deprecation import MiddlewareMixin
from django.conf import settings

class CorsMiddleware(MiddlewareMixin):

    def process_response(self,request,response):
        response['Access-Control-Allow-Origin'] = '*'
        #response['Access-Control-Allow-Credentials'] =  'true'
        if request.method == "OPTIONS":
            response["Access-Control-Allow-Methods"] = "GET,POST,PUT,DELETE"
            response["Access-Control-Allow-Headers"] = "Content-Type"
            response.status_code = 200
        return response
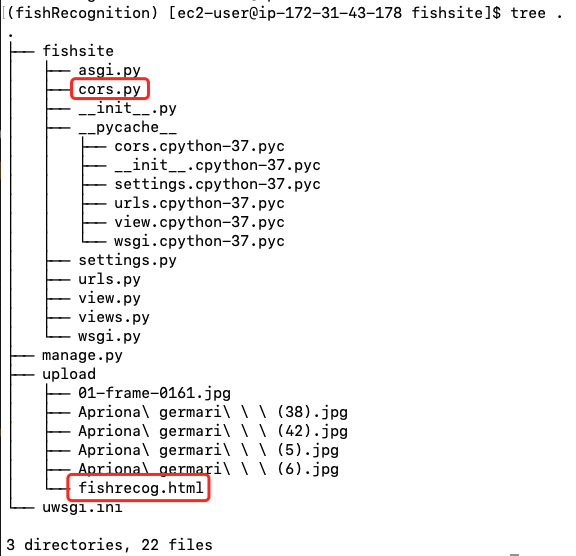
圖 5、 確認所有檔案相關位置
因為已經修改過 Django,所要要重新啟動 uwsgi,要先刪除原先的 uwsgi 行程
ps aux | grep uw
kill -9 8300 8302
uwsgi --ini uwsgi.ini

圖 6、重新啟動 uwsgi
接著回到本地端的瀏覽器,找到剛剛已本地檔案開啟模式的畫面,再重新拖拉一張圖片過去,可以在畫面下方看到 RESTful API 的回傳結果;在開發者工具視窗,選擇網路 (network) 功能頁面,可以發現瀏覽器會送出兩次 imgUpload 的請求,第一次是預檢,可以發現請求方法是 OPTIONS,預檢請求成功後,才會送出第二次實際的請求。
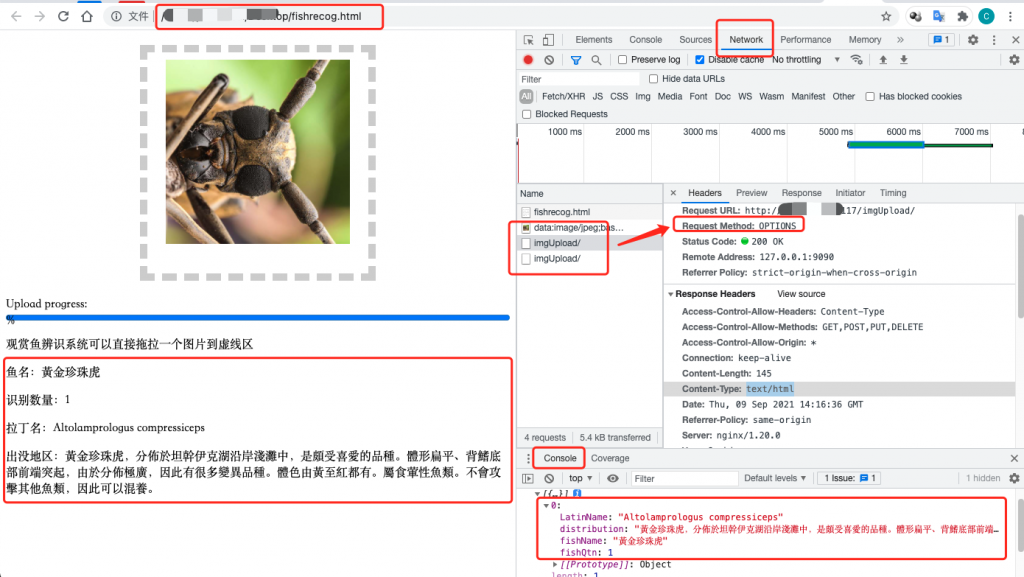
圖 7、重新執行本地端網頁操作
完成了 CORS後,最後希望可以自動啟動所有服務,包含 uwsgi ,所以我們需要手動設定,讓每次系統啟動時,都會自動啟動 uwsgi,在 Linux 中有一個 /etc/rc.local 檔案,每次系統啟動後就會自動執行這個草稿 (script) 檔案,所以只需要將要執行的命令放入該檔案內即可,我們在檔案最後加上一行指令,詳細相關位置如下圖所示。
/etc/rc.local
# 以 ec2-user 使用者身分執行命令
su ec2-user -c 'cd /home/ec2-user/fishRecognition/fishsite;/home/ec2-user/fishRecognition/bin/uwsgi -d --ini uwsgi.ini'
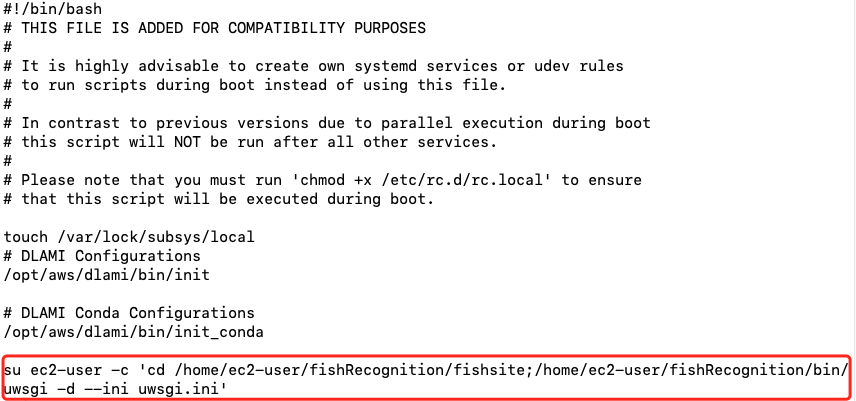
圖 8、在開機執行檔中加入 uwsgi 指令
只要重新啟動 EC2 在運行先前的畫面就可以確認是否生效。
fishrecog.html
<head>
<meta charset="utf-8"/>
<title>观赏鱼辨识系统</title>
<style>
#holder { border: 10px dashed #ccc; width: 300px; min-height: 300px; margin: 20px auto;}
#holder.hover { border: 10px dashed #0c0; }
#holder img { display: block; margin: 10px auto; }
#holder p { margin: 10px; font-size: 14px; }
progress { width: 100%; }
progress:after { content: '%'; }
.fail { background: #c00; padding: 2px; color: #fff; }
.hidden { display: none !important;}
</style>
</head>
<body>
<article>
<div id="holder">
</div>
<p id="upload" class="hidden"><label>不支援拖拉方式,但可以直接选择图片:<br><input type="file"></label></p>
<p id="filereader">File API & FileReader API not supported</p>
<p id="formdata">XHR2's FormData is not supported</p>
<p id="progress">XHR2's upload progress isn't supported</p>
<p>Upload progress: <progress id="uploadprogress" max="100" value="0">0</progress></p>
<p>观赏鱼辨识系统可以直接拖拉一个图片到虚线区</p>
<div id="result"></div>
</article>
<script>
var holder = document.getElementById('holder'),
tests = {
filereader: typeof FileReader != 'undefined',
dnd: 'draggable' in document.createElement('span'),
formdata: !!window.FormData,
progress: "upload" in new XMLHttpRequest
},
support = {
filereader: document.getElementById('filereader'),
formdata: document.getElementById('formdata'),
progress: document.getElementById('progress')
},
acceptedTypes = {
'image/png': true,
'image/jpeg': true,
'image/gif': true
},
progress = document.getElementById('uploadprogress'),
fileupload = document.getElementById('upload');
"filereader formdata progress".split(' ').forEach(function (api) {
if (tests[api] === false) {
support[api].className = 'fail';
} else {
// FFS. I could have done el.hidden = true, but IE doesn't support
// hidden, so I tried to create a polyfill that would extend the
// Element.prototype, but then IE10 doesn't even give me access
// to the Element object. Brilliant.
support[api].className = 'hidden';
}
});
function previewfile(file) {
if (tests.filereader === true && acceptedTypes[file.type] === true) {
var reader = new FileReader();
reader.onload = function (event) {
var image = new Image();
image.src = event.target.result;
image.width = 250; // a fake resize
holder.appendChild(image);
};
reader.readAsDataURL(file);
} else {
holder.innerHTML += '<p>文档已上传 ' + file.name + ' ' + (file.size ? (file.size/1024|0) + 'K' : '');
console.log(file);
}
}
function readfiles(files) {
//debugger;
var formData = tests.formdata ? new FormData() : null;
for (var i = 0; i < files.length; i++) {
if (tests.formdata) formData.append('fileUpload', files[i]);
previewfile(files[i]);
}
if (tests.formdata) {
var xhr = new XMLHttpRequest();
xhr.open('POST', 'http://13.229.139.117/imgUpload/');
xhr.onreadystatechange = function() {
if (xhr.readyState == XMLHttpRequest.DONE) {
result = document.getElementById('result');
var tr=xhr.responseText;
var utr=unescape(tr.replace(/\\u/gi, '%u'));
//jsonarr = eval('(' + xhr.responseText + ')');
var arr = JSON.parse(utr);
console.log(arr);
var str ='<p>鱼名:'+arr[0].fishName+'</p><p>识别数量:'+arr[0].fishQtn+'</p><p>拉丁名:'+arr[0].LatinName+'</p><p>出没地区:'+arr[0].distribution+'</p>';
result.innerHTML = str;
}
}
xhr.onload = function() {
progress.value = progress.innerHTML = 100;
};
if (tests.progress) {
xhr.upload.onprogress = function (event) {
if (event.lengthComputable) {
var complete = (event.loaded / event.total * 100 | 0);
progress.value = progress.innerHTML = complete;
}
}
}
xhr.send(formData);
}
}
if (tests.dnd) {
holder.ondragover = function () { this.className = 'hover'; return false; };
holder.ondragend = function () { this.className = ''; return false; };
holder.ondrop = function (e) {
this.className = '';
e.preventDefault();
readfiles(e.dataTransfer.files);
}
} else {
fileupload.className = 'hidden';
fileupload.querySelector('input').onchange = function () {
readfiles(this.files);
};
}
</script>
</body>
