Docker及Laravel為以後每個專案都會用到的搭配,所以這種時候就將它做成一個類似模板的環境並將他上傳到Github,如果以後有新專案要做的話直接clone下來就可以了,記得使用composer install、新增.env檔,利用指令啟動。
docker-compose up -d
Docker啟動後的資料夾分佈會長這樣
.
├── backend
│   ├── laravel
│   │   ├── README.md
│   │   ├── app
│   │   ├── artisan
│   │   ├── bootstrap
│   │   ├── composer.json
│   │   ├── composer.lock
│   │   ├── config
│   │   ├── database
│   │   ├── package.json
│   │   ├── phpunit.xml
│   │   ├── public
│   │   ├── resources
│   │   ├── routes
│   │   ├── server.php
│   │   ├── storage
│   │   ├── tests
│   │   ├── vendor
│   │   └── webpack.mix.js
│   ├── nginx
│   │   └── default.conf
│   └── postgresql
│       ├── PG_VERSION
│       ├── base
│       ├── global
│       ├── pg_commit_ts
│       ├── pg_dynshmem
│       ├── pg_hba.conf
│       ├── pg_ident.conf
│       ├── pg_logical
│       ├── pg_multixact
│       ├── pg_notify
│       ├── pg_replslot
│       ├── pg_serial
│       ├── pg_snapshots
│       ├── pg_stat
│       ├── pg_stat_tmp
│       ├── pg_subtrans
│       ├── pg_tblspc
│       ├── pg_twophase
│       ├── pg_wal
│       ├── pg_xact
│       ├── postgresql.auto.conf
│       ├── postgresql.conf
│       ├── postmaster.opts
│       └── postmaster.pid
└── docker-compose.yaml
nginx的default.conf內容有變更要注意,root會指向laravel的public資料夾
server {
    listen 80;
    index index.php index.html;
    server_name localhost;
    error_log  /var/log/nginx/error.log;
    access_log /var/log/nginx/access.log;
    root /var/www/laravel/public;

    location / {
        try_files $uri $uri/ /index.php?$query_string;
    }

    location ~ \.php$ {
        try_files $uri =404;
        fastcgi_split_path_info ^(.+\.php)(/.+)$;
        fastcgi_pass php:9000;
        fastcgi_index index.php;
        include fastcgi_params;
        fastcgi_param SCRIPT_FILENAME $document_root$fastcgi_script_name;
        fastcgi_param PATH_INFO $fastcgi_path_info;
    }
}
docker-compose裡的nginx與php掛載資料夾也要注意有變更
version: '3'
networks:
  laravel:
services:
  nginx:
    image: nginx:stable-alpine
    container_name: nginx
    ports:
      - "8080:80"
    volumes:
      - ./backend/laravel:/var/www/laravel
      - ./backend/nginx/default.conf:/etc/nginx/conf.d/default.conf
    depends_on:
      - php
      - postgresql
    networks:
      - laravel
  php:
    image: kurt6783/iron_man
    container_name: php
    working_dir: /var/www/laravel
    ports:
      - "9000:9000"
    volumes:
      - ./backend/laravel:/var/www/laravel
    networks:
      - laravel
  postgresql:
    image: mdillon/postgis:10
    container_name: postgresql
    tty: true
    ports:
      - "5432:5432"
    environment:
      - POSTGRES_PASSWORD=1234
    volumes:
      - ./backend/postgresql:/var/lib/postgresql/data
    networks:
      - laravel
這樣完整的專案環境就算建置好了,總算要進入今天的正題,Laravel - migration。
先移動至laravel資料夾,之後的操作幾乎都是在這層操作
cd backend/laravel
可以看到有database/migrations這個資料夾,裡面會有四個已經建立好的檔案,接著試試看下指令
php artisan migrate
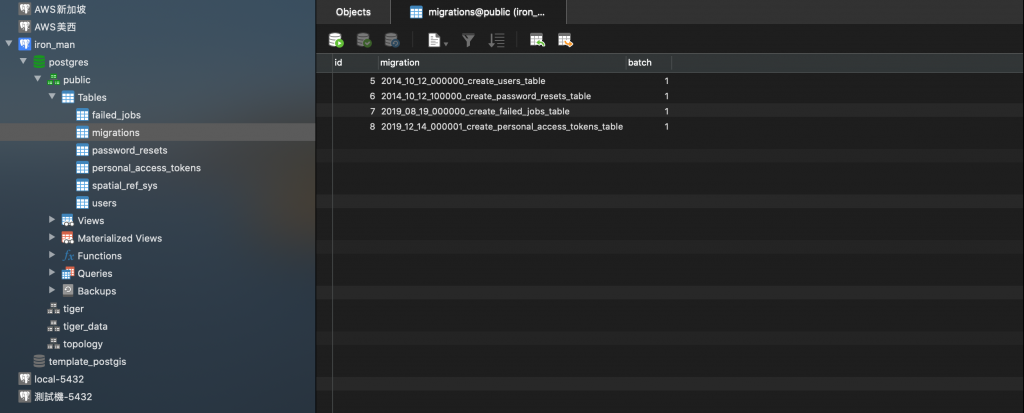
接著就會看到系統以迅雷不及掩耳的速度把table都建立好了,可以用Navicate來檢查一下
可以看到每個migration裡面都有up&down,up內的事情會在migrate時執行,down內的事情會在rollback時執行
php artisan migrate:rollback
migration是一層一層疊上去的,疊的順序可以migrations這個table裡面的batch來得知,當使用rollback指令時會將最上方的一層資料移除掉,如果想要將全部的table都移除,可以使用reset
php artisan migrate:reset
但是要特別注意,使用rollback或是reset時,table裡的資料會被移除而且無法救回,這兩個指令要小心使用。
還有一個比較特別的指令:seed,先打開database/seeders/DatabaseSeeder.php這個檔案,會看到有一行code被註解掉了,將此註解打開
\App\Models\User::factory(10)->create();
如果在使用migrate時搭配指令就會依照需求創建基本資料
php artisan migrate --seed
創建資料的格式會在database/factories,與其model對應的factory裡被定義。
Migration的操作差不多就這幾項,謝謝觀看的各位,請記得按讚分享開啟小鈴鐺,你的支持會讓按讚數+1。
