
經過 Day23 的講解,大家應該都有初步的了解及安裝完畢吧 XD
今天我們來運用 Formik 搭配 Yup 做個簡單表單畫面吧!
import React from 'react';
import {TouchableOpacity, Text, StyleSheet} from 'react-native';

const Button = ({label, onPress}) => {
  return (
    <TouchableOpacity style={styles.btn} activeOpacity={0.7} onPress={onPress}>
      <Text style={styles.btnText}>{label}</Text>
    </TouchableOpacity>
  );
};

const styles = StyleSheet.create({
  btn: {
    borderRadius: 8,
    height: 50,
    width: '100%',
    justifyContent: 'center',
    alignItems: 'center',
    backgroundColor: 'black',
    marginTop: 20,
  },
  btnText: {fontSize: 18, color: 'white', textTransform: 'uppercase'},
});

export default Button;
想更了解 TextInput 可以看看這個!
import React from 'react';
import {TextInput as RNTextInput, View, StyleSheet, Text} from 'react-native';

// ...otherProps 是除了label其他沒提到的 props(ES9)
const Input = ({label, ...otherProps}) => {
    const validationColor =  '#223e4b';
    return (
        <View style={[styles.input,{borderColor:validationColor}]}>
        <View style={{padding: 8}}>
            <Text>{label}</Text>
        </View>
        <View style={{flex: 1}}>
            <RNTextInput
            underlineColorAndroid="transparent"
            placeholderTextColor="#ccc"
            {...otherProps}
            />
        </View>
        </View>
    );
};
const styles = StyleSheet.create({
  input: {
    flexDirection: 'row',
    alignItems: 'center',
    height: 48,
    borderRadius: 8,
    borderWidth: StyleSheet.hairlineWidth,
    padding: 8,
    marginVertical: 10,
  },
});

export default Input;
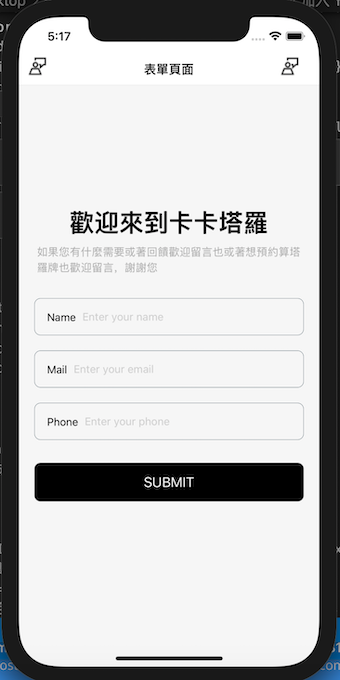
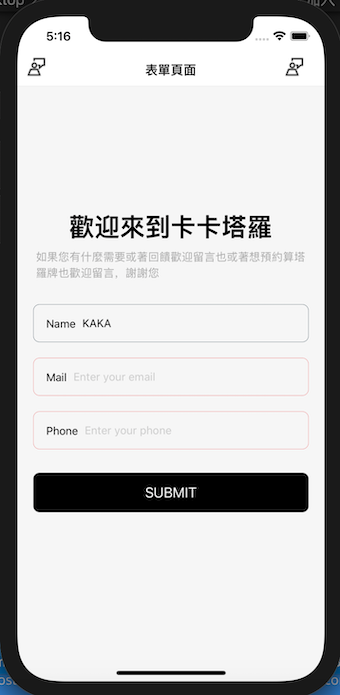
這次來試試用 useFormik 的方式
import React from 'react';
import {StyleSheet, View, Text, ScrollView} from 'react-native';
import {fonts} from '@src/constants';
import Input from '@src/components/Input';
import Button from '@src/components/Button';
import * as yup from 'yup';
// 引入 useFormik
import {useFormik} from 'formik';


const Formik = () => {
    // 使用 useFormik
  const {handleChange, handleSubmit, values} = useFormik({
    initialValues: {name: '', email: '', password: ''},
    onSubmit: values =>
      alert(
        `Name: ${values.name},Email: ${values.email}, Password: ${values.password}`,
      ),
  });
  return (
    <ScrollView style={styles.container}>
      <View style={styles.textBox}>
        <Text style={[styles.text, fonts.h1]}>歡迎來到卡卡塔羅</Text>
        <Text style={(fonts.p, styles.textContent)}>
          如果您有什麼需要或著回饋歡迎留言也或著想預約算塔羅牌也歡迎留言,謝謝您
        </Text>
      </View>

      <View style={styles.formBox}>
        <Input
          onChangeText={handleChange('name')}
          label="Name"
          placeholder="Enter your name"
          autoCapitalize="none"
          autoCompleteType="email"
          keyboardType="default"
          keyboardAppearance="dark"
          returnKeyType="next"
          returnKeyLabel="next"
        />
        <Input
          onChangeText={handleChange('email')}
          label="Mail"
          placeholder="Enter your email"
          autoCapitalize="none"
          autoCompleteType="email"
          keyboardType="email-address"
          keyboardAppearance="dark"
          returnKeyType="next"
          returnKeyLabel="next"
        />
        <Input
          onChangeText={handleChange('phone')}
          label="Phone"
          placeholder="Enter your phone"
          secureTextEntry
          autoCompleteType="phone-pad"
          autoCapitalize="none"
          keyboardAppearance="dark"
          returnKeyType="go"
          returnKeyLabel="go"
        />
        <Button label="submit" color="maroon" onPress={handleSubmit} />
      </View>
    </ScrollView>
  );
};

const styles = StyleSheet.create({
  container: {
    flex: 1,
    backgroundColor: 'rgb(246,246,246)',
    paddingHorizontal: 20,
  },
  textBox: {
    justifyContent: 'center',
    alignItems: 'center',
    paddingVertical: 50,
  },
  textTitle: {color: '#aaa'},
  textContent: {color: '#aaa', lineHeight: 20, marginTop: 10},
  formBox: {
    width: '100%',
    alignItems: 'center',
    justifyContent: 'center',
  },
  input: {
    width: '100%',
    textAlign: 'center',
    borderWidth: 1,
    borderColor: '#ddd',
    padding: 10,
    fontSize: 18,
    margin: 10,
  },
  errorText: {
    textAlign: 'center',
    color: 'crimson',
    marginBottom: 10,
  },
});

export default Formik;
import {
  number as yupNumber,
  object as yupObject,
  string as yupString,
  ValidationError,
} from 'yup';
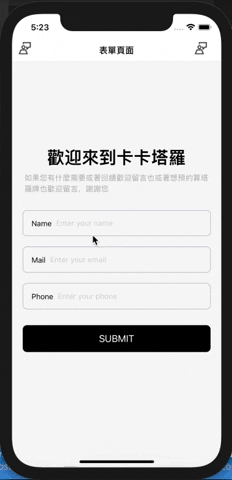
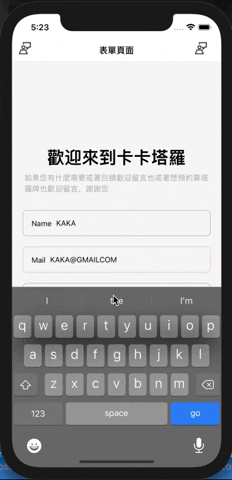
用堆疊的方式來驗證,如下面的 code
name:字串 必填
email:字串 email 驗證必填
phone:字串 符合 phoneRegExp 必填
  const phoneRegExp =
    /^((\\+[1-9]{1,4}[ \\-]*)|(\\([0-9]{2,3}\\)[ \\-]*)|([0-9]{2,4})[ \\-]*)*?[0-9]{3,4}?[ \\-]*[0-9]{3,4}?$/;

  const Schema = yupObject().shape({
    name: yupString().required('Required'),
    email: yupString().email('Invalid email').required('Required'),
    phone: yupString()
      .matches(phoneRegExp, 'Phone number is not valid')
      .required('Required'),
  });
    // errors, touched, handleBlur
    const {handleChange, handleSubmit, handleBlur, values, errors, touched} =
        useFormik({
        validationSchema: Schema, // 加入驗證機制
        initialValues: {name: '', email: '', phone: ''},
        onSubmit: values =>
            alert(
            `Name: ${values.name},Email: ${values.email}, phone: ${values.phone}`,
            ),
    });
<Input
  // ... rest remains same
  onBlur={handleBlur('email')} // 要記得改成正確的name
  error={errors.email} // 要記得改成正確的name
  touched={touched.email} // 要記得改成正確的name
/>
import React from 'react';
import {TextInput as RNTextInput, View, StyleSheet, Text} from 'react-native';
    // 加入參數
const Input = ({label, error, touched, ...otherProps}) => {
    // 判斷顏色
    const validationColor = !touched ? '#223e4b' : error ? '#FF5A5F' : '#223e4b';
    return (
        <View style={[styles.input, {borderColor: validationColor}]}>
        <View style={{padding: 8}}>
            <Text>{label}</Text>
        </View>
        <View style={{flex: 1}}>
            <RNTextInput
            underlineColorAndroid="transparent"
            placeholderTextColor="#ccc"
            {...otherProps}
            />
        </View>
    </View>
  );
});
const styles = StyleSheet.create({
  input: {
    flexDirection: 'row',
    alignItems: 'center',
    height: 48,
    borderRadius: 8,
    borderWidth: StyleSheet.hairlineWidth,
    padding: 8,
    marginVertical: 10,
  },
});

export default Input;
import React from 'react';
import {StyleSheet, View, Text, ScrollView} from 'react-native';
import {fonts} from '@src/constants';
import {useFormik} from 'formik';
import Input from '../components/Input';
import Button from '../components/Button';
import {object as yupObject, string as yupString, ValidationError} from 'yup';

const Formik = () => {
  const phoneRegExp =
    /^((\\+[1-9]{1,4}[ \\-]*)|(\\([0-9]{2,3}\\)[ \\-]*)|([0-9]{2,4})[ \\-]*)*?[0-9]{3,4}?[ \\-]*[0-9]{3,4}?$/;

  const Schema = yupObject().shape({
    name: yupString().required('Required'),
    email: yupString().email('Invalid email').required('Required'),
    phone: yupString()
      .matches(phoneRegExp, 'Phone number is not valid')
      .required('Required'),
  });
  const {handleChange, handleSubmit, handleBlur, values, errors, touched} =
    useFormik({
      validationSchema: Schema,
      initialValues: {name: '', email: '', phone: ''},
      onSubmit: values =>
        alert(
          `Name: ${values.name},Email: ${values.email}, phone: ${values.phone}`,
        ),
    });
  return (
    <ScrollView style={styles.container}>
      <View style={styles.textBox}>
        <Text style={[styles.text, fonts.h1]}>歡迎來到卡卡塔羅</Text>
        <Text style={(fonts.p, styles.textContent)}>
          如果您有什麼需要或著回饋歡迎留言也或著想預約算塔羅牌也歡迎留言,謝謝您
        </Text>
      </View>

      <View style={styles.formBox}>
        <Input
          onChangeText={handleChange('name')}
          label="Name"
          placeholder="Enter your name"
          autoCapitalize="none"
          autoCompleteType="email"
          keyboardType="default"
          keyboardAppearance="dark"
          onBlur={handleBlur('name')}
          error={errors.name}
          touched={touched.name}
          returnKeyType="next"
          returnKeyLabel="next"
        />
        <Input
          onChangeText={handleChange('email')}
          label="Mail"
          placeholder="Enter your email"
          autoCapitalize="none"
          autoCompleteType="email"
          keyboardType="email-address"
          keyboardAppearance="dark"
          onBlur={handleBlur('email')}
          error={errors.email}
          touched={touched.email}
          returnKeyType="next"
          returnKeyLabel="next"
        />
        <Input
          onChangeText={handleChange('phone')}
          label="Phone"
          placeholder="Enter your phone"
          autoCompleteType="phone-pad"
          autoCapitalize="none"
          keyboardAppearance="dark"
          onBlur={handleBlur('phone')}
          error={errors.phone}
          touched={touched.phone}
          returnKeyType="go"
          returnKeyLabel="go"
        />
        <Button label="submit" color="maroon" onPress={handleSubmit} />
      </View>
    </ScrollView>
  );
};

const styles = StyleSheet.create({
  container: {
    flex: 1,
    backgroundColor: 'rgb(246,246,246)',
    paddingHorizontal: 20,
  },
  textBox: {
    justifyContent: 'center',
    alignItems: 'center',
    paddingVertical: 50,
  },
  textTitle: {color: '#aaa'},
  textContent: {color: '#aaa', lineHeight: 20, marginTop: 10},
  formBox: {
    width: '100%',
    alignItems: 'center',
    justifyContent: 'center',
  },
  input: {
    width: '100%',
    textAlign: 'center',
    borderWidth: 1,
    borderColor: '#ddd',
    padding: 10,
    fontSize: 18,
    margin: 10,
  },
  errorText: {
    textAlign: 'center',
    color: 'crimson',
    marginBottom: 10,
  },
});

export default Formik;
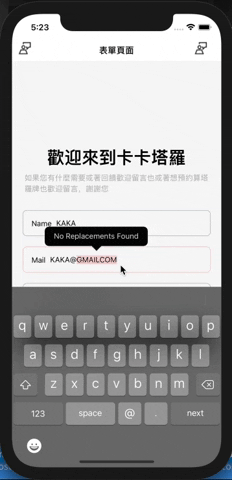
一切超不順對吧!別擔心我們還有一些東西要處理~~ 但至少現在可以確定的是驗證機制完成了 XD
Day 24 今日先到這邊:P 接下來應該會是
Day 25 手機裝置 keyboard 右下角的 next and go 怎麼設定關聯性
Day 26 如何點擊裝置螢幕就讓 keyboard 收起來 + 如何不讓 keyboard 擋住 input
參考文件:
Creating and Validating React Native Forms with Formik
[note] Yup 筆記
Formik doc
讓我們繼續走下去 :{}
