隨著資訊技術普及與推陳佈新,基礎設施及服務(IaaS)、平台即服務(PaaS)、軟體即服務(SaaS)等等...讓不同的使用者可以依照自身的條件與需求選擇服務,接著要探訪的項目近幾年越來越多開發者熟知的無伺服器服務,使用者不在需要思考伺服器運算環境需要什麼樣的規格、作業系統、負載均衡..等等問題,而在阿里雲提供什麼樣的無伺服器架構服務呢?
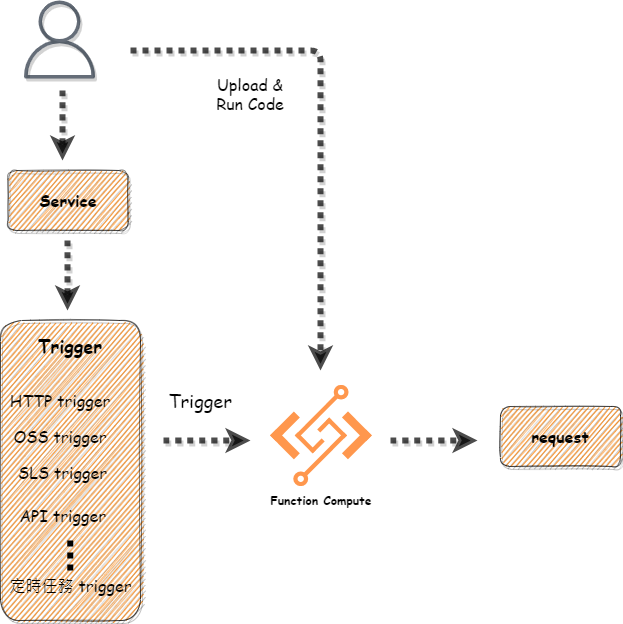
阿里雲FC是一個透過事件觸發驅動的全託管運算服務,只要將程式碼邏輯佈署上去,當有條件觸發時才會去執行運算,而未執行觸發FC時不會運行,對於成本降低有相當大的幫助
流程示意圖:
接著我們要利用FC建立一個自動轉檔的應用,將上傳至指定OSS資料夾內的影片轉碼成hls協議的影音格式並存入另一個OSS資料夾內
架構示意圖: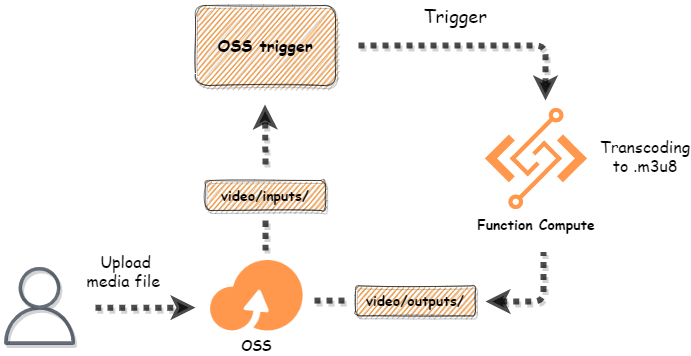
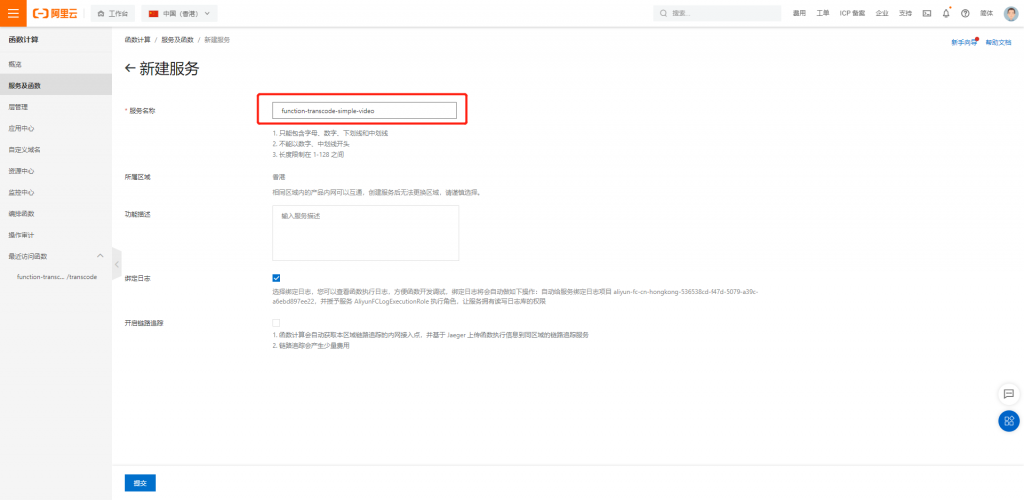
在產品導覽頁找到函數計算服務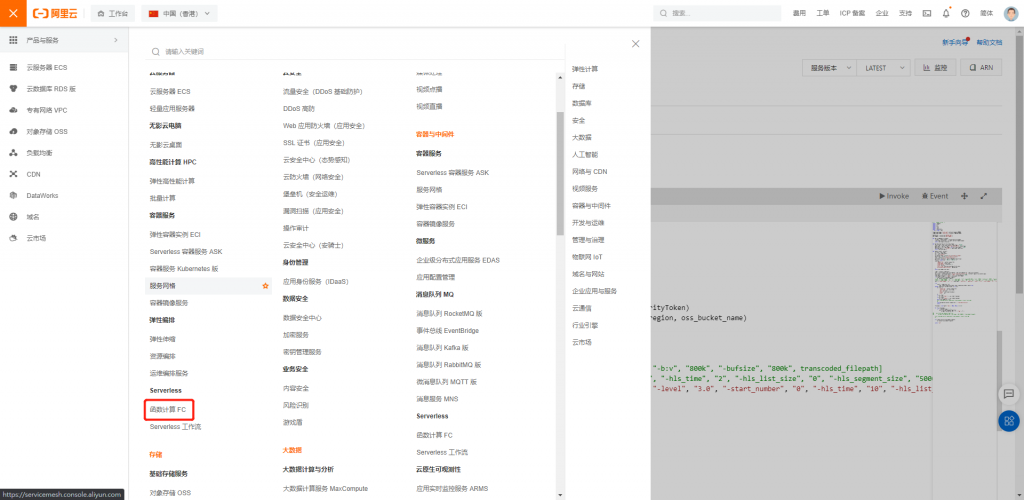
點選服務及函數建立服務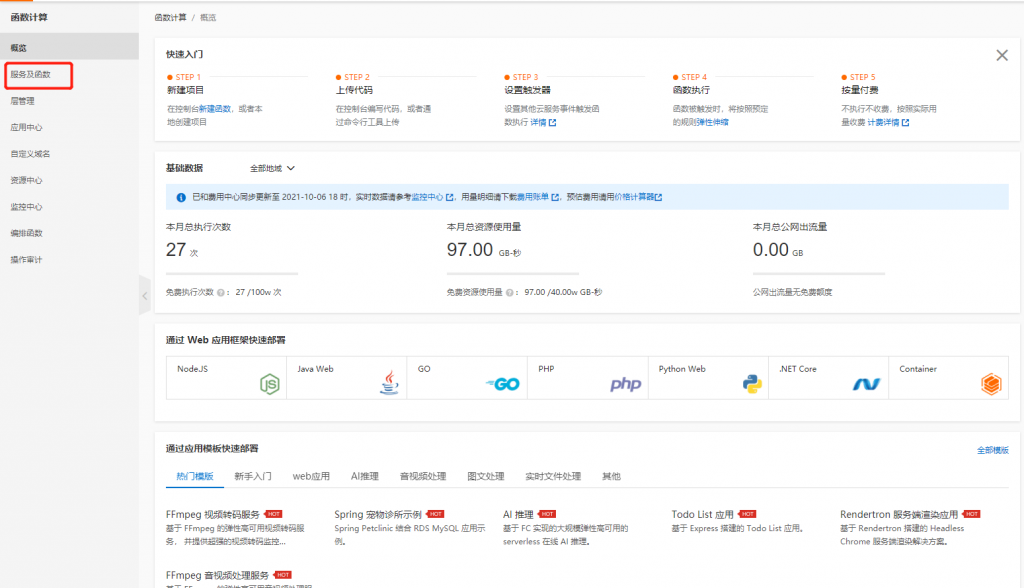
建立服務完成後點選新增函數
下方有提供多樣的模板可以套用,因為要使用OSS觸發驅動這裡選擇事件函數
建立函數名稱,這裡要測試的程式使用的是python3運行,上傳程式碼 (這裡上傳包含ffmpeg程式檔)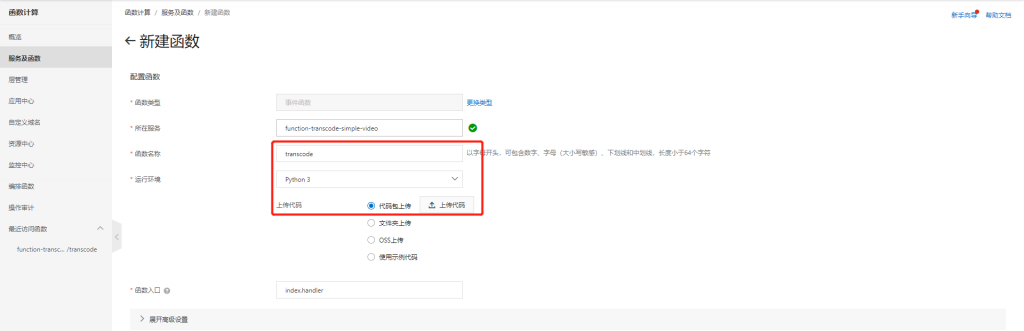
目錄結構:
ffmpeg
index.py
index.py完整範例程式碼:
# -*- coding: utf-8 -*-
import logging
import oss2
import os
import time
import json
import subprocess
from os import walk

logging.getLogger("oss2.api").setLevel(logging.ERROR)
logging.getLogger("oss2.auth").setLevel(logging.ERROR)

OUTPUT_DST = os.environ["OUTPUT_DST"]
DST_TARGET = os.environ["DST_TARGET"]

def get_fileNameExt(filename):
    (fileDir, tempfilename) = os.path.split(filename)
    (shortname, extension) = os.path.splitext(tempfilename)
    return shortname, extension

def get_beijing_time_str(utc_time_stamp):
    local_time = time.localtime(utc_time_stamp + 8*3600)
    data_head = time.strftime("%Y-%m-%d %H:%M:%S", local_time)
    data_secs = (utc_time_stamp - int(utc_time_stamp)) * 1000
    beijing_time_str = "%s.%03d" % (data_head, data_secs)
    return beijing_time_str

def handler(event, context):
    utc_now = time.time()
    evt = json.loads(event)
    evt = evt["events"]
    oss_bucket_name = evt[0]["oss"]["bucket"]["name"]
    object_key = evt[0]["oss"]["object"]["key"]
    size = evt[0]["oss"]["object"]["size"]
    shortname, extension = get_fileNameExt(object_key)
    M_size = round(size / 1024.0 / 1024.0, 2)
    json_log = {
        "request_id": context.request_id,
        "video_name": object_key,
        "video_format": extension[1:],
        "size": M_size,
        "start_time": get_beijing_time_str(utc_now),
        "processed_video_location": OUTPUT_DST,
    }
    print(json.dumps(json_log))

    creds = context.credentials
    auth = oss2.StsAuth(creds.accessKeyId, creds.accessKeySecret, creds.securityToken)
    oss_client = oss2.Bucket(auth, 'oss-%s-internal.aliyuncs.com' % context.region, oss_bucket_name)
    input_path = oss_client.sign_url('GET', object_key, 6 * 3600)
    transcoded_filepath = '/tmp/' + shortname + DST_TARGET
    if os.path.exists(transcoded_filepath):
        os.remove(transcoded_filepath)
    # cmd = ["/code/ffmpeg", "-y", "-i", input_path, "-vf", "scale=640:480", "-b:v", "800k", "-bufsize", "800k", transcoded_filepath]
    # cmd = ["/code/ffmpeg", "-y", "-i", input_path, "-b:v", "1M", "-g", "60", "-hls_time", "2", "-hls_list_size", "0", "-hls_segment_size", "500000",  transcoded_filepath]
    cmd = ["/code/ffmpeg", "-y", "-i", input_path, "-profile:v", "baseline", "-level", "3.0", "-start_number", "0", "-hls_time", "10", "-hls_list_size", "0", transcoded_filepath]

    try:
        result = subprocess.run(
            cmd, stdout=subprocess.PIPE, stderr=subprocess.PIPE, check=True)
    except subprocess.CalledProcessError as exc:
        err_ret = {
            'request_id': context.request_id,
            'returncode': exc.returncode,
            'cmd': exc.cmd,
            'output': exc.output.decode(),
            'event': evt,
        }
        if exc.stderr:
            err_ret['stderr'] = exc.stderr.decode()
        if exc.stdout:
            err_ret['stdout'] = exc.stdout.decode()
        print(json.dumps(err_ret))
        # if transcode fail, send event to mns queue or insert in do db
        # ...
        raise Exception(context.request_id + " transcode failure")
        return

    filenames = next(walk('/tmp'), (None, None, []))[2]

    for f in filenames:
        if f.find(shortname) != -1:
            oss_client.put_object_from_file(
                os.path.join(OUTPUT_DST, f), ('/tmp/'+ f) )

##    oss_client.put_object_from_file(
##        os.path.join(OUTPUT_DST, shortname + DST_TARGET), transcoded_filepath)

    # if transcode succ, send event to mns queue or insert in do db
    # ...

    if os.path.exists(transcoded_filepath):
        os.remove(transcoded_filepath)

    return "ok"
ffmpeg包為預設的設定,如找不到想測試可以聯絡筆者(噓)
建立好函數後,會到程式執行頁面,測試執行發現報錯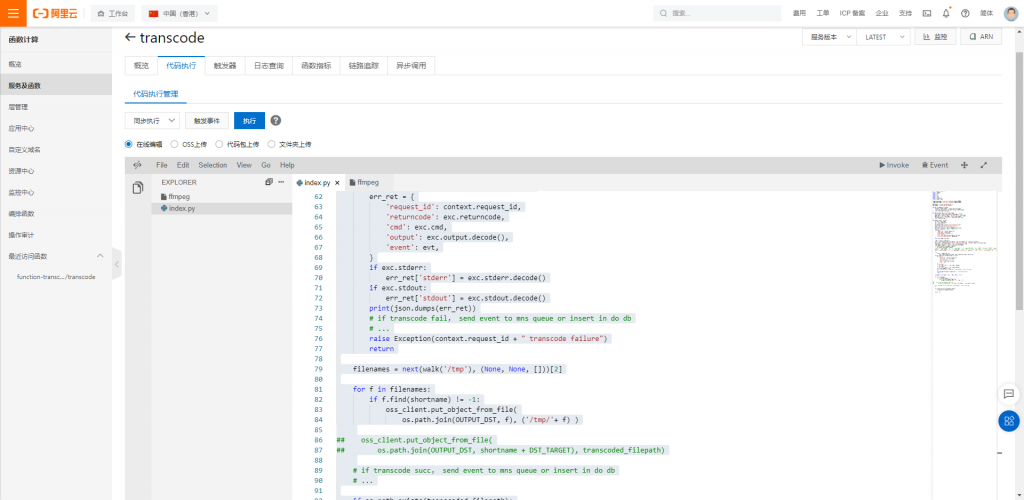
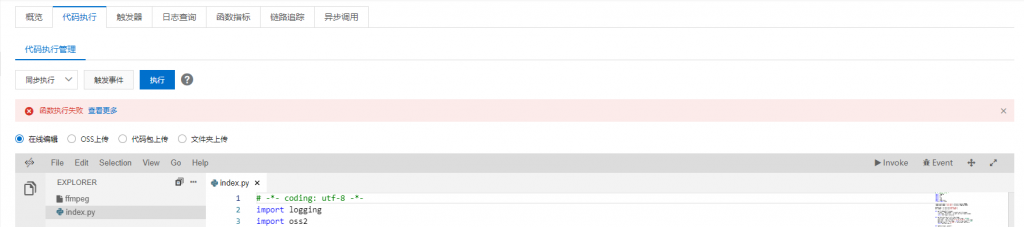
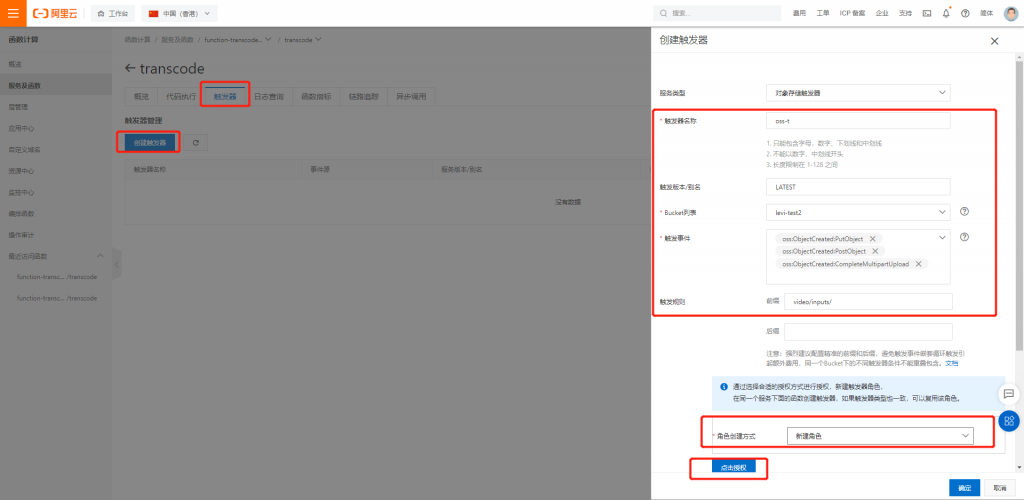
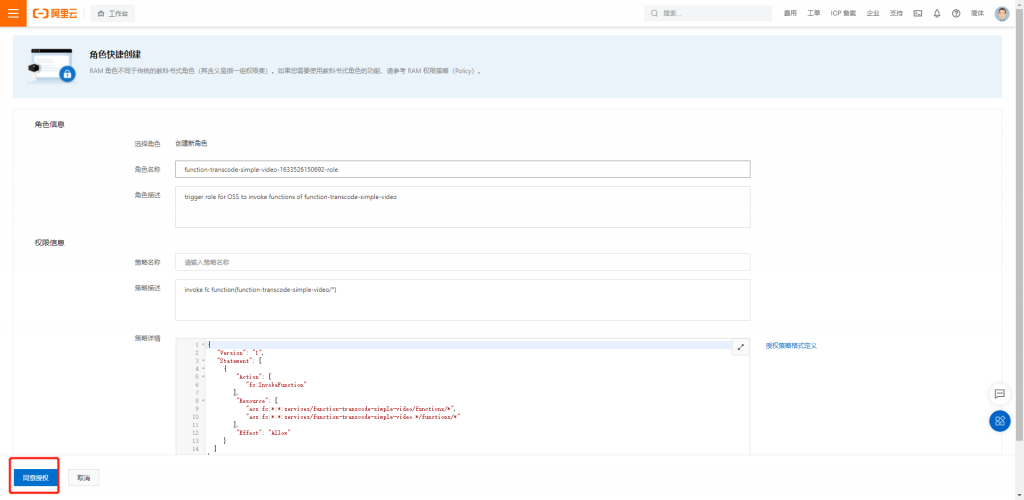
這裡發現忘記先建立OSS觸發條件;權限,建立觸發器:
在OSS Bucket下建立資料夾/vedio/inputs、/vedio/outputs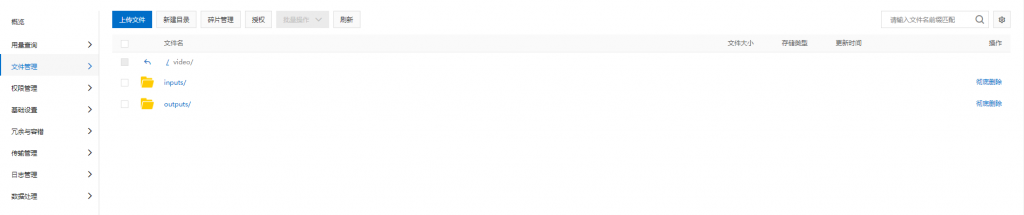
準備完成後,測試上傳影音檔案,查看/vedio/inputs上傳成功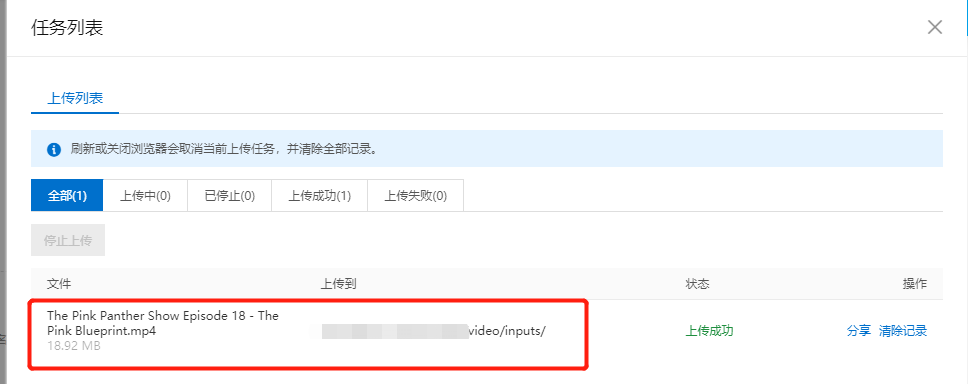

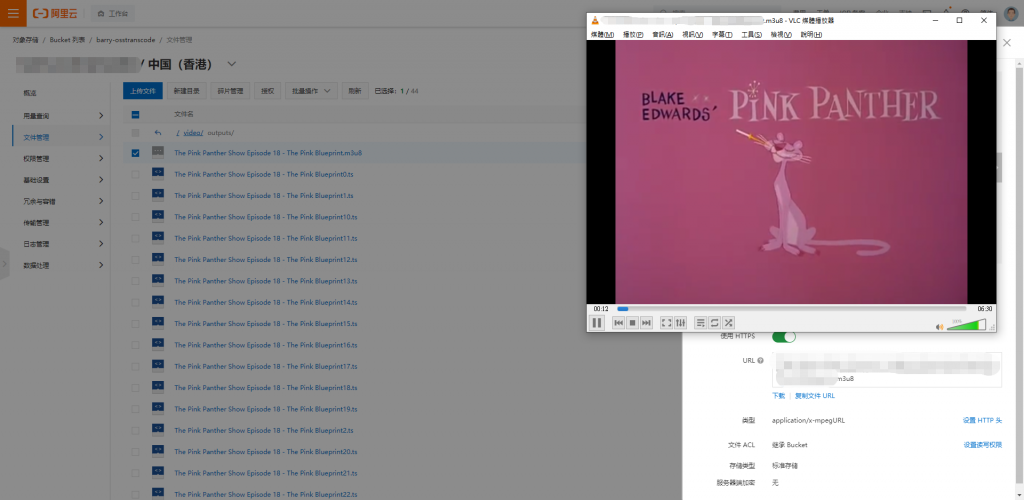
接著打開/vedio/outputs驗證mp4轉碼與m3u8成功,測試也能正常播放 (本影片僅測試使用)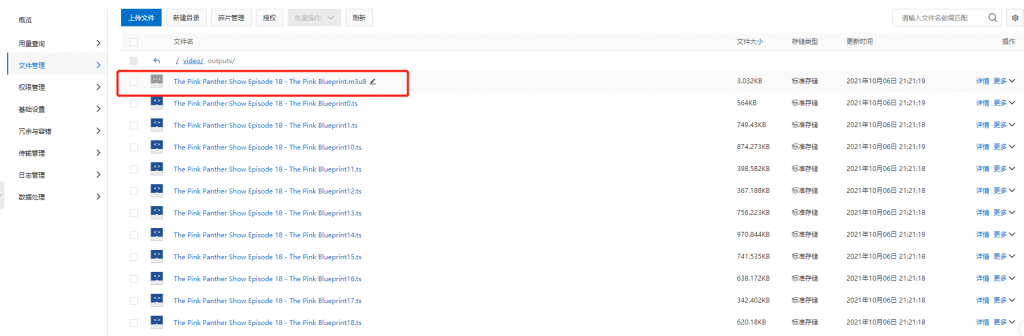
本篇的小應用就到這裡結束,對於經常需要使用影音串流的使用者可以透過FC快速完成轉碼工作並透過無伺服器特性不浪費使用資源,而運用FC能夠讓開發者集思廣益建立更多發揮創意的應用!