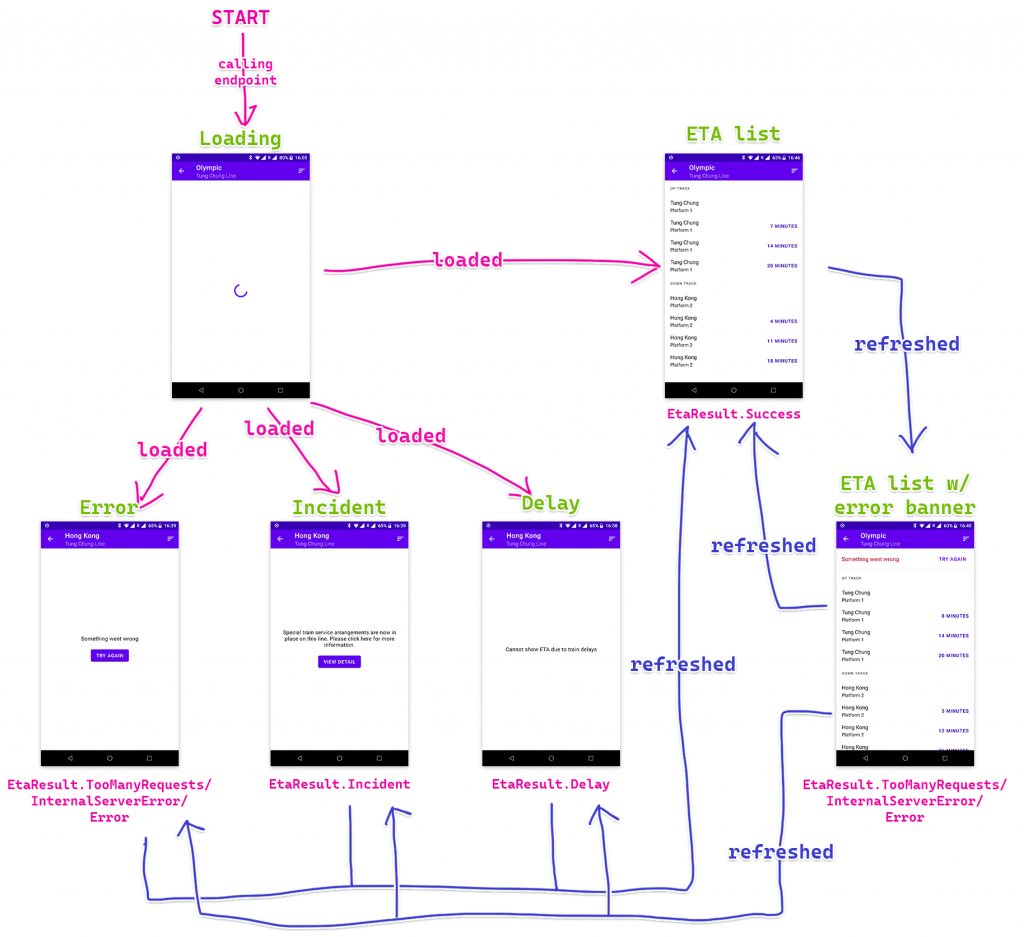
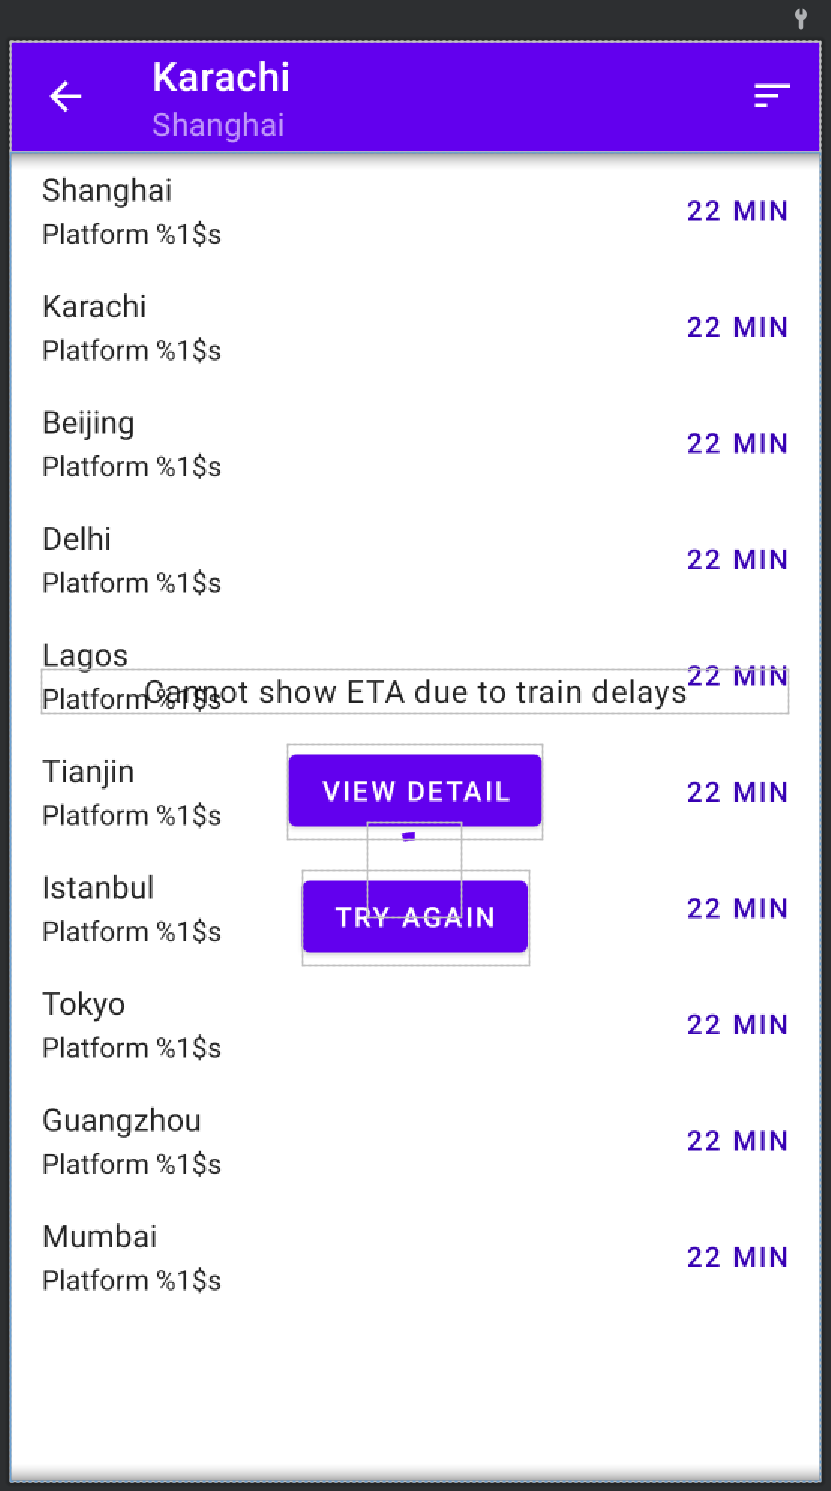
現在來到整個 app 最重要的頁面:抵站時間頁。這個頁面基本上都是跟上一頁一樣,都是以 RecyclerView 為主。但因為這次的內容要從 API server 取得,即是說我們需要處理載入中、載入成功和載入失敗三個情景。當中載入成功時更要細分為顯示班次、事故和延誤三個情景。情況好像有點複雜,我們先看看各情景時的畫面:

大致上可以分為兩部分:首次成功載入前和首次成功載入後。在首次成功載入前我們要全頁顯示載入中和各式錯誤畫面,但在首次成功載入後我們就盡量停留在班次畫面,如果是不能連接互聯網這類普通錯誤類型的話我們就在頁頂顯示一個 banner,下方就維持顯示之前成功載入的班次資料。但如果是出現事故和延誤的話那就不適宜顯示之前載入的班次,因為很可能都不正確,所以就全頁顯示錯誤。我們會在每次 call 完 API endpoint 後隔一段時間再 call 一次 API endpoint 更新內容,這樣用戶就不用刻意手動更新。
現在我們就先實作 RecyclerView 的部分。做法其實跟之前都是差不多,還是分為行車方向和班次兩個 view type。
跟上次一樣,我們都是會建立供 adapter 專用的 sealed interface 來表示顯示的 list item。留意我們不會把上下行標題 String 直接放進去,因為要避免 configuration change 後仍然顯示未切換語言前的文字。另外,因為 Header 只有一個 property,我們可以轉用 value class。
Value class 以前是叫做 inline class,本身設計的用途是用來明確標明那個 parameter 的意義。Kotlin 的 Duration 本身都是 value class。在定義 value class 時是需要加上 @JvmInline。我們看看下面的例子,原本 getProduct 的參數是 Int,但 Int 的意義不夠明顯。我們可以開一個 value class ProductId 做這個 parameter 的 type。這樣要 call getProduct 就要特別地「instantiate」一個 ProductId,那用家就一定知道這個數字是 product ID 而不是 user ID 之類的東西。留意 value class 在 compile 的時候會盡量拆走那個 type,所以 compile 後的 getProduct 參數最終只會變成 Int,這樣就不用擔心額外的開銷。但如果你做了好幾個放 Int 的 value class 然後又用 when 去判斷那個是不是 ProductId 的話,Kotlin compiler 就只會把那些 variable 的 type 變回普通 Java class 般(因為不可能拿着幾個 Int variable 就可以分辨到是那個 value class)。
// 原本的寫法
fun getProduct(productId: Int): Product

// 用了 value class 的寫法
fun getProduct(productId: ProductId): Product

@JvmInline
value class ProductId(val id: Int)
sealed interface EtaListItem {
    @JvmInline
    value class Header(val direction: EtaResult.Success.Eta.Direction) : EtaListItem

    data class Eta(
        val direction: EtaResult.Success.Eta.Direction,
        val destination: Station,
        val platform: String,
        val minuteCountdown: Int,
    ) : EtaListItem

    object DiffCallback : DiffUtil.ItemCallback<EtaListItem>() {
        override fun areItemsTheSame(oldItem: EtaListItem, newItem: EtaListItem): Boolean =
            when {
                oldItem is Header && newItem is Header -> oldItem.direction == newItem.direction
                oldItem is Eta && newItem is Eta -> oldItem == newItem
                else -> false
            }

        override fun areContentsTheSame(
            oldItem: EtaListItem,
            newItem: EtaListItem
        ): Boolean = when {
            oldItem is Header && newItem is Header -> oldItem == newItem
            oldItem is Eta && newItem is Eta -> oldItem == newItem
            else -> false
        }
    }
}
由於每筆班次都沒有 ID,我們惟有直接寫 oldItem == newItem。
首先是行車方向的 layout XML (eta_list_header_item.xml):
<com.google.android.material.textview.MaterialTextView xmlns:android="http://schemas.android.com/apk/res/android"
    xmlns:tools="http://schemas.android.com/tools"
    android:layout_width="match_parent"
    android:layout_height="48dp"
    android:ellipsize="end"
    android:gravity="center_vertical|start"
    android:maxLines="1"
    android:paddingStart="16dp"
    android:paddingEnd="16dp"
    android:textAlignment="viewStart"
    android:textAppearance="?textAppearanceOverline"
    tools:text="@string/up_track" />

對應的 HeaderViewHolder:
class HeaderViewHolder(
    private val binding: EtaListHeaderItemBinding,
) : RecyclerView.ViewHolder(binding.root) {
    fun bind(header: EtaListItem.Header) {
        binding.root.text = binding.root.resources.getString(
            when (header.direction) {
                EtaResult.Success.Eta.Direction.UP -> R.string.up_track
                EtaResult.Success.Eta.Direction.DOWN -> R.string.down_track
            }
        )
    }
}
這次我們直接用 view binding 而不是 data binding,因為它只有一個 TextView 沒有其他東西,寫的 code 份量跟用 data binding 還是差不多。
然後是班次的部分,先看看 layout XML (eta_list_eta_item.xml):
<?xml version="1.0" encoding="utf-8"?>
<layout xmlns:android="http://schemas.android.com/apk/res/android"
    xmlns:app="http://schemas.android.com/apk/res-auto"
    xmlns:tools="http://schemas.android.com/tools">

    <data>

        <variable
            name="eta"
            type="net.swiftzer.etademo.presentation.eta.EtaListItem.Eta" />

        <variable
            name="presenter"
            type="net.swiftzer.etademo.presentation.stationlist.LineStationPresenter" />
    </data>

    <androidx.constraintlayout.widget.ConstraintLayout
        android:layout_width="match_parent"
        android:layout_height="wrap_content">

        <androidx.constraintlayout.widget.Guideline
            android:id="@+id/startGuideline"
            android:layout_width="wrap_content"
            android:layout_height="wrap_content"
            android:orientation="vertical"
            app:layout_constraintGuide_begin="16dp" />

        <androidx.constraintlayout.widget.Guideline
            android:id="@+id/endGuideline"
            android:layout_width="wrap_content"
            android:layout_height="wrap_content"
            android:orientation="vertical"
            app:layout_constraintGuide_end="16dp" />

        <com.google.android.material.textview.MaterialTextView
            android:id="@+id/destination"
            android:layout_width="0dp"
            android:layout_height="wrap_content"
            android:layout_marginTop="8dp"
            android:layout_marginEnd="16dp"
            android:ellipsize="end"
            android:maxLines="1"
            android:text="@{presenter.mapStation(eta.destination)}"
            android:textAlignment="viewStart"
            android:textAppearance="?textAppearanceListItem"
            app:layout_constraintEnd_toStartOf="@+id/countdown"
            app:layout_constraintStart_toStartOf="@id/startGuideline"
            app:layout_constraintTop_toTopOf="parent"
            app:layout_goneMarginEnd="0dp"
            tools:text="@tools:sample/cities" />

        <com.google.android.material.textview.MaterialTextView
            android:id="@+id/platform"
            android:layout_width="0dp"
            android:layout_height="wrap_content"
            android:layout_marginTop="2dp"
            android:layout_marginEnd="16dp"
            android:layout_marginBottom="8dp"
            android:ellipsize="end"
            android:maxLines="1"
            android:text="@{@string/platform(eta.platform)}"
            android:textAlignment="viewStart"
            android:textAppearance="?textAppearanceListItemSecondary"
            app:layout_constraintBottom_toBottomOf="parent"
            app:layout_constraintEnd_toStartOf="@+id/countdown"
            app:layout_constraintStart_toStartOf="@id/startGuideline"
            app:layout_constraintTop_toBottomOf="@id/destination"
            app:layout_goneMarginEnd="0dp"
            tools:text="@string/platform" />

        <com.google.android.material.textview.MaterialTextView
            android:id="@+id/countdown"
            isVisible="@{eta.minuteCountdown > 0}"
            android:layout_width="wrap_content"
            android:layout_height="wrap_content"
            android:ellipsize="end"
            android:maxLines="1"
            android:text="@{@plurals/countdown_minute(eta.minuteCountdown, eta.minuteCountdown)}"
            android:textAlignment="viewEnd"
            android:textAppearance="?textAppearanceButton"
            android:textColor="@color/purple_700"
            app:layout_constraintBottom_toBottomOf="parent"
            app:layout_constraintEnd_toEndOf="@id/endGuideline"
            app:layout_constraintTop_toTopOf="parent"
            tools:text="22 min" />

    </androidx.constraintlayout.widget.ConstraintLayout>
</layout>
在 countdown 我們用了 @plurals/countdown_minute 的 quantity string resource。括號的兩個參數其實就是跟 getQuantityString 一樣。

class EtaViewHolder(
    lifecycleOwner: LifecycleOwner,
    private val binding: EtaListEtaItemBinding,
    presenter: LineStationPresenter,
) : RecyclerView.ViewHolder(binding.root) {
    init {
        binding.lifecycleOwner = lifecycleOwner
        binding.presenter = presenter
    }

    fun bind(eta: EtaListItem.Eta) {
        binding.eta = eta
    }
}
然後是對應的 EtaViewHolder,由於我們用了 data binding,所以裏面只有設定 data binding 的 code。
接下來就是 ListAdapter 的部分,同樣地都是跟上一頁的差不多。
class EtaListAdapter(
    lifecycleOwner: LifecycleOwner,
    presenter: LineStationPresenter,
) : ListAdapter<EtaListItem, RecyclerView.ViewHolder>(EtaListItem.DiffCallback) {
    private val lifecycleOwner = WeakReference(lifecycleOwner)
    private val presenter = WeakReference(presenter)

    override fun onCreateViewHolder(parent: ViewGroup, viewType: Int): RecyclerView.ViewHolder {
        val inflater = LayoutInflater.from(parent.context)
        return when (viewType) {
            R.layout.eta_list_header_item -> HeaderViewHolder(
                binding = EtaListHeaderItemBinding.inflate(inflater, parent, false),
            )
            R.layout.eta_list_eta_item -> EtaViewHolder(
                lifecycleOwner = requireNotNull(lifecycleOwner.get()),
                binding = EtaListEtaItemBinding.inflate(inflater, parent, false),
                presenter = requireNotNull(presenter.get()),
            )
            else -> throw UnsupportedOperationException("Unsupported view type $viewType")
        }
    }

    override fun getItemViewType(position: Int): Int = when (getItem(position)) {
        is EtaListItem.Header -> R.layout.eta_list_header_item
        is EtaListItem.Eta -> R.layout.eta_list_eta_item
    }

    override fun onBindViewHolder(holder: RecyclerView.ViewHolder, position: Int) {
        when (val item = getItem(position)) {
            is EtaListItem.Header -> (holder as HeaderViewHolder).bind(item)
            is EtaListItem.Eta -> (holder as EtaViewHolder).bind(item)
        }
    }
}
準備好 RecyclerView 的東西後,我們可以準備頁面的東西。
這頁的 layout XML 主要會放顯示班次的 RecyclerView、表示載入中的 CircularProgressIndicator 和顯示錯誤的 NestedScrollView,那個顯示在 RecyclerView 上方的 banner 會在之後補上。由於普通錯誤、延誤和事故三款錯誤所顯示的 UI 幾乎完全相同,我們會共用 NestedScrollView 入面的 view。
下面是 eta_fragment.xml 的內容:
<?xml version="1.0" encoding="utf-8"?>
<layout xmlns:android="http://schemas.android.com/apk/res/android"
    xmlns:app="http://schemas.android.com/apk/res-auto"
    xmlns:tools="http://schemas.android.com/tools">

    <data>

        <variable
            name="viewModel"
            type="net.swiftzer.etademo.presentation.eta.EtaViewModel" />

        <variable
            name="lineStationPresenter"
            type="net.swiftzer.etademo.presentation.stationlist.LineStationPresenter" />

        <variable
            name="etaPresenter"
            type="net.swiftzer.etademo.presentation.eta.EtaPresenter" />
    </data>

    <androidx.coordinatorlayout.widget.CoordinatorLayout
        android:layout_width="match_parent"
        android:layout_height="match_parent">

        <com.google.android.material.appbar.AppBarLayout
            android:layout_width="match_parent"
            android:layout_height="wrap_content">

            <com.google.android.material.appbar.MaterialToolbar
                android:id="@+id/topAppBar"
                style="@style/Widget.MaterialComponents.Toolbar.Primary"
                android:layout_width="match_parent"
                android:layout_height="?attr/actionBarSize"
                app:menu="@menu/eta"
                app:navigationIcon="@drawable/ic_baseline_arrow_back_24"
                app:navigationOnClickListener="@{() -> viewModel.goBack()}"
                app:subtitle="@{lineStationPresenter.mapLine(viewModel.line)}"
                app:title="@{lineStationPresenter.mapStation(viewModel.station)}"
                tools:subtitle="@tools:sample/cities"
                tools:title="@tools:sample/cities" />
        </com.google.android.material.appbar.AppBarLayout>

        <androidx.recyclerview.widget.RecyclerView
            android:id="@+id/recyclerView"
            isVisible="@{viewModel.showEtaList}"
            android:layout_width="match_parent"
            android:layout_height="match_parent"
            app:layout_behavior="@string/appbar_scrolling_view_behavior"
            tools:listitem="@layout/eta_list_eta_item" />

        <androidx.core.widget.NestedScrollView
            isVisible="@{viewModel.showError}"
            android:layout_width="match_parent"
            android:layout_height="match_parent"
            android:fillViewport="true"
            app:layout_behavior="@string/appbar_scrolling_view_behavior">

            <LinearLayout
                android:layout_width="match_parent"
                android:layout_height="match_parent"
                android:gravity="center"
                android:orientation="vertical"
                android:padding="16dp">

                <com.google.android.material.textview.MaterialTextView
                    android:layout_width="match_parent"
                    android:layout_height="wrap_content"
                    android:text="@{etaPresenter.mapErrorMessage(viewModel.errorResult)}"
                    android:textAlignment="center"
                    android:textAppearance="?textAppearanceBody1"
                    tools:text="@string/delay" />

                <com.google.android.material.button.MaterialButton
                    isVisible="@{viewModel.showViewDetail}"
                    android:layout_width="wrap_content"
                    android:layout_height="wrap_content"
                    android:layout_marginTop="16dp"
                    android:onClick="@{() -> viewModel.viewIncidentDetail()}"
                    android:text="@string/incident_cta" />

                <com.google.android.material.button.MaterialButton
                    isVisible="@{viewModel.showTryAgain}"
                    android:layout_width="wrap_content"
                    android:layout_height="wrap_content"
                    android:layout_marginTop="16dp"
                    android:onClick="@{() -> viewModel.refresh()}"
                    android:text="@string/try_again" />
            </LinearLayout>
        </androidx.core.widget.NestedScrollView>

        <com.google.android.material.progressindicator.CircularProgressIndicator
            isVisible="@{viewModel.showLoading}"
            android:layout_width="wrap_content"
            android:layout_height="wrap_content"
            android:layout_gravity="center"
            android:indeterminate="true"
            app:layout_behavior="@string/appbar_scrolling_view_behavior" />
    </androidx.coordinatorlayout.widget.CoordinatorLayout>
</layout>

MaterialToolbar 入面有一個切換班次排序的 menu item,下面是 menu resource XML:
<?xml version="1.0" encoding="utf-8"?>
<menu xmlns:android="http://schemas.android.com/apk/res/android"
    xmlns:app="http://schemas.android.com/apk/res-auto">

    <item
        android:id="@+id/changeSorting"
        android:icon="@drawable/ic_baseline_sort_24"
        android:title="@string/change_sorting"
        app:showAsAction="ifRoom" />
</menu>
EtaFragment我們這次會先做成功顯示班次的情景,所以其他地方會留待之後的篇章討論。EtaFragment 主要的工作是初始化 layout XML data binding、因應 EtaViewModel 外露的 Flow 來更新 RecyclerView 內容和處理用戶按下返回鍵時的轉頁導航。
在 onViewCreated 入面有一句 viewModel.setLanguage 用來通知 EtaViewModel 當前語言。要從 EtaFragment 取得當前語言而非由 EtaViewModel 經 constructor 取得 Application Context 然後取得當前語言是因為 ViewModel 能夠在 configuration change 後生存(即是在 configuration change 後都能經 ViewModelProvider 取得同一個 ViewModel instance),這亦都是 ViewModel 只能用 Application Context 而非 Activity Context 的原因(因為 Activity 會在 configuration change 後 instantiate 一個新的 instance,如果 ViewModel 持有 Activity 的 instance 會在 configuration change 後 leak Activity 。)回到當前語言的問題,由於 EtaViewModel 在 instantiate 時就拿到 Application Context,那個 Context 在 configuration change 後就不能反映到當前用戶所選的語言,要取得用戶最新選用的語言就要靠 Activity 或 Fragment 的 resources.configuration 取得。這亦解釋了為甚麼我們不會在 ViewModel call resources.getString 這類 method。如果你的 app 本身有強行更改 app locale 的話你應該會儲存用戶想看的語言,這樣你可以在 use case constructor injection 取得語言設定而不用經 Activity 或 Fragment。
EtaPresenter 是用來協助顯示錯誤文字,由於目前我們現在先處理成功的情景,我們暫時略過這部分。
而 onCreate 我們用了 onBackPressedDispatcher 攔截用戶 back button 的原因是為了統一返回的處理。之前在 layout XML 我們按 MaterialToolbar 的返回按鈕會 call EtaViewModel 的 goBack 處理,然後 EtaViewModel 會觸發 navigateBack 的 Flow 發射一個訊號讓 EtaFragment 導航。如果不加攔截的話用戶按系統的 back button 就不會繞經這個流程,日後想更改返回的流程就要額外花時間理解為甚麼按上方的 back button 跟下方系統的 back button 會有不同效果。
@AndroidEntryPoint
class EtaFragment : Fragment() {
    private val viewModel by viewModels<EtaViewModel>()
    private var _binding: EtaFragmentBinding? = null
    private val binding: EtaFragmentBinding get() = _binding!!
    private var _adapter: EtaListAdapter? = null
    private val adapter: EtaListAdapter get() = _adapter!!

    @Inject
    lateinit var lineStationPresenter: LineStationPresenter

    @Inject
    lateinit var etaPresenter: EtaPresenter

    override fun onCreate(savedInstanceState: Bundle?) {
        super.onCreate(savedInstanceState)
        requireActivity().onBackPressedDispatcher.addCallback(this, true) {
            viewModel.goBack()
        }
    }

    override fun onCreateView(
        inflater: LayoutInflater,
        container: ViewGroup?,
        savedInstanceState: Bundle?
    ): View {
        _binding = EtaFragmentBinding.inflate(inflater, container, false)
        binding.lifecycleOwner = viewLifecycleOwner
        binding.viewModel = viewModel
        binding.lineStationPresenter = lineStationPresenter
        binding.etaPresenter = etaPresenter
        return binding.root
    }

    override fun onViewCreated(view: View, savedInstanceState: Bundle?) {
        super.onViewCreated(view, savedInstanceState)
        viewModel.setLanguage(resources.configuration.appLanguage)

        binding.topAppBar.setOnMenuItemClickListener {
            when (it.itemId) {
                R.id.changeSorting -> {
                    viewModel.toggleSorting()
                    true
                }
                else -> false
            }
        }

        _adapter = EtaListAdapter(
            lifecycleOwner = viewLifecycleOwner,
            presenter = lineStationPresenter,
        )
        with(binding.recyclerView) {
            layoutManager = LinearLayoutManager(requireContext())
            adapter = this@EtaFragment.adapter
        }

        observeViewModel()
    }

    private fun observeViewModel() {
        viewLifecycleOwner.lifecycleScope.launch {
            viewLifecycleOwner.repeatOnLifecycle(Lifecycle.State.STARTED) {
                viewModel.navigateBack.collect {
                    findNavController().popBackStack()
                }
            }
        }
        viewLifecycleOwner.lifecycleScope.launch {
            viewLifecycleOwner.repeatOnLifecycle(Lifecycle.State.STARTED) {
                viewModel.etaList.collect {
                    adapter.submitList(it)
                }
            }
        }
    }

    override fun onDestroyView() {
        super.onDestroyView()
        binding.recyclerView.adapter = null
        _adapter = null
        _binding = null
    }
}
EtaViewModel最後來到 EtaViewModel 的部分,部分 code 放了 TODO() 是因為這些部分會留待之後講解。
import java.time.Duration as JavaDuration

@HiltViewModel
class EtaViewModel @Inject constructor(
    private val savedStateHandle: SavedStateHandle,
    private val clock: Clock,
    private val getEta: GetEtaUseCase,
) : ViewModel() {
    private val args by navArgs<EtaFragmentArgs>(savedStateHandle)
    private val language = MutableStateFlow(Language.ENGLISH)
    private val sortedBy = savedStateHandle.getLiveData(SORT_BY, 0).asFlow()
        .map { GetEtaUseCase.SortBy.values()[it] }
    val line: StateFlow<Line> = MutableStateFlow(args.line)
    val station: StateFlow<Station> = MutableStateFlow(args.station)
    private val _navigateBack = Channel<Unit>(Channel.BUFFERED)
    val navigateBack: Flow<Unit> = _navigateBack.receiveAsFlow()
    private val triggerRefresh = Channel<Unit>(Channel.BUFFERED)
    private val etaResult: StateFlow<Loadable<EtaResult>> = combineTransform(
        language,
        line,
        station,
        sortedBy,
        triggerRefresh.receiveAsFlow(),
    ) { language, line, station, sortedBy, _ ->
        emit(Loadable.Loading)
        emit(Loadable.Loaded(getEta(language, line, station, sortedBy)))
    }.stateIn(
        scope = viewModelScope,
        started = SharingStarted.WhileSubscribed(STATE_FLOW_STOP_TIMEOUT_MILLIS),
        initialValue = Loadable.Loading,
    )
    private val loadedEtaResult = etaResult.filterIsInstance<Loadable.Loaded<EtaResult>>()
        .map { it.value }
    val showLoading: StateFlow<Boolean> = etaResult
        .map { it == Loadable.Loading }
        .stateIn(
            scope = viewModelScope,
            started = SharingStarted.WhileSubscribed(STATE_FLOW_STOP_TIMEOUT_MILLIS),
            initialValue = true,
        )
    val showError: StateFlow<Boolean> = TODO()
    val showViewDetail: StateFlow<Boolean> = TODO()
    val showTryAgain: StateFlow<Boolean> = TODO()
    val errorResult: StateFlow<EtaFailResult> = TODO()
    val showEtaList = etaResult
        .map { it is Loadable.Loaded && it.value is EtaResult.Success }
        .stateIn(
            scope = viewModelScope,
            started = SharingStarted.WhileSubscribed(STATE_FLOW_STOP_TIMEOUT_MILLIS),
            initialValue = false,
        )
    val etaList = loadedEtaResult
        .filterIsInstance<EtaResult.Success>()
        .map { it.schedule }
        .combine(sortedBy) { schedule, sortedBy ->
            sequence {
                var lastDirection: EtaResult.Success.Eta.Direction? = null
                schedule.forEach {
                    if (lastDirection != it.direction && sortedBy == GetEtaUseCase.SortBy.DIRECTION) {
                        yield(EtaListItem.Header(it.direction))
                    }
                    yield(
                        EtaListItem.Eta(
                            direction = it.direction,
                            destination = it.destination,
                            platform = it.platform,
                            minuteCountdown = JavaDuration.between(clock.instant(), it.time)
                                .toMinutes()
                                .toInt()
                        )
                    )
                    lastDirection = it.direction
                }
            }.toList()
        }
        .stateIn(
            scope = viewModelScope,
            started = SharingStarted.WhileSubscribed(STATE_FLOW_STOP_TIMEOUT_MILLIS),
            initialValue = emptyList(),
        )
    private val _viewIncidentDetail = Channel<String>(Channel.BUFFERED)
    val viewIncidentDetail: Flow<String> = _viewIncidentDetail.receiveAsFlow()

    init {
        viewModelScope.launch {
            triggerRefresh.send(Unit)
        }
    }

    fun setLanguage(language: Language) {
        this.language.value = language
    }

    fun goBack() {
        viewModelScope.launch {
            _navigateBack.send(Unit)
        }
    }

    fun toggleSorting() {
        TODO()
    }

    fun refresh() {
        TODO()
    }

    fun viewIncidentDetail() {
        TODO()
    }
}
我們先看看 etaResult,我們用了 combineTransform 把 language(語言)、line(路綫)、station(車站)、sortedBy(排序)、triggerRefresh(觸發重新載入)整合在一起然後 call API endpoint(即是 GetEtaUseCase)。除了 triggerRefresh 之外,其餘的都是因為 GetEtaUseCase 需要用到才要加進入 combineTransform。而把 triggerRefresh 加進去只是單純想觸發它 call use case,這樣我們就可以一直使用同一個上游不用因為每次 call API 更新就要切換一個全新的 Flow。在 combineTransform 我們會用 emit 來發射最新的 value 去下游。在這裏我們先發射 Loadable.Loading 好讓我們在 UI 能顯示載入中的畫面。而之後的 emit 就會等待 getEta return 回來後才會發射實際結果。這個寫法會令每次 triggerRefresh 有東西被放進去後 etaResult 都會先發射載入中然後才發射實際 API 回傳結果。而最後轉成 StateFlow 就能讓下游(即是其餘在 data binding 用到的 StateFlow 和 etaList)每次有人 collect 時都不用再 call endpoint。而在 init 我們為了一進入這頁就 call API,所以就加了一句 triggerRefresh.send(Unit) 來觸發第一次的 API call。
接着就是 loadedEtaResult,它只是用來方便寫之後的 Flow,因為有好幾個 Flow 都會載入後的值才能繼續。
然後就是顯示 RecyclerView 的部分。showEtaList 就是控制 RecyclerView 是不是可見,所以就要檢查是不是已收到 API 成功的結果。另外一個 Flow 是 etaList,很明顯就是提供 RecyclerView 要顯示的內容。這個我們要取得 EtaResult.Success.schedule(班次)和 sortedBy(排序方式)來準備那個 List。在 combine 內有一個 sequence { ... }.toList() 的 block,其實我只是借 Sequence 來生成一個 List。因為 buildList 現在仍是 experimental,如果不想 opt-in 去用這些 API 的話就找了 sequence 來代替。跟上面的 combineTransform 有點似,sequence 都有 yield 來提供元素放進去 Sequence 內。整段 code 的大意是:如果是按方向排序的話,那就在方向開首加插一個標題(因為 EtaResult.Success.schedule 已經按方向排序好,所以我們會留意 EtaResult.Success.schedule 的 direction 跟上一筆是否不同就知道要不要加插標題);如果是按時間排序就直接生成 EtaListItem.Eta 就可以了。在轉換成供 adapter 使用的 EtaListItem.Eta 我們會把 Instant 換算成分鐘。那個 JavaDuration 是 java.time.Duration,幫它改名是因為之後我們會同時用到 Java 的 Duration 和 Kotlin 的 Duration,為免混淆我們就把它改名。
至於 goBack 就是處理用戶返回上一頁的動作,由於我們沒有特別的東西要做,所以就直接向 _navigateBack Channel 發送一個 Unit 就可以了,另外會提供一個 navigateBack 的 Flow 讓 Fragment 接收。同時做 private 的 Channel 跟 public 的 Flow 意義在於 Channel 本身就可以讓人放東西進去,在 ViewModel 我們應該只開放指定的渠道供 Fragment 去通知 ViewModel。把 Channel 直接 public 出去 Fragment 那邊就可以直接繞過我們原先設計的機制,所以在很多 ViewModel 的示範都會同時出現 MutableLiveData 跟 LiveData、MutableStateFlow 跟 StateFlow 的組合,就是為了令 Fragment 那邊不能直接改變 value,要改變 value 就一定要經 ViewModel 指定 method 去改。習慣上如果出現這種組合的話,我們會把 private 那個 variable 前面加一個 underscore (_) 來分別 public 那一個。如果你能想到一個更好的命字就當然直接用另一個名字。分開 public/private 的好處是為日後功能有變動時留有空間,而且把 logic 保留在 ViewModel 內。
這次的內容比較長,這是因為我想盡量壓縮篇數來寫其他內容。現在我們已經做了最基本顯示成功載入班次的部分。下一篇我們會暫時轉一轉題目,然後才繼續餘下的部分。
本篇我們看了用 combine 和 combineTransform 把多個 Flow 匯合成一個新的 Flow,以往用 LiveData 我們要自己 extend MediatorLiveData 才能做到的東西現在轉用 Flow 就有現成的東西可以用。
完整的 code 可以在 GitHub repo 找到,不過會夾雜本篇未完成的部分,希望大家不要介意。
