我們在上一篇提到當影像放大或縮小時等同於映射到另一個函數,新函數(影像)的定義域裡每個點(像素)都會對應到原始函數的某處。
org_x = new_x * (org_width/new_width)
org_y = new_y * (org_height/new_height)
當3x3的影像F(x, y)放大為4x4的影像Q(x, y)時,Q(1, 2)對應到F(x=1(3/4), y=2(3/4)) = F(0.75, 1.5),最近鄰插值會直接取F(1, 2)的值代入F(0.75, 1.5)。但是這個方法並不聰明,因為F(0.75, 1.5)周圍有4個像素(DEGH),考量這4個像素加權的影響一定會比單考慮最接近的1個像素來得合理。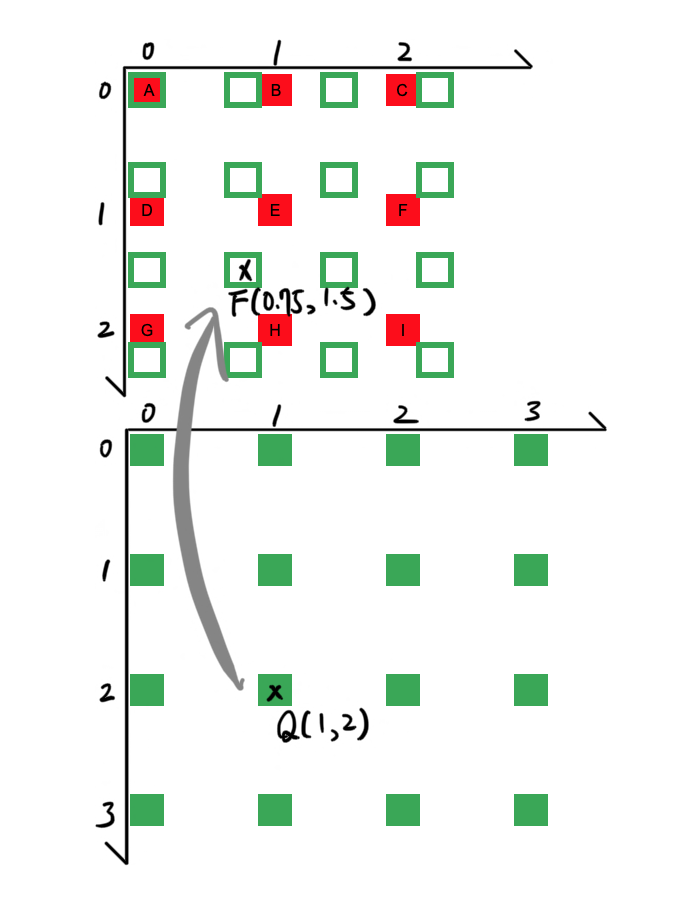
我們可以用線性插值(Linear interpolation)來推算兩點之間任一點的值,假設F(x, y)周圍的4個像素為F(x0, y0),F(x0, y1),F(x1, y0)及F(x1, y1)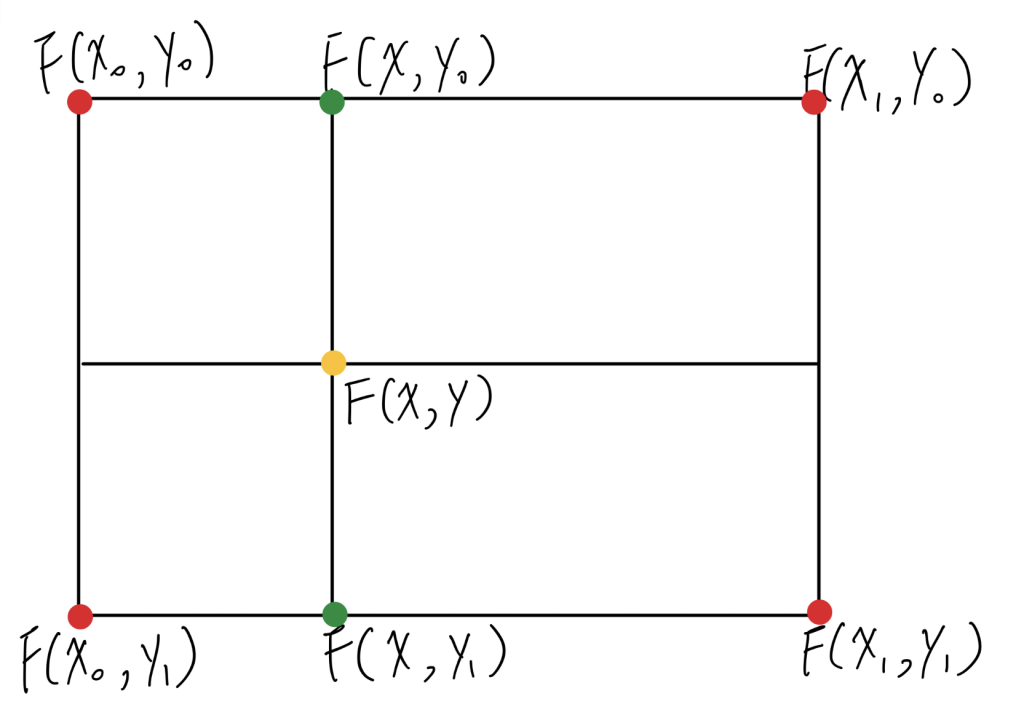
先計算兩次線性插值得到F(x, y0)及F(x, y1)
F(x, y0) = F(x0, y0) * (x1-x) + (x1, y0) * (x-x0)
F(x, y1) = F(x0, y1) * (x1-x) + (x1, y1) * (x-x0)
再透過F(x, y0)及F(x, y1)線性插值得到F(x, y)
F(x, y) = F(x, y0) * (y1-y) + F(x, y1) * (y-y0)
雙線性插值就是透過運行上述3次線性插值所構成的方法。
def bilinear(org, new_shape):
    org_height, org_width = org.shape[:2]
    new_height, new_width = new_shape[:2]
    # Adjustment for suitable mapping.
    adj_height = 0.5 * (org_height/new_height-1)
    adj_width = 0.5 * (org_width/new_width-1)

    new = np.zeros(shape=new_shape, dtype=np.uint8)
    for new_x in range(new_width):
        for new_y in range(new_height):
            # Added adjustment.
            org_x = new_x * (org_width/new_width) + adj_width
            org_y = new_y * (org_height/new_height) + adj_height
            # To get the 4 near pixels.
            org_x0 = int(org_x)
            org_y0 = int(org_y)
            org_x1 = np.clip(org_x0+1, 0, org_width-1)
            org_y1 = np.clip(org_y0+1, 0, org_height-1)
            # Linear interpolation.
            v0 = (org_x1-org_x)*org[org_y0, org_x0, :] + (org_x-org_x0)*org[org_y0, org_x1, :]
            v1 = (org_x1-org_x)*org[org_y1, org_x0, :] + (org_x-org_x0)*org[org_y1, org_x1, :]
            v = (org_y1-org_y)*v0 + (org_y-org_y0)*v1

            new[new_y, new_x, :] = v.astype(np.uint8)
    return new
在放大2倍影像與最近鄰插值的比較可以看到,雙線性插值邊緣較為平順及自然,不像最近鄰插值鋸齒狀的邊緣與馬賽克的效果。因此雙線性插值也是一般應用程式或套件預設改變影像解析度的方法。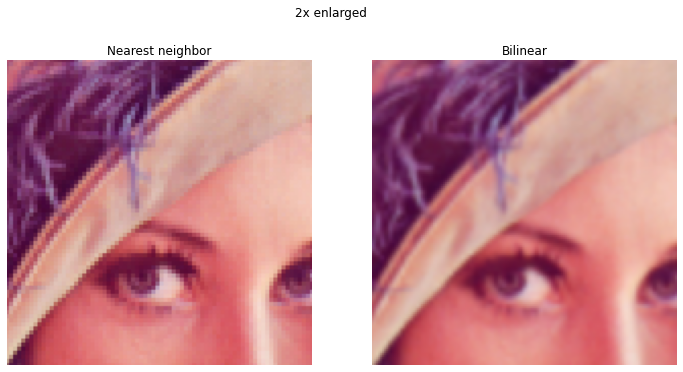
Google colab代碼演示:
https://colab.research.google.com/drive/1QjscKkLJL-Yb5DvdIQoJU2s8hsDiY8B4?usp=sharing