今天將完子彈的完整功能!
首先是要完成子彈,這是今天要用在標投檔裡的程式碼:
// ProjectileBase.h

// 在protected裡面添加
protected:

	virtual void Destroyed() override;

	UFUNCTION(Category = "Projectile")
	void OnProjectileHit(UPrimitiveComponent* HitComponent, AActor* OtherActor, UPrimitiveComponent* OtherComp, FVector NormalImpulse, const FHitResult& Hit);
接著是在子彈的.cpp裡要用的程式碼:
// ProjectileBase.cpp

// 在Beginplay中添加
BeginPlay()
{
	if(GetLocalRole() == ROLE_Authority)
		{
			SphereCollision->OnComponentHit.AddDynamic(this, &AProjectileBase::OnProjectileHit);
		}
}

// 實作Destroyed
Destroyed()
{
	FVector spawn_location = this->GetActorLocation();
	UGameplayStatics::SpawnEmitterAtLocation(this, ExplosionEffect, spawn_location, FRotator(0), true, EPSCPoolMethod::AutoRelease);
}

// 實作OnProjectileHit
OnProjectileHit(UPrimitiveComponent* HitComponent, AActor* OtherActor, UPrimitiveComponent* OtherComp, FVector Impulse, const FHitResult& Hit)
{
	if(OtherActor)
	{
		UGameplayStatics::ApplyPointDamage(OtherActor, Damage, Impulse, Hit, GetInstigator()->Controller, this, DamageType);
	}

	Destroy();
}
在這邊就將子彈的基本都完成了,接著要回到腳色裡面實現發射子彈。
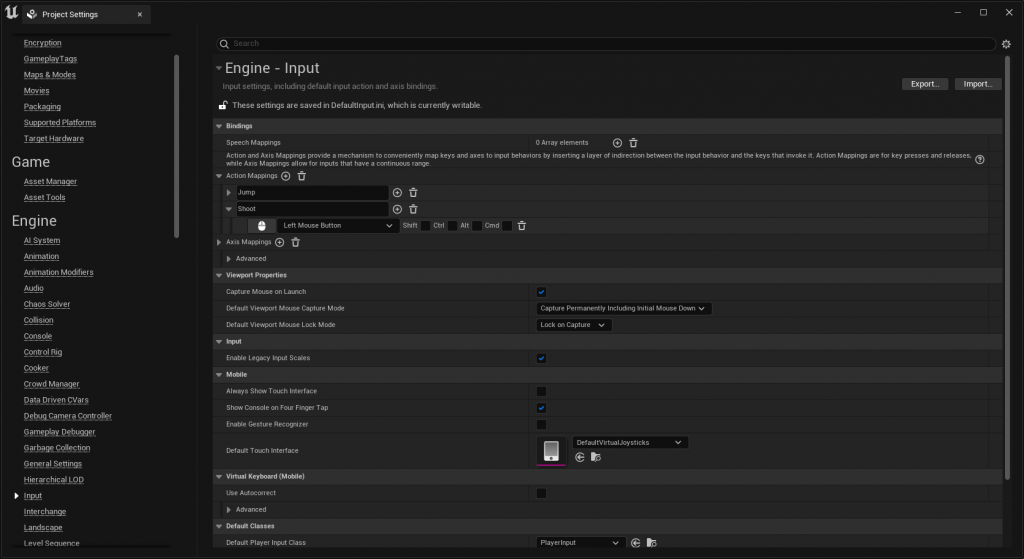
首先回到專案裡面設定操作按鈕,點選Edit然後進到Project Setting裡面,在左側列表找到Input然後在Action Mappings下面添加Shoot並設定為左滑鼠鍵。
接著開啟腳色的程式碼,這是要在標投檔裡新增的程式碼:
// NetworkDemoCharacter.h

// 在protected裡面添加
protected:

	UPROPERTY(EditDefaultsOnly, Category = "Projectile")
	TSubclassOf<AActor> Projectile;

	UPROPERTY(EditDefaultsOnly, Category = "Shoot")
	float ShootingRate;

	UFUNCTION(BlueprintCallable, Category = "Shoot")
	void Shooting();

	UFUNCTION(BlueprintCallable, Category = "Shoot")
	void StopShooting();

	UFUNCTION(Server, Reliable)
	void ControlShooting();

	bool bIsShooting;

	FTimerHandle ShootingTimer;
接著是.cpp檔中要添加的程式碼:
// NetworkDemoCharacter.cpp

// 在Constructor裡面添加
Constructor()
{
	ShootingRate = .2f;
	bIsShooting = false;
}

// 在SetupPlayerInputComponent裡面添加
SetupPlayerInputComponent()
{
	PlayerInputComponent->BindAction("Shoot", IE_Pressed, this, &ANetworkDemoCharacter::Shooting);
}

void ANetworkDemoCharacter::Shooting()
{
	if(!bIsShooting)
	{
		bIsShooting = true;
		UWorld* world = GetWorld();
		world->GetTimerManager().SetTimer(ShootingTimer, this, &ANetworkDemoCharacter::StopShooting, ShootingRate, false);
		ControlShooting();
	}
}

void ANetworkDemoCharacter::ControlShooting_Implementation()
{
		FVector current_location = this->GetActorLocation();
		FVector current_forward = this->GetActorForwardVector();

		FRotator current_rotation = this->GetControlRotation();
		FVector current_rotation_vector = this->GetControlRotation().Vector();

		FVector current_upvector = this->GetActorUpVector();
		FVector spawn_location = current_location + (current_rotation_vector * 100.f) + (current_upvector * 50.f);

		FActorSpawnParameters spawn_parameters;
		spawn_parameters.Instigator = this->GetInstigator();
		spawn_parameters.Owner = this;

		AActor* spawn_projectile = this->GetWorld()->SpawnActor<AActor>(Projectile, spawn_location, current_rotation, spawn_parameters);
}

void ANetworkDemoCharacter::StopShooting()
{
	bIsShooting = false;
}
上述都完成後就能回到專案中重新編譯,編譯成功後做一些基本的設定就可以來測試網路的功能。
首先打開Character在右邊可以找到Projectile的欄位,設定成我們自己創造的ProjectileBase_BP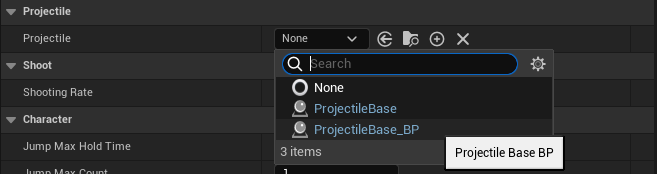
也可以看到下面有Shooting Rate讀者們可以自行調整,設定好之後點選左上角的編譯儲存。
打開開始模擬的設定選項將設定改成如下圖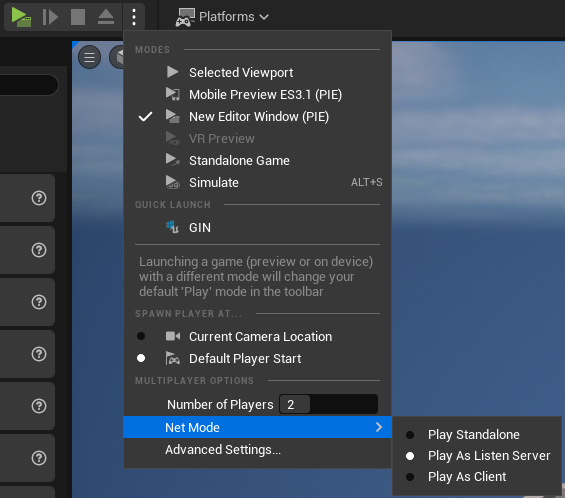
都設定完就可以開始執行遊戲,讀者會發現打開了兩個視窗並且腳色分別生成在一開始百在場景中的Player Start物件上,按下左鍵可以發射,當子彈碰撞到東西就會刪除並產生爆炸特效。
在OutputLog裡面可以看到我們設定的UE_LOG輸出的資訊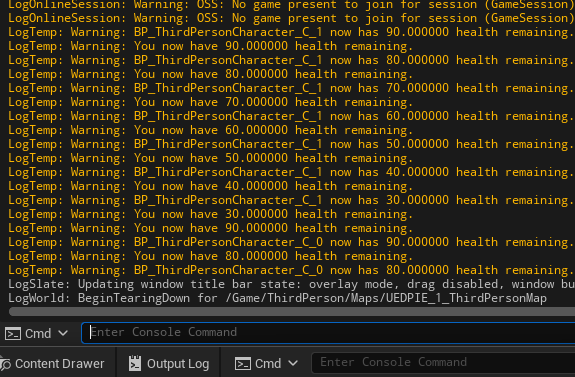
按下shift + F1就可選擇另一個視窗進行遊玩。


 iThome鐵人賽