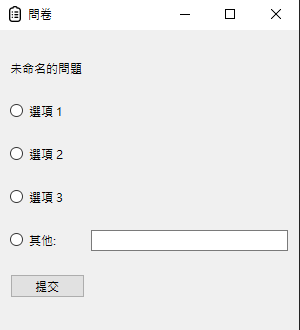
這次的 RadioButton 我們以 Google 表單裡的選擇題來當參考
首先要有表單名稱, 這個當作應用程式的名稱即可
接下來是問題名稱, 這個打算用 QLabel 達成
然後是三個 QRadioButton, 分別命名選項一, 選項二, 選項三
最後是一個 QRadioButton 名為其他, 但是後方連接一個文字輸入框 QLineEdit
在腦中想好要做出如何的程式後, 我們先開始來動工外觀吧!
import sys
from PySide6.QtWidgets import *
from PySide6.QtGui import *
from PySide6.QtCore import *

class MyWidget(QWidget):
    def __init__(self):
        super().__init__()
        layout = QGridLayout()
        self.setLayout(layout)
        label = QLabel("未命名的問題")
        label.setFixedHeight(20)
        layout.addWidget(label, 0, 0)
        tb = QRadioButton()
        tb.setText("選項 1")
        layout.addWidget(tb, 1, 0)
        tb = QRadioButton()
        tb.setText("選項 2")
        layout.addWidget(tb, 2, 0)
        tb = QRadioButton()
        tb.setText("選項 3")
        layout.addWidget(tb, 3, 0)
        tb = QRadioButton()
        tb.setText("其他: ")
        layout.addWidget(tb, 4, 0)
        edit = QLineEdit()
        layout.addWidget(edit, 4, 1)
        btn = QPushButton("提交")
        layout.addWidget(btn, 5, 0)

if __name__ == "__main__":
    app = QApplication([])
    QApplication.setApplicationName("問卷")
    QApplication.setWindowIcon(QIcon("icon\clipboard-list.png"))
    widget = MyWidget()
    widget.resize(300, 300)
    widget.show()

    sys.exit(app.exec())
來看看目前的長相
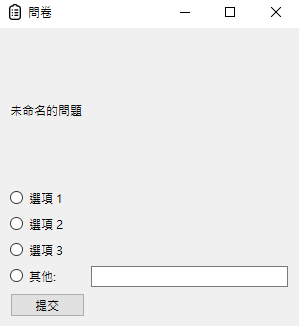
有點特別的是, 如果我不加上 label.setFixedHeight(20) 的話, 畫面會變成這樣
接下來我們由上往下一個一個把功能加上
我們先把其他這個選項先略過, 先從選項一二三開始, 這次希望達成的功能是, 再按下"提交"按鈕時, 按鈕右方能顯示選項裡內容
因為所有選項在按下"提交"按鈕後都會做同樣的動作, 所以在這裡我們用 QButtonGroup 把畫面上的 RadioButton 變成一個組, 這樣比較好一次處理
import sys
from PySide6.QtWidgets import *
from PySide6.QtGui import *
from PySide6.QtCore import *

class MyWidget(QWidget):
    def __init__(self):
        super().__init__()
        layout = QGridLayout()
        self.setLayout(layout)
        self.btnGroup = QButtonGroup(self)
        label = QLabel("未命名的問題")
        label.setFixedHeight(20)
        layout.addWidget(label, 0, 0)
        tb = QRadioButton()
        tb.setText("選項 1")
        layout.addWidget(tb, 1, 0)
        self.btnGroup.addButton(tb, 0)
        tb = QRadioButton()
        tb.setText("選項 2")
        layout.addWidget(tb, 2, 0)
        self.btnGroup.addButton(tb, 1)
        tb = QRadioButton()
        tb.setText("選項 3")
        layout.addWidget(tb, 3, 0)
        self.btnGroup.addButton(tb, 2)
        tb = QRadioButton()
        tb.setText("其他: ")
        layout.addWidget(tb, 4, 0)
        self.btnGroup.addButton(tb, 3)
        edit = QLineEdit()
        layout.addWidget(edit, 4, 1)
        btn = QPushButton("提交")
        btn.clicked.connect(self.showOption)
        layout.addWidget(btn, 5, 0)
        self.outputLabel = QLabel("")
        layout.addWidget(self.outputLabel, 5, 1)

    def showOption(self):
        for i in range(4):
            if self.btnGroup.button(i).isChecked():
                if i < 3:
                    self.outputLabel.setText(self.btnGroup.button(i).text())
                else:
                    self.outputLabel.setText("其他")

if __name__ == "__main__":
    app = QApplication([])
    QApplication.setApplicationName("問卷")
    QApplication.setWindowIcon(QIcon("icon\clipboard-list.png"))
    widget = MyWidget()
    widget.resize(300, 300)
    widget.show()

    sys.exit(app.exec())
途中展示
接下來就是選其他時, 其他後方文字輸入框的文字會顯示到"提交按鈕後方"
import sys
from PySide6.QtWidgets import *
from PySide6.QtGui import *
from PySide6.QtCore import *

class MyWidget(QWidget):
    def __init__(self):
        super().__init__()
        layout = QGridLayout()
        self.setLayout(layout)
        self.btnGroup = QButtonGroup(self)
        label = QLabel("未命名的問題")
        label.setFixedHeight(20)
        layout.addWidget(label, 0, 0)
        tb = QRadioButton()
        tb.setText("選項 1")
        layout.addWidget(tb, 1, 0)
        self.btnGroup.addButton(tb, 0)
        tb = QRadioButton()
        tb.setText("選項 2")
        layout.addWidget(tb, 2, 0)
        self.btnGroup.addButton(tb, 1)
        tb = QRadioButton()
        tb.setText("選項 3")
        layout.addWidget(tb, 3, 0)
        self.btnGroup.addButton(tb, 2)
        tb = QRadioButton()
        tb.setText("其他: ")
        layout.addWidget(tb, 4, 0)
        self.btnGroup.addButton(tb, 3)
        self.edit = QLineEdit()
        layout.addWidget(self.edit, 4, 1)
        btn = QPushButton("提交")
        btn.clicked.connect(self.showOption)
        layout.addWidget(btn, 5, 0)
        self.outputLabel = QLabel("")
        layout.addWidget(self.outputLabel, 5, 1)

    def showOption(self):
        for i in range(4):
            if self.btnGroup.button(i).isChecked():
                if i < 3:
                    self.outputLabel.setText(self.btnGroup.button(i).text())
                else:
                    self.outputLabel.setText(self.edit.text())

if __name__ == "__main__":
    app = QApplication([])
    QApplication.setApplicationName("問卷")
    QApplication.setWindowIcon(QIcon("icon\clipboard-list.png"))
    widget = MyWidget()
    widget.resize(300, 300)
    widget.show()

    sys.exit(app.exec())
展示
基本功能都有了, 明天我們來試試下一個功能吧~
