詳讀完 grid layout ,接下來要使用在專案中。除了呈現,我還要做出紀錄長按 item,並且記住 item index 的功能。
在建構頁面compose時,我會建立 screen 資料夾,這裡擺放一整個頁面的 composable。這麼做是為了提醒自己,這個composable 會紀錄整個頁面需要的 state,這個screen composable 用到的子 composable 依據情況必須使用到狀態提升,竟量讓子composable 是無狀態的。
composable 無狀態的好處有
建立 MainScreen() Composable。我會對照 flow 和 wirefram 先把這個頁面會做的功能寫上,以免遺漏。列出要做的事項可以用 TODO或是/****/ 如果是偏向說明 composable function 功能的部分我會用/****/ 做完一項功能回頭再來修正文件,如果是在 composable 中要注意的事項則會用 TODO 。
import androidx.compose.runtime.Composable

/**
 * 主頁面,展示所有記事。
 * 1. 以 Grid Layout 排列,Column 數 = 2。
 * 2. 記事 list 中的 card 可以長按、點擊。
 * 2.1 長按進入編輯模式
 * 2.1.1 編輯模式可以刪除
 * 2.1.2 編輯模式可以複製
 * 2.1.3 編輯模式可以移動在 list 中的順序
 * 2.2 點擊進入到單一記事頁面
 * 3. 懸浮按鈕可以新增記事
 * 4. 點選 search bar 進到 search 畫面
 * **/
@Composable
fun MainScreen() {

}
建立 LVG + TAB
columns 設為 GridCells.Fixed(2) 2 代表兩個欄位。
content = 去掉直接在尾部用 lambda { } 表示
@Composable
fun MainScreen() {
    LazyVerticalGrid(
        columns = GridCells.Fixed(2)
    ) {

    }
}
首先建立 listOf<Training>()
@Composable
fun MainScreen() {

    //  1.1 list code
    val trainingList = listOf<Training>()

    LazyVerticalGrid(
        columns = GridCells.Fixed(2) //1.
    ) {

    }
}
此時還沒有 Training 類別,用 alt+enter 選擇 Create class 讓IDE自動生成 class,減少打錯字的風險和時間。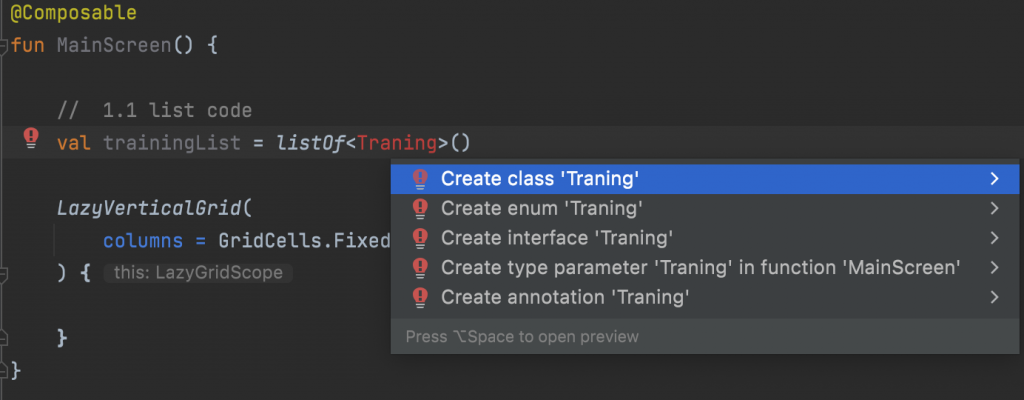
選擇 Traning 要提取的範圍 Extract to separate file 會另外建立 .kt 檔案。(如果將指標指向 MainScreen.kt 代表在該檔案下建立 class 檔案,IDE會反選出提取的範圍)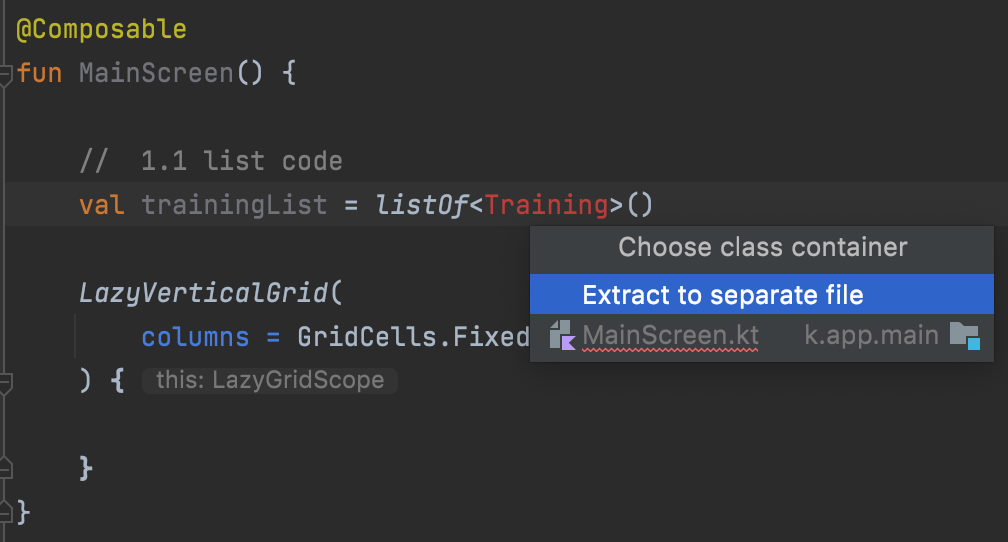
選取資料夾,因為我打算建立 data class 來傳遞資料,所以預先建立了資料夾 entity,這裏擺放所有的物件。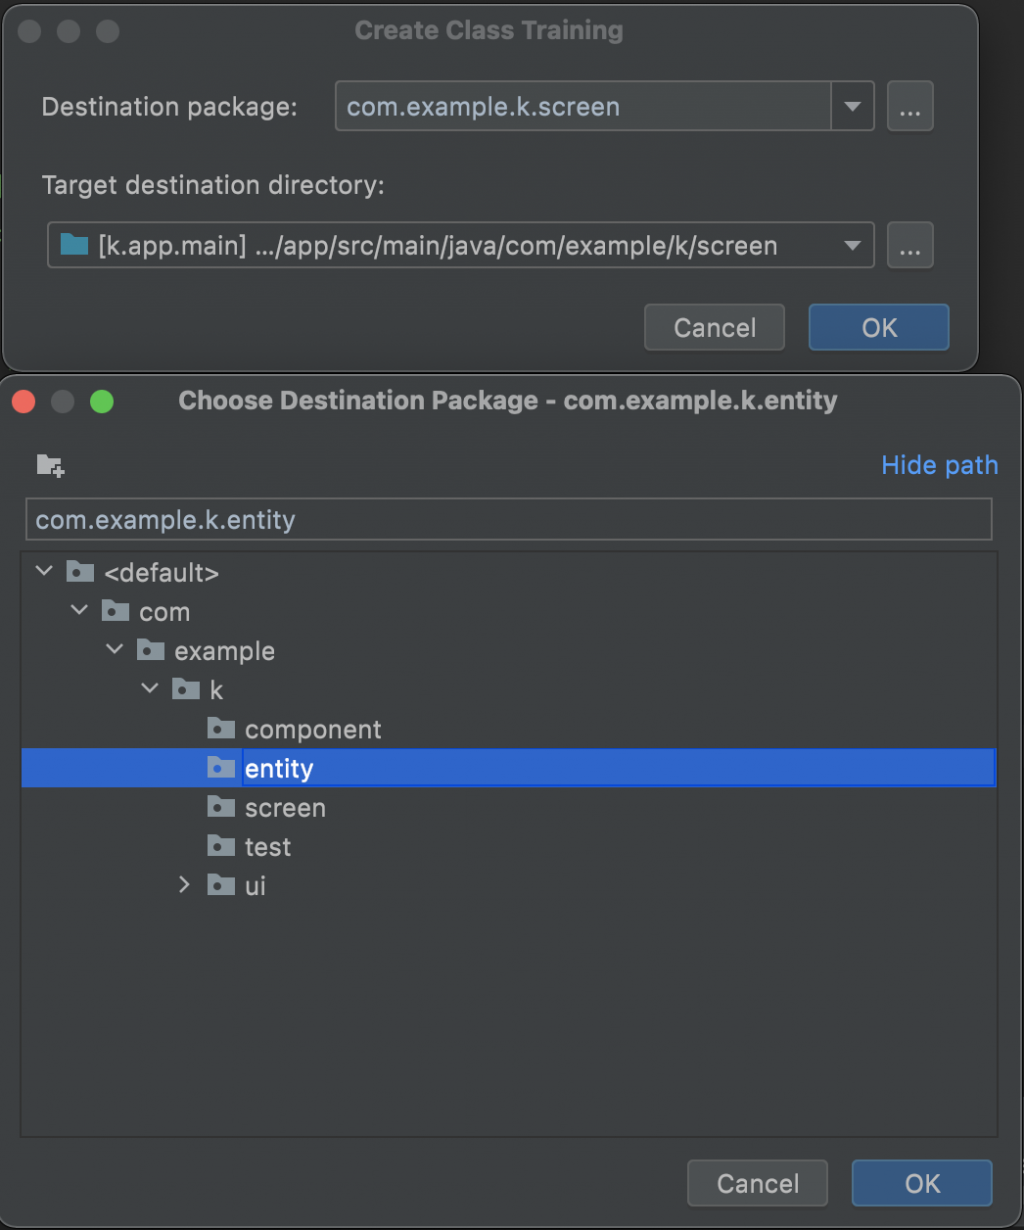
按下 OK 就會在 com.example.k.entity 路徑下間裡好 class Training
package com.example.k.entity

class Training {

}
再來把它改成 data class 觀察我的card 要顯示的資料來定義欄位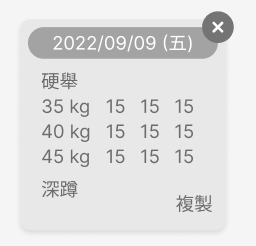
目前看起來是需要日期和內容,所以定義欄位 date 型態為 LocalDate、trainingContext型態為String 、最後別忘了id 到時候用來向DB做資料操作時會用到,型態為 Long。
data class Training(
    val id:Long,
    val date: LocalDate,
    val trainingContext:String
)
data class Training(
    val date: LocalDate,
    val trainingContext:String
)
回到 package com.example.k.screen ,在 LazyVerticalGrid 的 lambda 內使用 items() 放入 list
//  1.1 list code
val trainingList = listOf<Training>()

LazyVerticalGrid(
    columns = GridCells.Fixed(2) //1.
) {
    items(trainingList){

    }
}
使用 Material3 的 Card
items(trainingList){
    Card() {

    }
}
在 lambda function 中要使用 trainingList 裡的物件時可以用 it ,也可以像我這樣在 { 左大括號 加上自己為遍歷的item 取名成 training 再加上 -> 。
items(trainingList) { training ->
    Card {
        Text(text = training.date.toString()) //沒有取名成training的話 可以用it
        Text(text = training.trainingContext)
    }
}
先用最笨的方式寫在 composable 中,之後要實踐 MVVM 架構時回來修改資料來源,所以這裡要加上 TODO 提醒自己。
val trainingList = listOf<Training>( //TODO extract data
    Training(
        id = 1,
        date= LocalDate.now(),
        trainingContext = "硬舉 \n 35 kg 15 15 15"
    ),
    Training(
        id = 2,
        date= LocalDate.now(),
        trainingContext = "深蹲 \n 60 kg 15 15 15"
    )
)
prev+tab 生成 Preview fun(),取名方式我習慣用 Preview + 要預覽的 Composable 的名稱 。
@Preview
@Composable
fun PreviewMainScreen() {
    MainScreen()
}
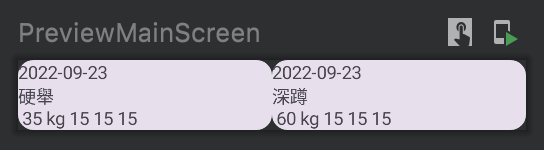
好的資料順序正確,再來加上適當的邊距。
參考 M3 Guide line ,Card 內部的context 距離 Card 邊緣為內邊距離為 16.dp ,Card 和 Card 之間距離 8.dp 。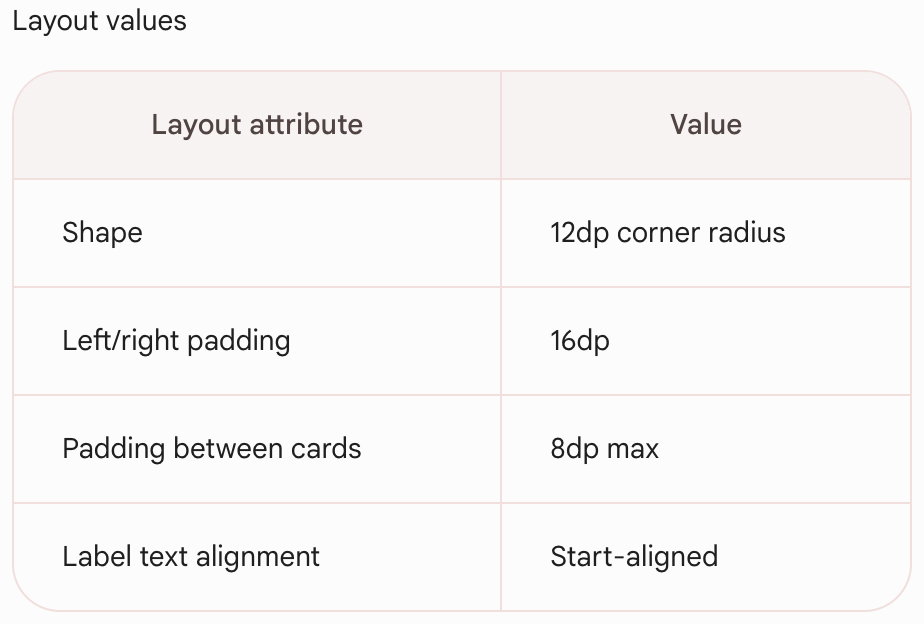
LazyVerticalGrid(
    columns = GridCells.Fixed(2),
    horizontalArrangement = Arrangement.spacedBy(8.dp) //item 之間距離 8.dp
) {
    items(trainingList) { training ->
        Card(
            ~~modifier = Modifier.padding(16.dp)~~ //card 外邊距
        ) {
            Column(
                modifier = Modifier.padding(16.dp) //card 內邊距
            ) {
                Text(text = training.date.toString())
                Text(text = training.trainingContext)
            }
        }
    }
}
這裡用到了 horizontalArrangement 用到 spaceBy(.dp) 能設定 item與 item 之間的距離。
其他還有Center 、End 、Start 、SpaceBetween 、SpaceAround ,可以參考團員聖佑詳細的排版元件之 Column、Row。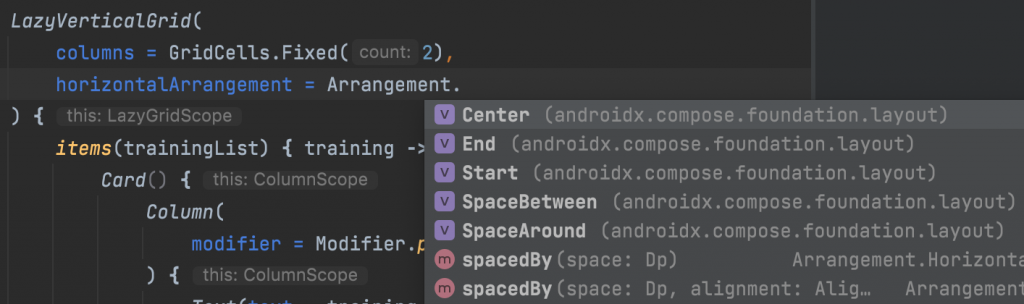
注意設定 Card 內邊距時不是在 Card() 參數 modifier 設置,而是要在Card內設置 Column、Row、Box 等等排版composable 的 modifier 設置外距來達到 Card 內邊距的效果。
今天就先做到這吧!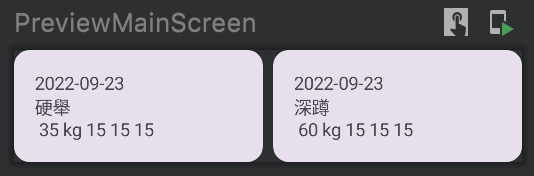
今天初步的把訓練資料用在 Grid Layout 上,明天繼續調整 Card 中的日期樣式以及字體行之間的距離。
今日運動
分腿蹲
2+2 kg 左右腳各 15 15 15 下
5+5 kg 左右腳各 12 15下
硬舉50kg 10 10 10
俯身划船 左右手各 8kg 7 10 10 10 下
單手划船 12kg 左右手各 10 10 下
(下樓有扶手真是太棒了(抖)