
前端的專案通常會挑一個樣式框架來搭配使用,好處是,
好的 UI框架 讓你專注於商業邏輯的開發之外也能兼顧全站的風格與美觀。
Angular 專案最常搭配的是 Angular Material,除了這款框架之外,Primeng,NG-ZOORO 與 Nebular 也都是 Angular 專案中常見的 UI框架,專案初期通常會決定好 UI框架,其中,
UI框架的挑選較為主觀,好看方便用就好。
Nebular 是一個基於 Eva 設計系統規範的可定制 Angular UI 庫,具有 40 多個 UI 組件、包含4個視覺主題,讓專案能輕鬆做到多種風格變化,RWD 的樣式設計讓專案能自適應各種裝置,另有 Auth 和 Security 模塊等。
Day 3 我們已經用 ng-new 建立一個名為 my-app 的 Angular 專案,接下來我們示範如何安裝 Nebular 到 my-app 中。
Nebular 支持使用 Angular Schematics 進行初始化配置
ng add @nebular/theme
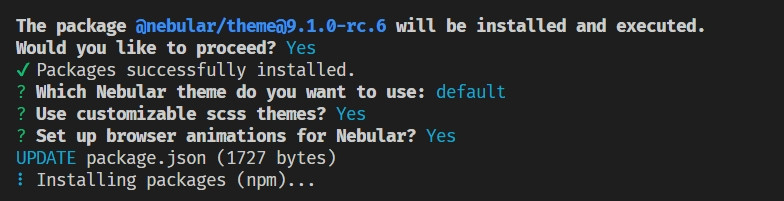
default 版面。themes.scss。BrowserAnimationsModule 模組。也可以手動安裝
npm install --save @nebular/theme @angular/cdk @angular/animations
安裝 Eva Icons pack
npm install --save eva-icons @nebular/eva-icons
配置 Nebular 模組到 Angular 專案中 src/app/app.module.ts
import { NbThemeModule } from '@nebular/theme';

...

@NgModule({
  imports: [

    ...

    BrowserModule,
    AppRoutingModule,
    BrowserAnimationsModule,

    // this will enable the default theme, you can change this by passing `{ name: 'dark' }` to enable the dark theme
    NbThemeModule.forRoot({ name: 'default' }),

    NbLayoutModule,
    NbEvaIconsModule,
  ]
})
export class AppModule {
配置 Nebular 樣式到 Angular 專案中 angular.json
"styles": [
  "node_modules/@nebular/theme/styles/prebuilt/default.css",
],
安裝配置完成。
由於 Nebular 版本較舊導致新的 Node 與 Angular-Cli 無法正常安裝,你可能會在安裝時得到 ERESOLVE unable to resolve dependency tree 訊息,
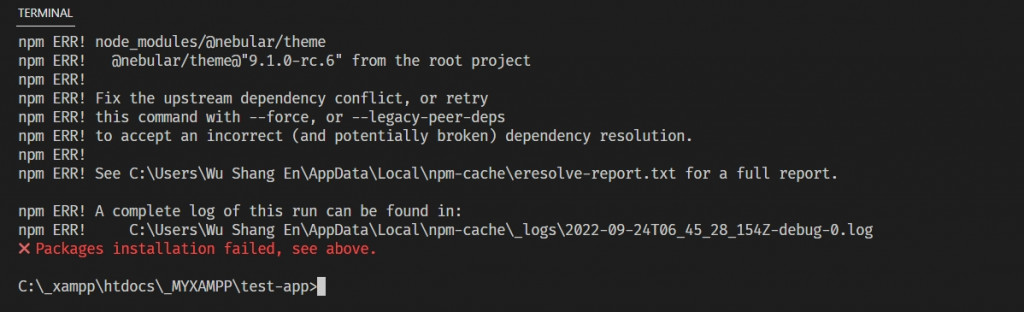
解決方法是暫時退 node 版本,使用 nvm 指定環境 node@14.15.2 與 @angular/cli@12.0.0-next.1 安裝完成後再將環境復原即可。
Nebular 配置的時候會自動新增一段代碼到 styles.scss,直接砍掉就好,我們只會用到 themes.scss
@use 'themes' as *;

@use '@nebular/theme/styles/globals' as *;

@include nb-install() {
  @include nb-theme-global();
};
/* You can add global styles to this file, and also import other style files */
如果砍掉 styles.scss 整個檔案,記得去修改 angular.json 的配置,因為styles.scss 是 Angular 建的,
"styles": [
    "node_modules/@nebular/theme/styles/prebuilt/default.css",
    "src/themes.scss",
    "src/styles.scss"
]
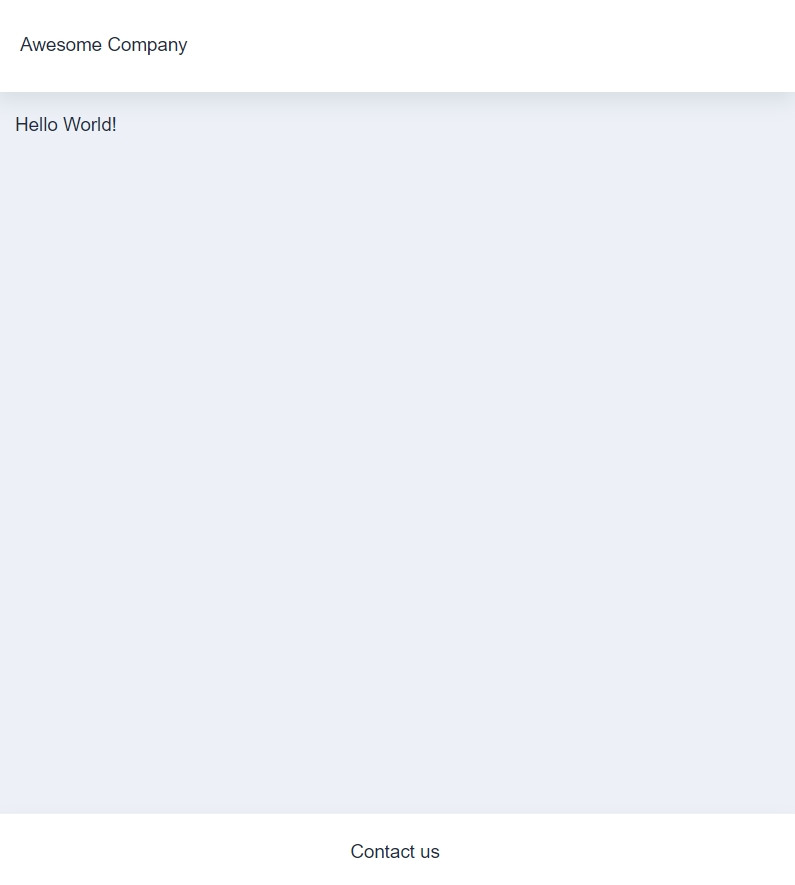
安裝好 Nebular 後,來試試看打造一個有基本頁面佈局的首頁,建立一個首頁 ng g c home,
src\app\app.module.ts
// Nebular
import { NbThemeModule } from '@nebular/theme';
import { NbEvaIconsModule } from '@nebular/eva-icons';
import { NbSidebarModule, NbLayoutModule, NbButtonModule } from '@nebular/theme';

// Home
import { HomeComponent } from './home/home.component';

@NgModule({
    declarations: [AppComponent, HomeComponent],
    imports: [
        BrowserModule,
        AppRoutingModule,
        BrowserAnimationsModule,
        NbThemeModule.forRoot({ name: 'default' }),
        NbLayoutModule,
        NbSidebarModule,
        NbButtonModule,
        NbEvaIconsModule,
    ],
    providers: [],
    bootstrap: [AppComponent],
})
src\app\app-routing.module.ts
import { HomeComponent } from './home/home.component';

const routes: Routes = [
    {
        path: 'home',
        component: HomeComponent,
    },
];
src\app\app.component.ts
import { Component } from '@angular/core';

@Component({
    selector: 'app-root',
    template: `<router-outlet></router-outlet>`,
})
export class AppComponent {}
使用 app-routing.module.ts 的 SPA 專案通常會將 app.component.ts 當作入口,
不需要 app.component.html 和 app.component.scss 直接砍掉就好。
溫馨提醒,
ng serve模式下,有修改到模組設定的時候,最好重跑一次ng serve。
src\app\home\home.component.html
<nb-layout center>
    <nb-layout-header>Awesome Company</nb-layout-header>

    <nb-layout-column>
        Hello World!
    </nb-layout-column>

    <nb-layout-footer>Contact us</nb-layout-footer>
</nb-layout>
結果畫面
Nebular 中的每個元件都是模組化的,使用到的時候再 import 是為了節省 APP 的整體載入時間,但是這樣會讓你的專案比較難以維護,尤其當專案較大不只有一個根模組的時候,Nebular 元件的模組可能到處都載入難以管理,所以我的專案通常會先管理起來,
建立 src\app\_define\nebular\ 資料夾,創建 nebular.module.ts
按照 Nebular 元件的分類先建立一個 定義檔,將元件分為幾個大類匯出,之後按照不同模組的使用情況引入需要的 Nebular 元件,比較懶惰的作法就全部整合起來變成 NEBULAR_ALL,打包的時候讓 Tree Shaking 把真的沒有用到的模組過濾掉,
引入到 Angular 模組中只要 import NEBULAR_ALL 就可以使用所有的 Nebular 元件了,按照需求也可以自訂模組需要的元件組合。
src\app\_define\nebular\nebular.module.ts
// Nebular Global Modules
import {
    NbIconModule,
    NbLayoutModule,
    NbCardModule,
    NbStepperModule,
    NbAccordionModule,
    NbListModule,
    NbFormFieldModule,
} from '@nebular/theme';

// Nebular Navigation Modules
import { NbSidebarModule, NbMenuModule, NbTabsetModule, NbActionsModule } from '@nebular/theme';

// Nebular Forms Modules
import {
    NbInputModule,
    NbButtonModule,
    NbCheckboxModule,
    NbToggleModule,
    NbRadioModule,
    NbSelectModule,
    NbAutocompleteModule,
    NbDatepickerModule,
} from '@nebular/theme';

// Nebular Modals & Overlays Modules
import {
    NbPopoverModule,
    NbContextMenuModule,
    NbDialogModule,
    NbToastrModule,
    NbTooltipModule,
    NbWindowModule,
} from '@nebular/theme';

// Nebular Extra Modules
import {
    NbSearchModule,
    NbUserModule,
    NbAlertModule,
    NbSpinnerModule,
    NbProgressBarModule,
    NbBadgeModule,
    NbChatModule,
    NbCalendarModule,
    NbCalendarRangeModule,
    NbTreeGridModule,
} from '@nebular/theme';

/**
 * Export Nebular Modules List
 * Customize modules list here for your feature module
 *
 * @export {const} NEBULAR_GLOBAL
 */
export const NEBULAR_GLOBAL = [
    NbIconModule,
    NbLayoutModule,
    NbCardModule,
    NbStepperModule,
    NbAccordionModule,
    NbListModule,
];

/**
 * nebular navigation
 *
 * @export {const} NEBULAR_NAVIGATION
 */
export const NEBULAR_NAVIGATION = [NbTabsetModule, NbActionsModule];

/**
 * nebular forms
 *
 * @export {const} NEBULAR_FORMS
 */
export const NEBULAR_FORMS = [
    NbInputModule,
    NbButtonModule,
    NbCheckboxModule,
    NbToggleModule,
    NbRadioModule,
    NbSelectModule,
    NbAutocompleteModule,
    NbDatepickerModule,
    NbFormFieldModule,
];

/**
 * nebular modals
 *
 * @export {const} NEBULAR_MODALS
 */
export const NEBULAR_MODALS = [
    NbPopoverModule,
    NbContextMenuModule,
    NbDialogModule.forChild(),
    NbTooltipModule,
    NbWindowModule.forChild(),
];

/**
 * nebular extra
 *
 * @export {const} NEBULAR_EXTRA
 */
export const NEBULAR_EXTRA = [
    NbSearchModule,
    NbUserModule,
    NbAlertModule,
    NbSpinnerModule,
    NbProgressBarModule,
    NbBadgeModule,
    NbChatModule,
    NbCalendarModule,
    NbCalendarRangeModule,
    NbTreeGridModule,
];

/**
 * Nebular Modules for Root
 *
 * @export {const} NEBULAR_ROOT
 */
export const NEBULAR_ROOT = [
    NbSidebarModule.forRoot(),
    NbMenuModule.forRoot(),
    NbDialogModule.forRoot(),
    NbToastrModule.forRoot(),
    NbWindowModule.forRoot(),
    NbDatepickerModule.forRoot(),
];

/**
 * Nebular Modules for Child
 *
 * @export {const} NEBULAR_CHILD
 */
export const NEBULAR_CHILD = [NbSidebarModule, NbMenuModule, NbDialogModule, NbToastrModule, NbWindowModule];

/**
 * Nebular Modules for All
 *
 * @export {const} NEBULAR_ALL
 */
export const NEBULAR_ALL = [
    ...NEBULAR_GLOBAL,
    ...NEBULAR_NAVIGATION,
    ...NEBULAR_FORMS,
    ...NEBULAR_MODALS,
    ...NEBULAR_EXTRA,
];
定義 @define 檔案路徑為 src/app/_define/*
tsconfig.json
{
"compilerOptions": {
    "baseUrl": "./",
    "paths": {
        "@define/*": [
            "src/app/_define/*"
        ]
    },
    ...
}
使用 NEBULAR_ALL 在 src\app\app.module.ts
import { NEBULAR_ROOT, NEBULAR_ALL } from '@define/nebular/nebular.module';

@NgModule({
    imports: [
        ...NEBULAR_ROOT,
        ...NEBULAR_ALL,
    ]
})
這樣根模組就能使用所有的 Nebular 元件了。
使用
NEBULAR_ALL後就不需要再像官網的教學範例每次都要回到根模組再import一次了。
src\app\app.module.ts
// Nebular
import { NbThemeModule } from '@nebular/theme';
import { NbEvaIconsModule } from '@nebular/eva-icons';
import { NEBULAR_ROOT, NEBULAR_ALL } from '@define/nebular/nebular.module';

// Home
import { HomeComponent } from './home/home.component';

@NgModule({
    declarations: [AppComponent, HomeComponent],
    imports: [
        BrowserModule,
        AppRoutingModule,
        BrowserAnimationsModule,
        NbThemeModule.forRoot({ name: 'default' }),
        NbEvaIconsModule,
        ...NEBULAR_ROOT,
        ...NEBULAR_ALL,
    ],
    providers: [],
    bootstrap: [AppComponent],
})
載入的元件越多就越能看到這個寫法的簡潔性。
順便換個新佈局 src\app\home\home.component.html
<nb-layout>
    <nb-layout-header fixed>
        <a href="#" (click)="toggle()"><i class="nb-menu"></i></a>
    </nb-layout-header>

    <nb-layout-header subheader>
        <nb-actions>
            <nb-action icon="home-outline"></nb-action>
            <nb-action icon="search-outline"></nb-action>
            <nb-action icon="edit-outline"></nb-action>
        </nb-actions>
    </nb-layout-header>

    <nb-sidebar></nb-sidebar>

    <nb-layout-column class="colored-column-basic">Layout Content</nb-layout-column>
</nb-layout>
src\app\home\home.component.ts
import { Component } from '@angular/core';
import { NbSidebarService } from '@nebular/theme';

@Component({
    selector: 'app-home',
    templateUrl: './home.component.html',
    styleUrls: ['./home.component.scss'],
})
export class HomeComponent {
    constructor(private sidebarService: NbSidebarService) {}

    toggle() {
        this.sidebarService.toggle(true);
        return false;
    }
}
新佈局頁面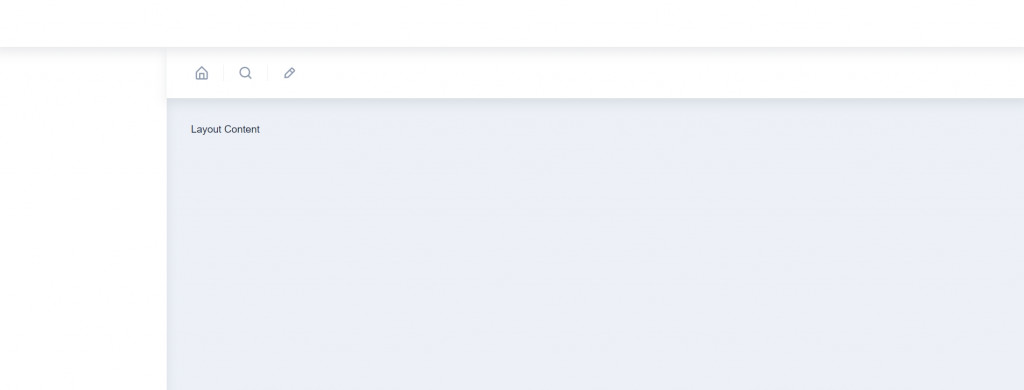
為了驗證可以使用所有的元件不需在額外引入,在 Home 頁面中引入 Card,
<nb-layout>
    <nb-layout-header fixed>
        <a href="#" (click)="toggle()"><i class="nb-menu"></i></a>
    </nb-layout-header>

    <nb-layout-header subheader>
        <nb-actions>
            <nb-action icon="home-outline"></nb-action>
            <nb-action icon="search-outline"></nb-action>
            <nb-action icon="edit-outline"></nb-action>
        </nb-actions>
    </nb-layout-header>

    <nb-sidebar></nb-sidebar>

    <nb-layout-column class="colored-column-basic">

        <!-- 在這裡加入 卡片 -->
        <nb-card status="success">
            <nb-card-header>Nebula</nb-card-header>
            <nb-card-body>
                A nebula is an interstellar cloud of dust, hydrogen, helium and other ionized gases. Originally, nebula
                was a name for any diffuse astronomical object, including galaxies beyond the Milky Way.
            </nb-card-body>
            <nb-card-footer>By Wikipedia</nb-card-footer>
        </nb-card>

        <nb-card status="danger">
            <nb-card-header>Nebula</nb-card-header>
            <nb-card-body>
                A nebula is an interstellar cloud of dust, hydrogen, helium and other ionized gases. Originally, nebula
                was a name for any diffuse astronomical object, including galaxies beyond the Milky Way.
            </nb-card-body>
            <nb-card-footer>By Wikipedia</nb-card-footer>
        </nb-card>
        <!-- 在這裡加入 卡片 結尾 -->

    </nb-layout-column>
</nb-layout>
新佈局頁面加入卡片元件
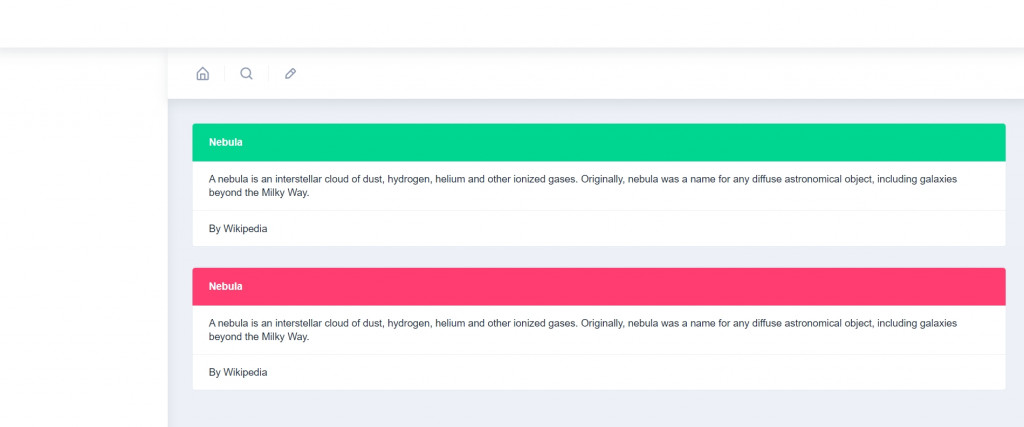
Nebular 的元件都必須放在
<nb-layout></nb-layout>中。
Angular 使用 UI框架 主要目的是為了專案的風格統一,開發者只要花點時間熟悉這些元件的使用,就可以快速構建一個很有設計感的網站,Nebular 還包含許多的特色功能模組,有機會再來介紹這些功能。
Angular加上有設計感的Nebular,接下來我們從簡單的需求練習使用Angular來進行專案開發。



 iThome鐵人賽
 看影片追技術