這篇將會介紹在 K8s 組出服務必備的第二元素:Namespace & Service。
上個文章我們講到 Pod 跟 Workload, 這裡要來說很重要的 Namespace 跟 Service,如果想要在同個 Cluster 分出不同用的 Pod 是不是只能更換名字?或者尋找 Pod 是不是只能呼叫 Cluster 內部的 IP?今天會帶你一併理解。
Namespace(命名空間)可以把同一個 Cluster 裡面的資源,分割成不同的組別,像是切割 Development、Staging、Production 這三個命名空間。
示範怎麼新增刪除 Namespace:
kubectl create namespace staging # 新增 Namespace 名為 staging
kubectl delete namespace staging # 刪除 Namespace 名為 staging
# 請避免以 kube- 為開頭的 Namespace,那是 K8s 系統 Namespace 保留。
kubectl get namespace # 查詢有哪些 Namespace
kubectl 本身也可以臨時指定 Namespace,只要在命令中間加 -n <NAMESPACE_NAME> 就可以了,示範命令如下:
kubectl -n staging apply -f pod.yaml
kubectl -n staging apply -f nginx-deploy.yaml
前一章節所講的 Pod、Workload 都可以使用在 Namespace 上。
注意:但有些 Resource 是不吃 Namespace,像是下一篇要說的 Persistent Volume 還有 StorageClass、Node 這些在 Cluster 層級就無法用 Namespace 區隔,就算在 kubectl 可以打上 namespace 名稱,但是 API 呼叫會忽略這個變數。
那我們建立好 Namespace 就可以在 YAML 當中實作了:
# 1. Save as `nginx-pod-staging.yaml`
# 2. In bash, `kubectl apply -f nginx-pod-staging.yaml`
# 2.1. `kubectl apply -f nginx-pod-staging.yaml -n <OTHER_NAMESPACE>` will be denied.
# 3. If you want to remove, `kubectl delete -f nginx-pod-staging.yaml`
apiVersion: v1
kind: Pod
metadata:
  name: nginx-in-staging
  namespace: staging # Pod 加入到 staging 的 namespace
spec:
  containers:
  - name: nginx
    image: nginx:1.14.2
    ports:
    - containerPort: 80
然後我們要再用 kubectl get pod 檢查 Pod 有沒有建立成功:

系統提示訊息:No resources found in default namespace.,因為 Pod 確實不在 default 這個 Namespace 下,會在名為 staging 的 Namespace 下。
所以命令應該是這樣寫的:kubectl get pod -n staging

如果遇到 Pod 給的 YAML 跟 kubectl 打的 Namespace 有衝突怎麼辦?遇到這種矛盾情況,系統會直接拒絕你的要求。
ubuntu@bastion-host:~$ kubectl apply -f nginx-pod-staging.yaml -n OTHER_NAMESPACE
error: the namespace from the provided object "staging" does not match the namespace "OTHER_NAMESPACE". You must pass '--namespace=staging' to perform this operation.
基本上後面開始介紹 Helm 以後,都會使用到 Namespace,所以要注意一下自己的 Namespace 喔!
Service 可以讓你把多個 Pod 跑的應用程式變成網路服務,不需要修改應用程式就可以做負載平衡。
為什麼會需要 Service?首先,Pod 不是一直都會存在,像是 Deployment 可以自由直接建立或刪除,每個 Pod 都會有 K8s 內網的 IP,這個 IP 也是會一直變動的。
這樣就會有一些問題:如果今天有前端跟後端的 Pod,前端想要找後端的 Pod,但是他會一直變動,那 Pod 要如何尋找呢?
這時候就可以靠 Service 來幫你達成了!可以先來看看他的基礎範例:
# 1. Save as `other-svc.yaml`
# 2. In bash, `kubectl apply -f other-svc.yaml`
# 3. If you want to remove, `kubectl delete -f other-svc.yaml`
apiVersion: v1
kind: Service
metadata:
  name: other-svc # Service 的名字
spec:
  type: ClusterIP
  selector:
    app: other # 對應 Pod 的標籤
  ports:
    - protocol: TCP # 可以選擇 TCP 跟 UDP
      port: 80 # 對 service 要 expose 的 port
      targetPort: 9376 # 對應 Pod 的 containerPort
.spec.selector 就是要對應的 Pod 選擇條件器,也就是符合條件的就會被對應,以上面範例來說,Pod 選擇就會對應有 app=other 這個標籤。
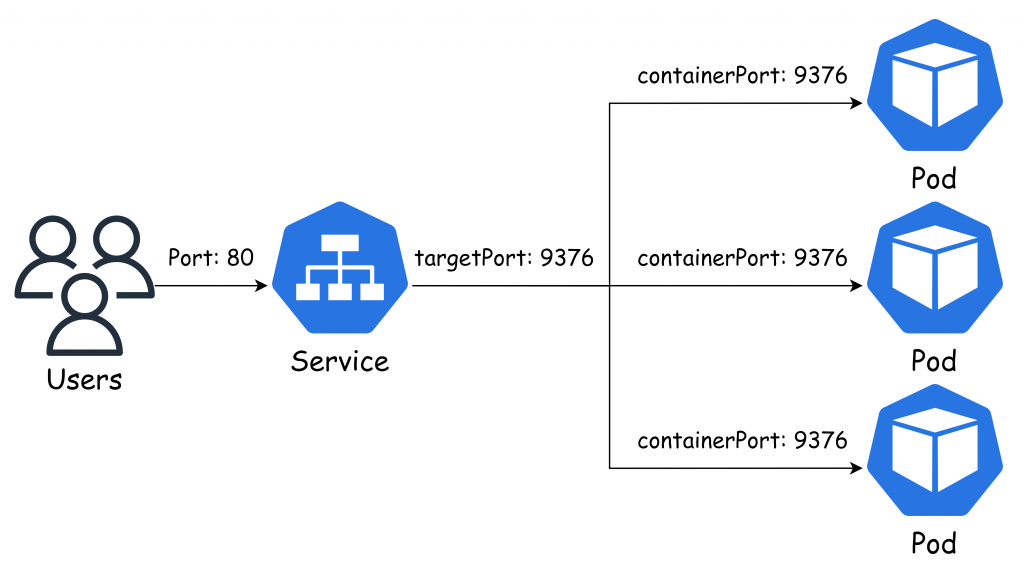
根據我過往的經驗,有些人會搞不太懂 .spec.ports[].port 跟 .spec.ports[].targetPort 之間的差異:
.spec.ports[].port 代表的是這個 Service 要對外 expose 的 port.spec.ports[].targetPort 會向下尋找 Pod 對應的 containerPort
其實就像是這張圖:

.spec.type 有四種型態:
為了方便 Demo,我這裡給出 NodePort + Deployment 部署:
# 1. Save as `nginx-nodeport.yaml`
# 2. In bash, `kubectl apply -f nginx-nodeport.yaml`
# 3. If you want to remove, `kubectl delete -f nginx-nodeport.yaml`
apiVersion: v1
kind: Service
metadata:
  name: nginx-nodeport # Service 的名字
spec:
  type: NodePort
  selector:
    app: nginx # 對應 Pod 的標籤
  ports:
    - protocol: TCP # 可以選擇 TCP 跟 UDP
      port: 80 # 對 service 要 expose 的 port
      targetPort: 80 # 對應 Pod 的 containerPort
      nodePort: 31234 # Worker node 的 Port 31234 會對應到此服務
# 1. Save as `nginx-deploy.yaml`
# 2. In bash, `kubectl apply -f nginx-deploy.yaml`
# 3. If you want to remove, `kubectl delete -f nginx-deploy.yaml`
apiVersion: apps/v1
kind: Deployment
metadata:
  name: nginx-deployment
  labels:
    app: nginx
spec:
  replicas: 3
  selector:
    matchLabels:
      app: nginx
  template:
    metadata:
      labels:
        app: nginx
    spec:
      containers:
      - name: nginx
        image: nginx:1.14.2
        ports:
        - containerPort: 80
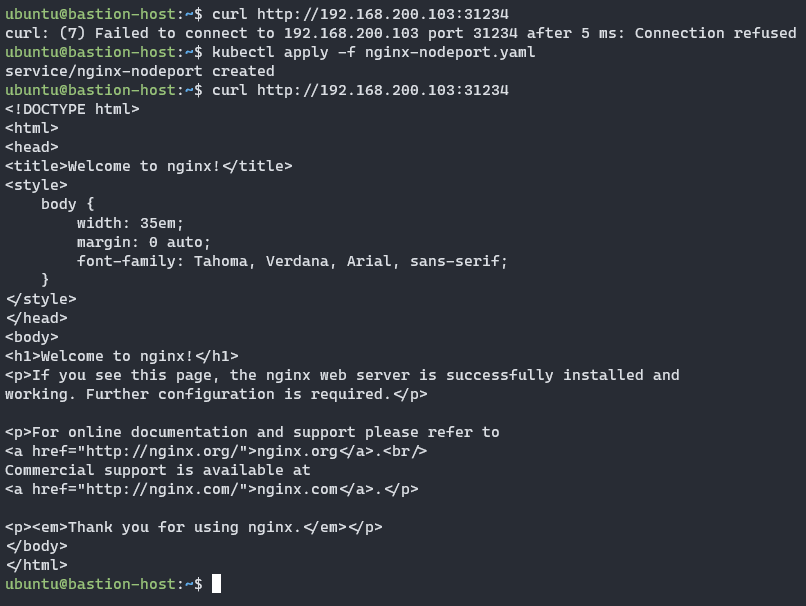
打上這些命令來測試
kubectl apply -f nginx-deploy.yaml
kubectl apply -f nginx-nodeport.yaml
那我們就試試 curl http://192.168.200.102:31234

只要回傳資料顯示 Nginx 網頁就代表服務取得成功!
那我們就把這次實驗刪掉:
kubectl delete -f nginx-deploy.yaml
kubectl delete -f nginx-nodeport.yaml
我們證明 Service 有對應到 Pod,但要怎麼證明 Service 有對應到哪個 Pod 呢?這個我將會在後面兩篇文章做個 Demo。
下一遍我們將來介紹如何儲存資料、設定檔和機密資料。
本系列內容也會同步貼到我的 Blog https://blog.yangjerry.tw 歡迎來我的 Blog 點一下 RSS 追蹤,那我們就下一篇文章見啦!
