本系列文已改編成書「甚麼?網頁也可以做派對遊戲?使用 Vue 和 babylon.js 打造 3D 派對遊戲吧!」
書中不只重構了程式架構、改善了介面設計,還新增了 2 個新遊戲呦!ˋ( ° ▽、° )
新遊戲分別使用了陀螺儀與震動回饋,趕快買書來研究研究吧!ლ(╹∀╹ლ)
在此感謝深智數位的協助,歡迎大家前往購書,鱈魚感謝大家 (。・∀・)。
助教:「所以到底差在哪啊?沒圖沒真相,被你坑了都不知道。(´。_。`)」
鱈魚:「你對我是不是有甚麼很深的偏見啊 (っ °Д °;)っ,來人啊,上連結!」

目前我們已經成功新增 ws-client 模組,ws-client 模組的主要功能是「管理 socketId 與 clientId 的映射關係」。
目的是「只要 client 傳輸的 id 相同,即使 socket 改變,都可以取得先前的連線資料。」
基本概念為:
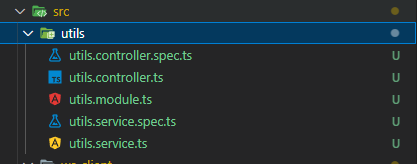
接著來介紹一下,目前 ws-client 資料夾內的檔案分別功能為何:
ws-client.gateway.ts
負責處理請求,概念與 MVC 模型中的 controller 功能類似。
ws-client.gateway.spec.ts:
gateway 測試檔案,負責測試 ws-client.gateway 功能,本次專案不會用到。
ws-client.service.ts
負責提供 ws-client 功能邏輯。
ws-client.service.spec.ts
service 測試檔案,負責測試 ws-client.service 功能,本次專案不會用到。
ws-client.module.ts
負責包裝以上檔案成為一個獨立模組。
首先讓我們完成 ws-client.service 功能邏輯,設計一下預期使用的型別定義。
src\ws-client\ws-client.service.ts
import { Injectable } from '@nestjs/common';

export enum ClientType {
  /** 遊戲機,負責建立派對房間 */
  GAME_CONSOLE = 'game-console',
  /** 玩家,通常是手機端網頁 */
  PLAYER = 'player',
}

export type ClientId = string;

export interface Client {
  id: ClientId;
  socketId: string;
  type: `${ClientType}`;
}

@Injectable()
export class WsClientService {}
新增 Map 物件儲存目前已連線之 client。
import { Injectable } from '@nestjs/common';

...

@Injectable()
export class WsClientService {
  clientsMap = new Map<ClientId, Client>();
}
接著新增新增或替換 Client 的 method。
import { Injectable } from '@nestjs/common';

...

export interface PutClientParams {
  socketId: string;
  clientId: ClientId;
  type: `${ClientType}`;
}

@Injectable()
export class WsClientService {
  clientsMap = new Map<ClientId, Client>();

  /** 不存在則新增,存在則更新 */
  putClient(params: PutClientDto) {
    const { clientId, socketId, type } = params;

    const client = this.clientsMap.get(clientId);

    // 新增
    if (!client) {
      const newClient = { id: clientId, socketId, type };
      this.clientsMap.set(clientId, newClient);
      return newClient;
    }

    // 更新
    client.socketId = socketId;
    client.type = type;

    this.clientsMap.set(clientId, client);

    return client;
  }
}
儲存 client 之後,當然還要可以取出才行,最後我們新增取得 client 用的 method。
...

/** 允許使用 socketId 或 clientId 取得 */
export type GetClientParams = { socketId: string } | { clientId: string };

@Injectable()
export class WsClientService {
  ...
  getClient(params: GetClientParams) {
    // 存在 clientId,使用 clientId 取得
    if ('clientId' in params) {
      return this.clientsMap.get(params.clientId);
    }

    // 否則用 socketId 查詢
    const clients = [...this.clientsMap.values()];
    const target = clients.find(({ socketId }) => socketId === params.socketId);
    return target;
  }
}
service 基本上這樣就完成了,接下來完成 gateway 的功能吧。( ´ ▽ ` )ノ
ws-client.gateway 的工作其實非常單純,只專注於 client 連線事件。並於連線時,取得 clientId 並呼叫 service。
根據 NestJS 官網的介紹,只要新增名為 handleConnection 的 method,只要 client 連線時,NestJS 就會自動呼叫此名稱的 method。
src\ws-client\ws-client.gateway.ts
...
import { Socket } from 'socket.io';

@WebSocketGateway()
export class WsClientGateway {
  constructor(private readonly wsClientService: WsClientService) {
    //
  }

  handleConnection(socket: Socket) {
  }
}
method 好了,所以我們要怎麼取得 client 連線時傳輸的訊息?
根據 Socket.IO 文件的說法,伺服器可以透過 socket.handshake.query 的方式取得資料。
...
export class WsClientGateway {
  ...
  handleConnection(socket: Socket) {
    const queryData = socket.handshake.query;
  }
}
像這樣就可以取得 client 連線時傳輸的資料,只是現在有另一個問題:「我們要怎麼確定 queryData 的資料定義正確?」
在此需要一個可以判斷物件型別是否正確的 function,所以讓我們新增新的模組,用來處理各類資料吧。
輸入以下指令,建立 utils 模組。
nest g resource utils
What transport layer do you use?
選哪一個都可以,因為用不到 controller
Would you like to generate CRUD entry points?
輸入「n」
之後就可以看到目錄下新增了 utils 模組。
接著讓我們刪除 controller 的檔案(因為這個模組不處理請求),並調整 utils.module 內容。
src\utils\utils.module.ts
import { Module } from '@nestjs/common';
import { UtilsService } from './utils.service';

@Global()
@Module({
  providers: [UtilsService],
  exports: [UtilsService],
})
export class UtilsModule {
  //
}
@Global() 裝飾器會讓此模組變成全域模組,也就是在任意地方都可以存取。exports 則表示此模組要對外提供那些內容。接著讓我們完成 utils.service 功能,我們希望 queryData 要包含 clientId 與 type 資料,新增名為 isSocketQueryData 的 method 進行判斷。
src\utils\utils.service.ts
import { Injectable } from '@nestjs/common';
import { ClientType } from 'src/ws-client/ws-client.service';

interface SocketQueryData {
  clientId: string;
  type: `${ClientType}`;
}

@Injectable()
export class UtilsService {
  isSocketQueryData(data: any): data is SocketQueryData {
    // 沒有必要屬性
    if (!('clientId' in data) || !('type' in data)) {
      return false;
    }

    // type 不屬於列舉類型
    if (!Object.values(ClientType).includes(data['type'])) {
      return false;
    }

    return true;
  }
}
}
接下來讓我們回到 ws-client.gateway,來使用 utils 模組功能吧!
src\ws-client\ws-client.gateway.ts
...
import { UtilsService } from 'src/utils/utils.service';
...
export class WsClientGateway {
  constructor(
    private readonly wsClientService: WsClientService,
    private readonly utilsService: UtilsService,
  ) {
    //
  }

  handleConnection(socket: Socket) {
    const queryData = socket.handshake.query as unknown;

    // 若資料無效,則中斷連線
    if (!this.utilsService.isSocketQueryData(queryData)) {
      socket.disconnect();
      return;
    }

    const { clientId, type } = queryData;
  }
}
現在我們可以確定 queryData 內容一定是我們希望的資料了,接續完成此 method 吧。
...
@WebSocketGateway()
export class WsClientGateway {
  ...

  handleConnection(socket: Socket) {
    ...

    const { clientId, type } = queryData;

    this.wsClientService.putClient({
      socketId: socket.id,
      clientId,
      type,
    });
  }
}
其實只要呼叫 this.wsClientService.putClient 就完成了。(´,,•ω•,,)
不過還是加個 logger,方便查看訊息吧。
...
import { Logger } from '@nestjs/common';
...
export class WsClientGateway {
  private logger: Logger = new Logger(WsClientGateway.name);
  ...
  handleConnection(socket: Socket) {
    this.logger.log(`client connected : ${socket.id}`);

    const queryData = socket.handshake.query as unknown;
    this.logger.log(`queryData : `, queryData);
    ...
  }
}
(以此專案規模而言,使用 console.log 就足夠了,只是在持續增長的專案中,用 logger 可以保留未來拓展彈性,所以養成好習慣,這裡就使用 logger 吧。( ´ ▽ ` )ノ)
最終在 ws-client.module 加上 exports,以便未來有需求時,別的模組也能使用 service
src\ws-client\ws-client.module.ts
import { Module } from '@nestjs/common';
import { WsClientService } from './ws-client.service';
import { WsClientGateway } from './ws-client.gateway';

@Module({
  providers: [WsClientGateway, WsClientService],
  exports: [WsClientService],
})
export class WsClientModule {
  //
}
以上我們已經準備好可以連線的伺服器了,現在讓我們回到 Web 專案。
首先新增 main.type 定義基本資料。
src\types\main.type.ts
export enum ClientType {
  /** 遊戲主機 */
  GAME_CONSOLE = 'game-console',
  /** 玩家 */
  PLAYER = 'player',
}
再新增 main.store 用來儲存 socket.io 之 client。
src\stores\main.store.ts
import { defineStore } from 'pinia';
import { Socket } from 'socket.io-client';
import { ClientType } from '../types/main.type';
import { nanoid } from 'nanoid';

interface State {
  /** 儲存於 LocalStorage 中,識別是否為同一個連線 */
  clientId: string,

  /** Socket.io Client 物件 */
  client?: Socket,
  type?: `${ClientType}`,
}

export const useMainStore = defineStore('main', {
  state: (): State => {
    const clientId = localStorage.getItem(`animals-party:clientId`) ?? nanoid();

    return {
      clientId,
      client: undefined,
      type: undefined,
    }
  },

  actions: {
    setClientId(id: string) {
      this.$patch({
        clientId: id
      });

      localStorage.setItem(`animals-party:clientId`, id);
    },

    setClient(client: Socket, type: `${ClientType}`) {
      this.$patch({
        client,
        type
      });
    }
  }
})
可以注意到在 setClientId 中,我們也同時將 clientId 儲存至 localStorage,並在每次初始化時取得 localStorage 已儲存 id,若沒有 id,則使用 nanoid 建立。
接著新增 use-socket-client,用來負責封裝各類 socket 功能吧。
src\composables\use-socket-client.ts
import { ref } from 'vue'
import { io, Socket } from "socket.io-client";
import { nanoid } from 'nanoid';
import { ClientType } from '../types/main.type';

import { useMainStore } from '../stores/main.store';
import { storeToRefs } from 'pinia';

export function useSocketClient() {
  const mainStore = useMainStore();
  const { client } = storeToRefs(mainStore);

  function connect(type: `${ClientType}`) {
    if (!mainStore.clientId) {
      mainStore.setClientId(nanoid());
    }

    // 已經存在
    if (mainStore.client) {
      mainStore.client.connect();
      return mainStore.client;
    }

    // 建立連線,傳送 query data
    const client: Socket = io({
      query: {
        clientId: mainStore.clientId,
        type
      }
    });

    mainStore.setClient(client, type);
    return client;
  }

  function close() {
    mainStore.client?.close();
  }

  return {
    client,

    connect,
    close
  }
}
最後回到 the-home,讓我們實際在 startParty() 中,試試看啟動連線吧!(≧∀≦)
src\views\the-home.vue
<script setup lang="ts">
...
const { connect } = useSocketClient();

async function startParty() {
  await loading.show();

  connect('game-console');

  router.push({
    name: RouteName.GAME_CONSOLE
  });
}
</script>
這裡還有一件非常非常重要的事情,就是要設定 Vite 的 proxy 功能,請 Vite 的 Dev Server 協助代理傳輸資料,否則會怎麼樣都無法連線喔!
讓我們前往 vite.config 設定
vite.config.ts
...

// https://vitejs.dev/config/
export default defineConfig({
  plugins: [
    ...
  ],

  server: {
    proxy: {
      '/socket.io': {
        target: 'ws://localhost/socket.io',
        ws: true
      }
    }
  }
})
現在按下首頁的「建立派對」後,應該會在伺服器的終端機中到以下訊息。
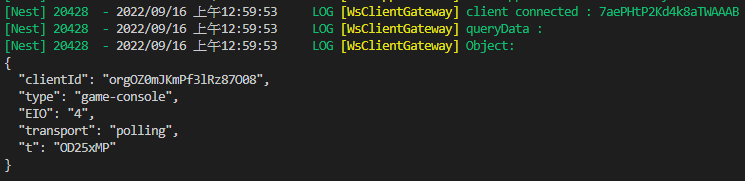
我們成功讓前後端連線了!✧*。٩(ˊᗜˋ*)و✧*。
以上程式碼已同步至 GitLab,大家可以前往下載:

