目前國內已經有許多券商提供定期定額投資的服務,而且在一定的金額內,還提供了較優惠的手續費用。不過這些券商提供的定期定額服務,多數都有扣款日期以及標的的限制,無法更彈性地選擇定期定額投入的日期以及投資標的。此外,海外券商提供股息再投資計畫(Dividend Reinvestment Plan)的服務已行之有年,臺灣證券市場這方面仍較缺乏,還尚未看到有券商提供此功能。為了打破這些限制,我們可以設計一個定期定額投資系統,執行自己的系統性投資計劃。
定期定額投資(Systematic Investment Plan)是一種投資策略,投資人在每個特定的時間將相同數量的資金投資於特定的投資標的。因為每次投入的金額是固定的,當投資標的價格下降時,買進的數量就比較多;當投資標的價格上漲時,買進的數量就比較少。當執行定期定額一段時間後,買進的成本就會趨向平均值。
定期定額特別適用於「指數化投資」以及「買進並持有」的長期投資策略。伴隨經濟發展,整體股票市場市值也持續增長,如果相信人類的經濟的活動將不斷成長,並且我們想參與其中、享受人類經濟成長果實最簡單的方法,就如同指數化投資之父、先鋒集團(Vanguard)創辦人 約翰.柏格 所說:「買進投資整體市場股市組合的基金,並永久持有。」
ETF 是常用於指數化投資的工具,在臺股最具代表性的就是 元大臺灣50(0050)以及 富邦台50(006208)。事實上,打敗大盤績效並不是簡單的事,如果尚未找到適合的投資策略,那麼參與市場報酬就是最簡單、也最穩健的投資方式。
我們將定期定額系統實作在既有的 Trader 應用伺服器上。為了理解定期定額系統的運作流程,我們先描繪出 Trader 應用伺服器的系統環境圖:
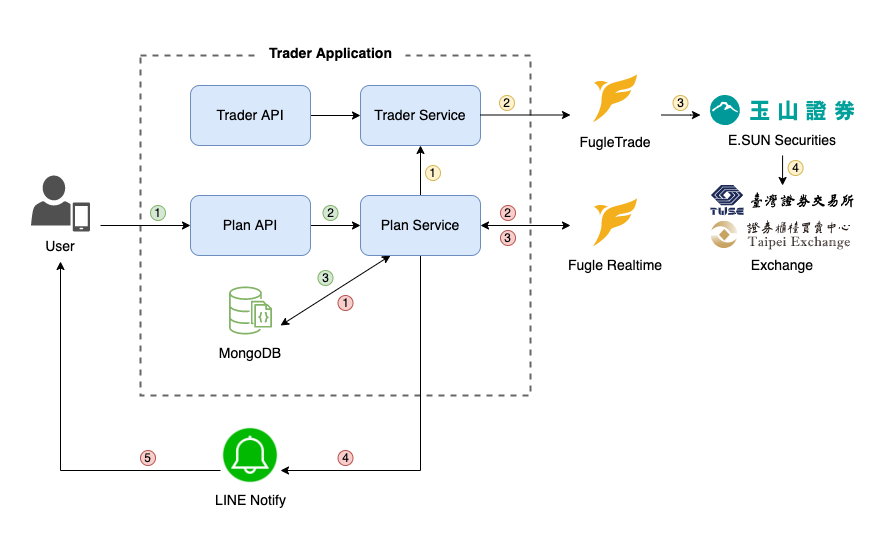
Trader 應用伺服器,主要包含以下元件:
Trader 定期定額系統處理資料的流程可以分成三大部分,包含使用者向 Plan API 請求定期定額委託設定、 Plan Service 執行定期定額委託,以及 Plan Service 向 Trader Service 下達委託指令。
使用者向 Plan API 請求定期定額委託設定:
Plan Service 執行定期定額委託::
Plan Service 向 Trader Service 請求下單委託::
當 Plan Service 完成下單後,會更新 MongoDB 資料庫,將該筆定期定額委託設定的預約單更新為已執行。當下單委託成功後, Trader Service 亦會收到委託回報,並且透過 LINE Notify 將回報訊息發送給使用者。
暸解定期定額系統的運作流程後,我們開始進行實作。請打開終端機,使用 Nest CLI 在 trader 應用程式目錄下建立 PlanModule:
$ nest g module plan -p trader
執行後,Nest CLI 會在專案下建立 apps/trader/src/plan 目錄,在該目錄下新增 plan.module.ts 檔案,並且將 PlanModule 加入至 AppModule 的 imports 設定。
然後開啟建立的 apps/trader/src/plan/plan.module.ts 檔案,我們要匯入 FugleRealtimeModule 透過富果行情 API 查詢股票即時報價。
import { Module } from '@nestjs/common';
import { FugleRealtimeModule } from '@fugle/realtime-nest';

@Module({
  imports: [
    FugleRealtimeModule.registerAsync({
      useFactory: () => ({
        apiToken: process.env.FUGLE_REALTIME_API_TOKEN,
      }),
    }),
  ],
})
export class PlanModule {}
這裡使用環境變數讀取富果行情 API Token,在專案目錄下的 .env 檔案加入 FUGLE_REALTIME_API_TOKEN 環境變數:
FUGLE_REALTIME_API_TOKEN=
下一步,為了啟用排程任務,在專案下開啟 apps/trader/src/app.module.ts 檔案,在根模組 AppModule 匯入 ScheduleModule:
import { Module } from '@nestjs/common';
import { ConfigModule } from '@nestjs/config';
import { ScheduleModule } from '@nestjs/schedule';
import { MongooseModule } from '@nestjs/mongoose';
import { FugleTradeModule } from '@fugle/trade-nest';
import { LineNotifyModule } from 'nest-line-notify';
import { IpFilter } from 'nestjs-ip-filter';
import { TraderModule } from './trader/trader.module';
import { PlanModule } from './plan/plan.module';

@Module({
  imports: [
    ConfigModule.forRoot(),
    ScheduleModule.forRoot(), // <--- 加入 ScheduleModule
    MongooseModule.forRoot(process.env.MONGODB_URI),
    FugleTradeModule.forRoot({
      config: {
        apiUrl: process.env.FUGLE_TRADE_API_URL,
        certPath: process.env.FUGLE_TRADE_CERT_PATH,
        apiKey: process.env.FUGLE_TRADE_API_KEY,
        apiSecret: process.env.FUGLE_TRADE_API_SECRET,
        aid: process.env.FUGLE_TRADE_AID,
        password: process.env.FUGLE_TRADE_PASSWORD,
        certPass: process.env.FUGLE_TRADE_CERT_PASS,
      },
    }),
    LineNotifyModule.forRoot({
      accessToken: process.env.LINE_NOTIFY_ACCESS_TOKEN,
    }),
    IpFilter.register({
      whitelist: String(process.env.ALLOWED_IPS).split(','),
    }),
    TraderModule,
    PlanModule,
  ],
})
export class AppModule {}
在 apps/trader/src/plan 目錄下新增 plan.schema.ts 檔案,我們要定義 PlanSchema,這代表的是一個 Mongoose Schema,定義定期定額委託的設定:
import { Prop, Schema, SchemaFactory } from '@nestjs/mongoose';
import { Document } from 'mongoose';

export type PlanDocument = Plan & Document;

@Schema({ timestamps: true })
export class Plan {
  @Prop()
  symbol: string;

  @Prop()
  price: number;

  @Prop()
  days: number[];

  @Prop()
  startDate: string;

  @Prop()
  endDate: string;

  @Prop()
  preorders: Array<{ date: string; placed: boolean; }>;

  @Prop({ default: false })
  completed: boolean;
}

export const PlanSchema = SchemaFactory.createForClass(Plan);
在 PlanSchema 中,各欄位的說明如下:
symbol:股票代碼price:定期投入的金額days:定期扣款日startDate:開始執行的時間endDate:結束執行的時間preorders:預約委託單completed:預約委託單是否已被全數執行完成 PlanSchema 後,我們繼續在 apps/trader/src/plan 目錄下建立 plan.repository.ts 檔案,實作 PlanRepository 作為對資料庫存取的介面。我們需要在 PlanRepository 實作以下方法:
getPlans():取得未執行完畢的定期定額委託設定。createPlan():建立一個定期定額委託設定。removePlan():刪除一個定期定額委託設定。updateExecutedPlan():更新定期定額委託設定,變更已執行的預約委託單。實作 PlanRepository 程式碼如下:
import { DateTime } from 'luxon';
import { Injectable } from '@nestjs/common';
import { InjectModel } from '@nestjs/mongoose';
import { Model } from 'mongoose';
import { Plan, PlanDocument } from './plan.schema';
import { CreatePlanDto } from './dto/create-plan.dto';

@Injectable()
export class PlanRepository {
  constructor(
    @InjectModel(Plan.name) private readonly model: Model<PlanDocument>,
  ) {}

  async getPlans(): Promise<PlanDocument[]> {
    return this.model.find({ completed: false })
      .select('-__v -createdAt -updatedAt')
      .lean();
  }

  async createPlan(createPlanDto: CreatePlanDto): Promise<PlanDocument> {
    const { symbol, days, price, startDate, endDate } = createPlanDto;

    const start = DateTime.fromISO(startDate);
    const end = DateTime.fromISO(endDate);
    const preorders = [];

    for (let current = start; current <= end; current = current.plus({ day: 1 })) {
      if (days.includes(current.get('day'))) {
        preorders.push({ date: current.toISODate(), placed: false });
      }
    }

    return this.model.create({ symbol, days, price, startDate, endDate, preorders });
  }

  async removePlan(id: string): Promise<void> {
    await this.model.deleteOne({ _id: id });
  }

  async getPlansToExecute(date: string): Promise<PlanDocument[]> {
    return this.model.find({
      completed: false,
      startDate: { $lte: date },
      endDate: { $gte: date },
      preorders: {
        $elemMatch: {
          date: { $lte: date },
          placed: false,
        },
      },
    });
  }

  async updateExecutedPlan(id: string, date: string): Promise<PlanDocument> {
    return this.model.findOneAndUpdate(
      { _id: id, 'preorders.date': date },
      { $set: { 'preorders.$.placed': true } },
      { new: true },
    );
  }
}
在 createPlan() 方法中,接收參數 createPlanDto 是資料傳輸物件(Data Transfer Object)用來建立定期定額委託設定。在 apps/trader/src/plan 目錄下建立 dto 資料夾,並在目錄下新增 create-plan.dto.ts 檔案, 實作 CreatePlanDto 表示新增定期定額委託設定的資料傳輸物件:
import { IsString, IsNumber, IsArray, IsDateString } from 'class-validator';

export class CreatePlanDto {
  @IsString()
  symbol: string;

  @IsNumber()
  price: number;

  @IsArray()
  days: number[];

  @IsDateString()
  startDate: string;

  @IsDateString()
  endDate: string;
}
完成後,開啟 apps/trader/src/plan/plan.module.ts 檔案,在 PlanModule 加入 PlanSchema 與 PlanRepository:
import { Module } from '@nestjs/common';
import { MongooseModule } from '@nestjs/mongoose';
import { FugleRealtimeModule } from '@fugle/realtime-nest';
import { Plan, PlanSchema } from './plan.schema';
import { PlanRepository } from './plan.repository';

@Module({
  imports: [
    MongooseModule.forFeature([
      { name: Plan.name, schema: PlanSchema },
    ]),
    FugleRealtimeModule.registerAsync({
      useFactory: () => ({
        apiToken: process.env.FUGLE_REALTIME_API_TOKEN,
      }),
    }),
  ],
  providers: [PlanRepository],
})
export class PlanModule {}
我們已經在 PlanSchema 定義定期定額委託設定的資料欄位,並且在 PlanRepository 實作系統性投資計劃的資料庫存取方式,下一步要實作 PlanService,完成實現定期定額委託的各項方法。請打開終端機,使用 Nest CLI 建立 PlanService:
$ nest g service plan -p trader --no-spec
執行後,Nest CLI 會在 apps/trader/src/plan 目錄下建立 plan.service.ts 檔案,開啟該檔案在 PlanService 實作以下可供外部存取的方法:
getPlans():取得所有定期定額委託設定。createPlan():建立一個定期定額委託設定。removePlan():移除一個定期定額委託設定。實作 PlanService 程式碼如下:
import { omit } from 'lodash';
import { DateTime } from 'luxon';
import { Injectable, Logger } from '@nestjs/common';
import { Cron } from '@nestjs/schedule';
import { HttpClient } from '@fugle/realtime';
import { FugleTrade, Order } from '@fugle/trade';
import { InjectHttpClient } from '@fugle/realtime-nest';
import { InjectFugleTrade } from '@fugle/trade-nest';
import { InjectLineNotify, LineNotify } from 'nest-line-notify';
import { PlanRepository } from './plan.repository';
import { CreatePlanDto } from './dto/create-plan.dto';

@Injectable()
export class PlanService {
  constructor(
    @InjectHttpClient() private readonly client: HttpClient,
    @InjectFugleTrade() private readonly fugle: FugleTrade,
    @InjectLineNotify() private readonly lineNotify: LineNotify,
    private readonly PlanRepository: PlanRepository,
  ) {}

  async getPlans() {
    return this.PlanRepository.getPlans();
  }

  async createPlan(createPlanDto: CreatePlanDto) {
    const plan = await this.PlanRepository.createPlan(createPlanDto);
    return omit(plan.toJSON(), ['__v', 'createdAt', 'updatedAt']);
  }

  async removePlan(id: string) {
    return this.PlanRepository.removePlan(id);
  }

  @Cron('0 29 13 * * *')
  async execute() {
    const dt = DateTime.local();
    const date = dt.toISODate();
    const time = dt.toFormat('yyyy/MM/dd HH:mm:ss');

    try {
      const plans = await this.PlanRepository.getPlansToExecute(date);

      for (const plan of plans) {
        const res = await this.client.intraday.quote({ symbolId: plan.symbol, oddLot: true });
        if (res.data.info.date !== date) continue;

        const price = res.data.quote.order.asks.pop().price;
        const quantity =  Math.floor(plan.price / price);

        const order = new Order({
          stockNo: plan.symbol,
          buySell: Order.Side.Buy,
          price,
          quantity,
          apCode: Order.ApCode.IntradayOdd,
          priceFlag: Order.PriceFlag.Limit,
          bsFlag: Order.BsFlag.ROD,
          trade: Order.Trade.Cash,
        });

        // 設定推播訊息
        const message = [
          '',
          `<<定期定額>>`,
          `股票代號: ${plan.symbol}`,
          `價格: ${price}`,
          `數量: ${quantity}`,
          `時間: ${time}`,
        ].join('\n');

        // 透過 LINE Notify 推播訊息
        await this.lineNotify.send({ message });

        // 執行下單委託
        await this.fugle.placeOrder(order);

        // 將預約訂單更新為已執行
        const preorder = plan.preorders.find(preorder => preorder.date <= date && preorder.placed === false);
        await this.PlanRepository.updateExecutedPlan(plan.id, preorder.date);
      }
    } catch (err) {
      Logger.error(err.message, err.stack, PlanService.name);
    }
  }
}
考量流動性與即時的五檔報價,我們以「盤中零股交易」的方式下委託單。臺股的盤中零股交易與一般交易稍有不同,在盤中零股交易在上午 09:10 時進行第一筆撮合,之後每 3 分鐘都是以集合競價方式撮合成交。依照這個規則,13:30 最後一盤的撮合前,在 13:28 盤中零股交易會有一次最新的零股撮合成交價。
註:證交所已宣布自 2022 年 12 月 19 日起,盤中零股交易撮合間隔時間由現行 3 分鐘縮短至 1 分鐘。
在 execute() 方法,我們使用 @Cron() 裝飾器聲明排程任務,將執行定期定額委託的時間設定在 13:29:00,目的是在最後一盤完成撮和成交。
在 execute() 方法中,我們從資料庫取得在程式執行當下要被執行的定期定額委託設定。取出匹配的定期定額委託設定後,再使用 this.client.intraday.quote() 方法,透過富果即時行情 API 取得定期定額標的 (股票或ETF)的最新成交價以及最佳五檔報價。如果取得最新報價的日期,不等於程式執行當下的日期,則代表程式執行當下的日期非交易日,因此就結束函式。
基於定期定額投資的目的,我們希望委託單可按照計畫在設定金額買入對應的股數,而零股交易買賣成交優先順序是以價格優先,因此我們使用取得報價揭露的「最後一檔委賣價」作為委買價,並算出買入對應的股數,讓委託單可以盡可能完成成交。
完成下單後,我們這筆定期定額計畫的委託單就已經被執行了,最後呼叫 this.PlanRepository.updateExecutedPlan() 方法更新該定期定額計畫,將最近一次預約委託單更新為已下單。
當時間至 13:30 所有股票完成最後一盤成交後,主動回報就會通知這筆零股委託單是否已經撮和成交了。
完成 Plan Service 後,我們要實作 Plan API,提供使用者透過 HTTP API 請求設定定期定額委託。打開終端機,使用 Nest CLI 建立 PlanController:
$ nest g controller plan -p trader --no-spec
執行後,Nest CLI 會在 apps/trader/src/plan 目錄下建立 plan.controller.ts 檔案,開啟該檔案在 PlanController 實作以下方法:
getPlans():取得未執行完畢的定期定額委託設定。createPlan():建立一個定期定額委託設定。removePlan():刪除一個定期定額委託設定。實作 PlanController 程式碼如下:
import { Controller, Get, Post, Delete, Body, Param } from '@nestjs/common';
import { PlanService } from './plan.service';
import { CreatePlanDto } from './dto/create-plan.dto';

@Controller('sip')
export class PlanController {
  constructor(private readonly PlanService: PlanService) {}

  @Get('/plans')
  async getPlans() {
    return this.PlanService.getPlans();
  }

  @Post('/plans')
  async createPlan(@Body() createPlanDto: CreatePlanDto) {
    return this.PlanService.createPlan(createPlanDto);
  }

  @Delete('/plans/:id')
  async removePlan(@Param('id') id: string) {
    return this.PlanService.removePlan(id);
  }
}
完成 PlanController 後,就可以測試 Plan API 了。首先啟動 Trader 應用程式:
$ npm start trader
然後在終端機透過 curl 指令來測試以下 API endpoints:
GET /sip/plans:取得所有定期定額委託設定。POST /sip/plans:建立一個定期定額委託設定。DELETE /sip/plans/:id:移除一個定期定額委託設定。使用以下 curl 指令建立一個定期定額委託設定,以元大臺灣50(0050)為例,在 2022 年 9 月 5 日、15 日以及 25 日每次投入 5000 元:
$ curl --request POST \
    --url http://localhost:3001/sip/plans \
    --header 'Content-Type: application/json' \
    --data '{
      "symbol": "0050",
      "price": 5000,
      "days": [5,15,25],
      "startDate": "2022-09-01",
      "endDate": "2022-09-30"
    }'
成功建立一個定期定額委託設定,以 Plan ID 6333b894919c4223830e0ff1 為例:
{"symbol":"0050","price":5000,"days":[5,15,25],"startDate":"2022-09-01","endDate":"2022-09-30","preorders":[{"date":"2022-09-05","placed":false},{"date":"2022-09-15","placed":false},{"date":"2022-09-25","placed":false}],"completed":false,"_id":"6333b894919c4223830e0ff1"}
使用以下 curl 指令取得所有定期定額委託設定:
$ curl --request GET \
    --url http://localhost:3001/sip/plans
成功取得所有定期定額委託設定:
[{"_id":"6333b894919c4223830e0ff1","symbol":"0050","price":5000,"days":[5,15,25],"startDate":"2022-09-01","endDate":"2022-09-30","preorders":[{"date":"2022-09-05","placed":false},{"date":"2022-09-15","placed":false},{"date":"2022-09-25","placed":false}],"completed":false}]
使用以下 curl 指令刪除一個定期定額委託設定,以 Plan ID 6333b894919c4223830e0ff1 為例:
$ curl --request DELETE \
    --url http://localhost:3001/sip/plans/6333b894919c4223830e0ff1
完成後,我們就可以請求 Plan API 新增定期定額委託設定。當觸發下單委託條件時,Plan Service 就會向 Trader Service 發送下單請求,並透過 LINE Notify 發送推播訊息。
下圖是執行定期定額委託的通知訊息,定期定額投入 5000 元買進元大臺灣50(0050)。
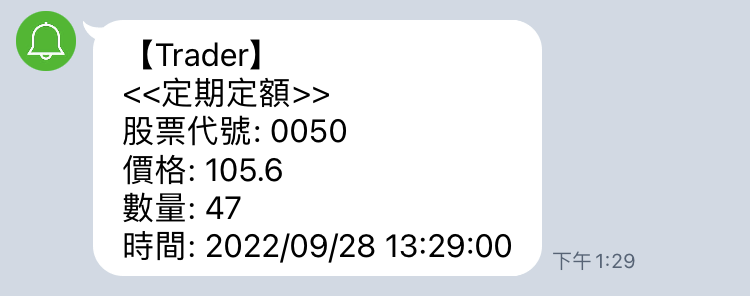
以上,我們已經完成了定期定額投資系統。需要注意的是,在我們的實作範例並沒有把手續費納入其中。如果想要將手續費列入計算,可以您自行實現滿足這個需求。
本系列文已正式出版為《Node.js 量化投資全攻略:從資料收集到自動化交易系統建構實戰》。本書新增了全新內容和實用範例,為你提供更深入的學習體驗!歡迎參考選購,開始你的量化投資之旅!
天瓏網路書店連結:https://www.tenlong.com.tw/products/9786263336070