XGBoost 演算法, 近年來常被用在機器學習, Kaggle競賽中的結構話資料或表格中。XGBoost 演算法的設計是 "迭代梯度決策樹- gradient boosted decision trees" 可供快速運算和精確計算使用。如果建模不適合預期,請使用XGboost。 XGBoost算法已成為許多數據科學家的終極武器。它是一種高度複雜的算法,功能強大,足以處理各種不規則的數據。
梯度提升(Gradient Boosting)是一種算法,最早的論文是《Greedy Function Approximation: A Gradient Boosting Machine》,它可以應用到很多模型上,但是最常見的是用到決策樹上,也就是GBDT(Gradient Boosting Decision Tree)。我們這裡介紹XGBoost,它是一種GBDT的實現。
介紹Xgboost之前我們先了解一下分類與回歸樹(Classification And Regression Tree/CART)。它也是一種決策樹,可以用於分類和回歸。 CART的每次劃分都把一棵樹劃分成兩棵子樹,如下圖所示。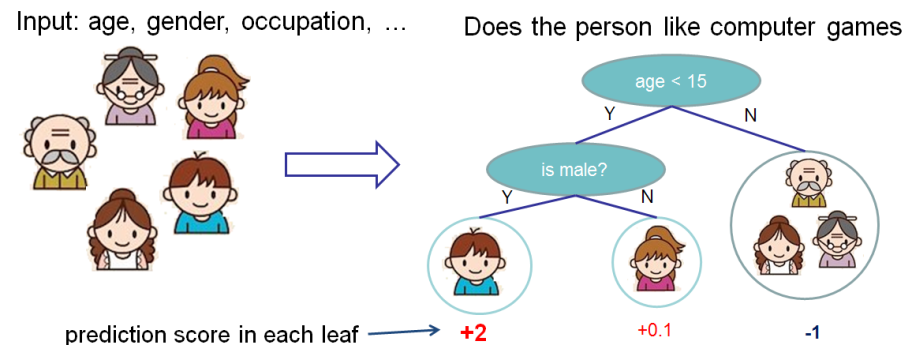
XGBoost(eXtreme Gradient Boosting)是梯度增强算法的進階版。其中, 包含了關鍵字'Boosting',意味著它是一個boosting集成算法,所以它的主要思路是將成百上千個樹模型組合起來成為一個準確率很高的模型,此模型通過不斷迭代生成新的樹。
作者定義XGBoost: a scalable machine learning system for tree boosting.
XGBoost參數_Official
XGBoost 可想成多個CART進行融合,如下圖所示,我們可以把兩棵樹的輸出加起來得到最終的輸出。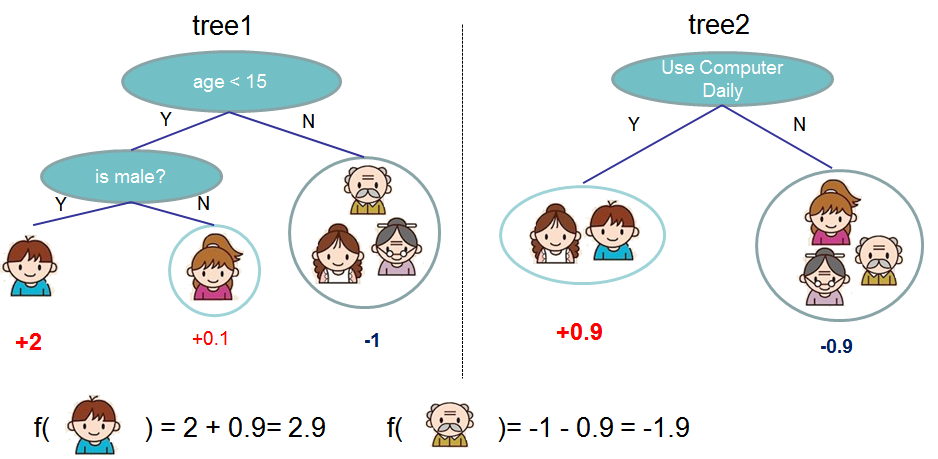
Don't forget to do pip install xgboost in the pycharm terminal before hands on.
from xgboost import XGBClassifier
import numpy as np
import pandas as pd
import sklearn
from sklearn.multiclass import OneVsRestClassifier
#讀資料
df_1 = pd.read_csv('usa_inc.csv')
print(df_1)
#Label encoding~
from sklearn.preprocessing import LabelEncoder
labelencoder = LabelEncoder()
df_1['id'] = labelencoder.fit_transform(df_1['id'])
df_1.dropna()
print(df_1)
'''### for analyzing which job has more paid, # occupation(label encoding) & num of occupation
occup_num = df_1['occupation'].value_counts()
#print(df_1['occupation'], occup_num)
'''
## dateframe set dummy variables
df_1_dummy = pd.get_dummies(df_1, columns=['occupation','gender'])
#print(df_1_dummy)
## get train test dataset
from sklearn.model_selection import train_test_split
train_data = df_1_dummy.iloc[:,0:3] #columns seperation
#from sklearn.preprocessing import StandardScaler
#scaler = StandardScaler().fit(train_data)
#X_scaled = scaler.transform(train_data)
train_target = df_1_dummy.iloc[:,4:20] #columns seperation
# split train and test data
X_train, X_test, y_train, y_test = train_test_split(train_data,train_target,test_size=0.2, random_state=0)
# print(X_train.shape)
#training the model
clf_multilabel = OneVsRestClassifier(XGBClassifier())
clf_multilabel.fit(X_train,y_train)
pred = clf_multilabel.predict(X_test)
#print(pred) ##multilabel_XGBoost
pd.set_option('display.max_columns', None) # 設定字元顯示寬度
# 將預測好的結果轉成dataframe
df_pred = pd.DataFrame(pred,columns=['gender_0', 'gender_1', 'occupation_1', 'occupation_2', 'occupation_3', 'occupation_4', 'occupation_5', 'occupation_6', 'occupation_7', 'occupation_8', 'occupation_9', 'occupation_10', 'occupation_11', 'occupation_12', 'occupation_13'])
#print(df_pred)
pd.set_option('display.max_rows', None) # 設定字元顯示寬度
## append test_x and test_y
X_test.index = range(len(X_test))
# print(X_test)
##concat
final_result = pd.concat((X_test,df_pred),axis =1)
## 把label encoding 的id標籤數值轉回原本的id
final_result['id'] = labelencoder.inverse_transform(final_result['id'])
# print(final_result)
#把透過pandas get dummies 取得one-hot encoding 的gender和occupation欄位轉回來
def undummify(df, prefix_sep="_"):
    cols2collapse = {
        item.split(prefix_sep)[0]: (prefix_sep in item) for item in df.columns
    }
    series_list = []
    for col, needs_to_collapse in cols2collapse.items():
        if needs_to_collapse:
            undummified = (
                df.filter(like=col)
                    .idxmax(axis=1)
                    .apply(lambda x: x.split(prefix_sep, maxsplit=1)[1])
                    .rename(col)
            )
            series_list.append(undummified)
        else:
            series_list.append(df[col])
    undummified_df = pd.concat(series_list, axis=1)
    return undummified_df
final_result_add = undummify(final_result)
final_result_add.sort_values(by='gender')
final_result_add_2 = final_result_add.sort_values(by='occupation')
# print(final_result_add)
print(final_result_add_2)
from sklearn.model_selection import train_test_split
from sklearn import metrics
from  sklearn.datasets  import  make_hastie_10_2
from xgboost.sklearn import XGBClassifier
X, y = make_hastie_10_2(random_state=0)
X_train, X_test, y_train, y_test = train_test_split(X, y, test_size=0.5, random_state=0)##test_size测试集合所占比例
clf = XGBClassifier(
silent=0 ,#设置成1则没有运行信息输出,最好是设置为0.是否在运行升级时打印消息。
#nthread=4,# cpu 线程数 默认最大
learning_rate= 0.3, # 如同学习率
min_child_weight=1,
# 这个参数默认是 1,是每个叶子里面 h 的和至少是多少,对正负样本不均衡时的 0-1 分类而言
#,假设 h 在 0.01 附近,min_child_weight 为 1 意味着叶子节点中最少需要包含 100 个样本。
#这个参数非常影响结果,控制叶子节点中二阶导的和的最小值,该参数值越小,越容易 overfitting。
max_depth=6, # 构建树的深度,越大越容易过拟合
gamma=0,  # 树的叶子节点上作进一步分区所需的最小损失减少,越大越保守,一般0.1、0.2这样子。
subsample=1, # 随机采样训练样本 训练实例的子采样比
max_delta_step=0,#最大增量步长,我们允许每个树的权重估计。
colsample_bytree=1, # 生成树时进行的列采样
reg_lambda=1,  # 控制模型复杂度的权重值的L2正则化项参数,参数越大,模型越不容易过拟合。
#reg_alpha=0, # L1 正则项参数
#scale_pos_weight=1, #如果取值大于0的话,在类别样本不平衡的情况下有助于快速收敛。平衡正负权重
#objective= ‘multi:softmax‘, #多分类的问题 指定学习任务和相应的学习目标
#num_class=10, # 类别数,多分类与 multisoftmax 并用
n_estimators=100, #树的个数
seed=1000 #随机种子
#eval_metric= ‘auc‘
)
clf.fit(X_train,y_train,eval_metric=‘auc‘)
#设置验证集合 verbose=False不打印过程
clf.fit(X_train, y_train,eval_set=[(X_train, y_train), (X_val, y_val)],eval_metric=‘auc‘,verbose=False)
#获取验证集合结果
evals_result = clf.evals_result()
y_true, y_pred = y_test, clf.predict(X_test)
print"Accuracy : %.4g" % metrics.accuracy_score(y_true, y_pred)
#回归
#m_regress = xgb.XGBRegressor(n_estimators=1000,seed=0)
補充的程式碼為參考 "XGBoost中参数调整的完整指南(包含Python中的代码)" 的文章 >>> 更多調整XGBoost參數&實作可以參考此連結~ "XGBoost中参数调整的完整指南(包含Python中的代码)"


 iThome鐵人賽