在之前文章中我們有用 PixelBit 玩過小恐龍,這次我們換點口味改玩俄羅斯方塊。
此次俄羅斯方塊是參考這位作者的 Code 下去重構:https://www.youtube.com/watch?v=a9YPPsduDNg
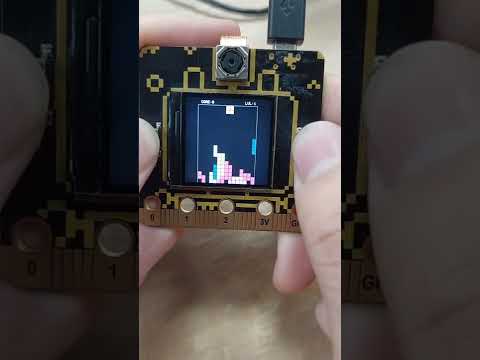
下圖是我們的 PixelBit,可以看到除了 500 萬畫素鏡頭、TFT(240x240),還有左右兩顆 A、B 無段按鍵,這兩顆按鍵剛好適合我們玩各種遊戲,我們將會搭配 TFT、AB 按鍵來玩俄羅斯方塊。
引用相關 Library
/* #region  include */
#include "CircusUart.h"
#include "config.h"
#include "tet.h"
#include <SPI.h>
#include <TFT_eSPI.h>
#include <TJpg_Decoder.h>
/* #endregion */
將積木分三個區塊
/* #region  buff */
uint16_t BlockImage[Block_NUM][Block_SIEZ][Block_SIEZ];     // 8 種積 Pixel,包含分隔線
uint16_t backBuffer[Height * Length][Width * Length];       // 遊戲區塊 Pixel,[Height*Length][Width*Length]
int      screen[Width][Height] = {0};                       // 存放積木區塊顏色 index (積木格數)
/* #endregion */
定義 7 種積木各個方向占用座標、可旋轉的方向數量(每個積木最多四個方向),積木顏色
/* #region  建立 7 個積木形狀、各種方向、顏色 index */
Block_t blocks[7] = {
     {{{{-1, 0}, {0, 0}, {1, 0}, {2, 0}}, {{0, -1}, {0, 0}, {0, 1}, {0, 2}}, {{0, 0}, {0, 0}, {0, 0}, {0, 0}}, {{0, 0}, {0, 0}, {0, 0}, {0, 0}}},       2, 1}, // 長條型
     {{{{0, -1}, {1, -1}, {0, 0}, {1, 0}}, {{0, 0}, {0, 0}, {0, 0}, {0, 0}}, {{0, 0}, {0, 0}, {0, 0}, {0, 0}}, {{0, 0}, {0, 0}, {0, 0}, {0, 0}}},       1, 2}, // 正方形
     {{{{-1, -1}, {-1, 0}, {0, 0}, {1, 0}}, {{-1, 1}, {0, 1}, {0, 0}, {0, -1}}, {{-1, 0}, {0, 0}, {1, 0}, {1, 1}}, {{1, -1}, {0, -1}, {0, 0}, {0, 1}}}, 4, 3}, //
     {{{{-1, 0}, {0, 0}, {0, 1}, {1, 1}}, {{0, -1}, {0, 0}, {-1, 0}, {-1, 1}}, {{0, 0}, {0, 0}, {0, 0}, {0, 0}}, {{0, 0}, {0, 0}, {0, 0}, {0, 0}}},     2, 4},
     {{{{-1, 0}, {0, 0}, {1, 0}, {1, -1}}, {{-1, -1}, {0, -1}, {0, 0}, {0, 1}}, {{-1, 1}, {-1, 0}, {0, 0}, {1, 0}}, {{0, -1}, {0, 0}, {0, 1}, {1, 1}}}, 4, 5},
     {{{{-1, 1}, {0, 1}, {0, 0}, {1, 0}}, {{0, -1}, {0, 0}, {1, 0}, {1, 1}}, {{0, 0}, {0, 0}, {0, 0}, {0, 0}}, {{0, 0}, {0, 0}, {0, 0}, {0, 0}}},       2, 6},
     {{{{-1, 0}, {0, 0}, {1, 0}, {0, -1}}, {{0, -1}, {0, 0}, {0, 1}, {-1, 0}}, {{-1, 0}, {0, 0}, {1, 0}, {0, 1}}, {{0, -1}, {0, 0}, {0, 1}, {1, 0}}},   4, 7}
};
/* #endregion */
宣告一些會需要用到的全域變數
/* #region  動態變數 */
Point_t pos;       // 當前積木座標
Block_t block;     // 當前積木
int     rot     = 0;
bool    started = false, gameover = false;

boolean btn_AB     = false;               // 觸發積木 旋轉
boolean btn_LEFT   = false;               // 觸發積木 往左
boolean btn_RIGHT  = false;               // 觸發積木 往右
int     game_speed = GAME_INIT_SPEED;     // 下降速度

// 紀錄按鍵狀態,避免重複觸發
// TODO: 將按鍵觸發狀態細分,並交由 328P 處理
int pom  = 0;
int pom2 = 0;
int pom3 = 0;

int score = 0;
int lvl   = 1;

ATM_BTN_STATE_E btn_b_state = ATM_BTN_REL;
ATM_BTN_STATE_E btn_a_state = ATM_BTN_REL;
/* #endregion */
建立 TFT、CircusUart object
/* #region  Object */
TFT_eSPI   tft = TFT_eSPI();
CircusUart uart(Serial);
/* #endregion */
初始化遊戲
/* #region  初始化遊戲 */
void initGame()
{
    // 清除 screen 內容
    for (int j = 0; j < Height; ++j)
        for (int i = 0; i < Width; ++i)
            screen[i][j] = 0;
    // 變數初始化
    gameover   = false;
    score      = 0;
    game_speed = GAME_INIT_SPEED;
    lvl        = 1;
    // 產生新積木
    PutStartPos();
    /*  根據當前旋轉方向(rot)選擇 Block_t 內其中一種方向積木,
        取得 X 座標(block.square[rot][i].X)加上 X 開始座標(pos.X),
        取得 Y 座標(block.square[rot][i].Y)加上 Y 開始座標(pos.Y),
        設定積木顏色 index 到積木空間 buff(screen)內
    */
    for (int i = 0; i < 4; ++i)
        screen[pos.X + block.square[rot][i].X][pos.Y + block.square[rot][i].Y] = block.color;
    // 繪製分數、難度等級
    tft.drawString("SCORE:" + String(score), 38, 8, 1);
    tft.drawString("LVL:" + String(lvl), 167, 8, 1);

    // 繪製所有積木到 TFT
    Draw();
}
/* #endregion */
初始化遊戲積木
/* #region  初始化遊戲積木 */
void PutStartPos()
{
    game_speed = GAME_INIT_SPEED;
    pos.X      = 7;                           // 初始化積木 X 座標,遊戲區正中間 Width/2
    pos.Y      = 1;                           // 初始化積木 Y 座標,遊戲區最上方
    block      = blocks[random(7)];           // 隨機取積木
    rot        = random(block.numRotate);     // 隨機設定方向
}
/* #endregion */
繪製所有積木到 TFT
/* #region  更新 backBuffer,繪製 backBuffer 到 TFT */
void Draw()
{                                                    // Draw 120x240 in the center
    for (int i = 0; i < Width; ++i)                  // 水平尋訪 square
        for (int j = 0; j < Height; ++j)             // 垂直尋訪 square
            for (int k = 0; k < Length; ++k)         // 垂直尋訪 square 中 Pixel
                for (int l = 0; l < Length; ++l)     // 水平尋訪 square 中 Pixel
                                                     // 設定 backBuffer 每一點像素言顏色
                    backBuffer[j * Length + l][i * Length + k] = BlockImage[screen[i][j]][k][l];
    // 顯示 backBuffer 到 TFT
    tft.pushImage(36, 20, 165, 220, *backBuffer);
}
/* #endregion */
明天我們會繼續講剩下的方法。


 iThome鐵人賽