本系列文已改編成書「甚麼?網頁也可以做派對遊戲?使用 Vue 和 babylon.js 打造 3D 派對遊戲吧!」
書中不只重構了程式架構、改善了介面設計,還新增了 2 個新遊戲呦!ˋ( ° ▽、° )
新遊戲分別使用了陀螺儀與震動回饋,趕快買書來研究研究吧!ლ(╹∀╹ლ)
在此感謝深智數位的協助,歡迎大家前往購書,鱈魚感謝大家 (。・∀・)。
助教:「所以到底差在哪啊?沒圖沒真相,被你坑了都不知道。(´。_。`)」
鱈魚:「你對我是不是有甚麼很深的偏見啊 (っ °Д °;)っ,來人啊,上連結!」

企鵝準備好了,現在讓我們建立企鵝遊戲用的玩家搖桿頁面吧。
企鵝遊戲搖桿基本上和大廳搖桿相同,只差在不是方向鍵,而是類比搖桿。
讓我們複製大廳搖桿並刪除方向鍵部分。
src\views\player-gamepad-the-first-penguin.vue
<template>
  <div
    class="w-full h-full flex text-white select-none"
    @touchmove="(e)=>e.preventDefault()"
  >

    <gamepad-btn
      class="absolute bottom-10 right-20"
      size="6rem"
      icon="done"
      @trigger="(status) => handleBtnTrigger('confirm', status)"
    />

    <div
      class="code-name"
      :class="codeNameClass"
    >
      {{ codeName }}
    </div>

    <q-dialog
      v-model="isPortrait"
      persistent
    >
      <q-card class="p-8">
        <q-card-section class="flex flex-col items-center gap-6">
          <q-spinner-box
            color="primary"
            size="10rem"
          />
          <div class="text-4xl">
            請將手機轉為橫向
          </div>
          <div class="text-base">
            轉為橫向後,此視窗會自動關閉
          </div>
        </q-card-section>
      </q-card>
    </q-dialog>
  </div>
</template>

<script setup lang="ts">
import { computed } from 'vue';
import { getPlayerColor } from '../common/utils';
import { KeyName } from '../types/player.type';

import GamepadBtn from '../components/gamepad-btn.vue';

import { useScreenOrientation } from '@vueuse/core';
import { useLoading } from '../composables/use-loading';
import { useClientPlayer } from '../composables/use-client-player';

const loading = useLoading();
const { orientation } = useScreenOrientation();
const player = useClientPlayer();

// 玩家資訊
const codeName = computed(() => player.codeName.value);
const playerColorName = computed(() => getPlayerColor({
  codeName: codeName.value
}));
const codeNameClass = computed(() => `bg-${playerColorName.value}`);

// 轉向
const isPortrait = computed(() => orientation.value?.includes('portrait'));

function handleBtnTrigger(keyName: `${KeyName}`, status: boolean) {
  console.log(`[ handleBtnTrigger ] : `, { keyName, status });

  player.emitGamepadData([{
    name: keyName,
    value: status,
  }]);
}

function init() {
  loading.hide();
}
init();
</script>

<style scoped lang="sass">
.code-name
  position: absolute
  top: 0
  left: 50%
  transform: translateX(-50%)
  width: 20rem
  height: 20rem
  display: flex
  justify-content: center
  padding: 0.1rem
  clip-path: circle(50% at 50% 0)
  font-size: 4rem
  text-shadow: 0px 0px 2px rgba(#000, 0.6)
</style>
接著新增至 Router 中。
src\router\router.ts
...
export enum RouteName {
  ...
  PLAYER_GAMEPAD_THE_FIRST_PENGUIN = 'player-gamepad-the-first-penguin',
}

const routes: Array<RouteRecordRaw> = [
  ...
  {
    path: `/player-gamepad`,
    ...
    children: [
      ...
      {
        path: `the-first-penguin`,
        name: RouteName.PLAYER_GAMEPAD_THE_FIRST_PENGUIN,
        component: () => import('../views/player-gamepad-the-first-penguin.vue')
      },
    ]
  },
  ...
]
...
先取消玩家 Router 自動跳轉的功能,讓我們可以先專注完成搖桿功能。
註解呼叫 init() 部分即可。
src\views\player-gamepad.vue
...
<script setup lang="ts">
...
function init() {...}
// init();
</script>
接著讓我們直接前往企鵝搖桿頁面,在網址列輸入 http://localhost:3000/player-gamepad/the-first-penguin,直接前往企鵝搖桿頁面。
目前應該會看到如下圖畫面。
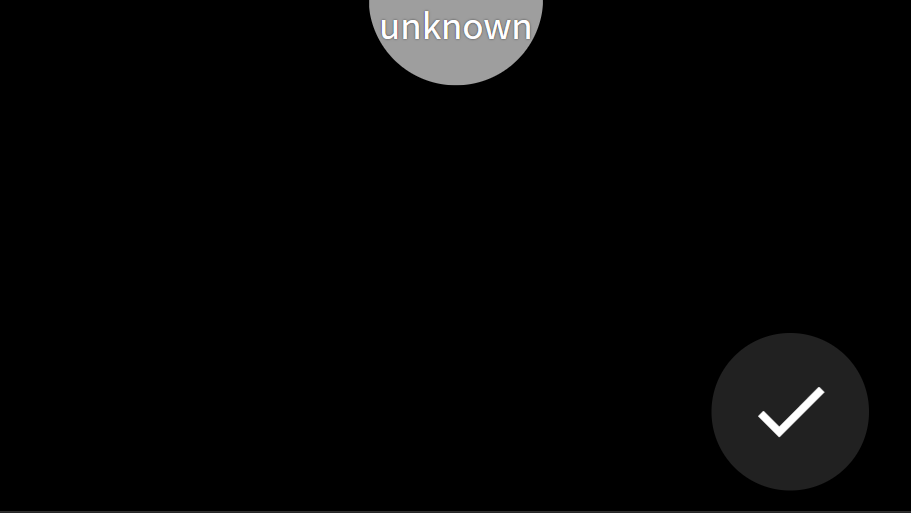
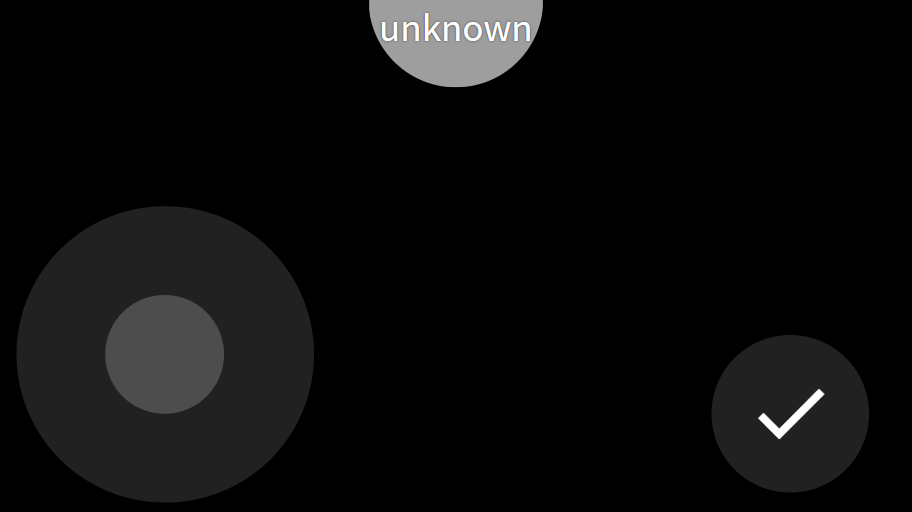
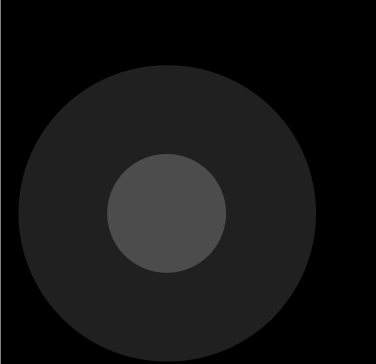
可以發現只差類比搖桿就可以馬上完成了!( ´ ▽ ` )ノ,預期外觀如下圖。
.png)
讓我們建立類比搖桿組件吧,首先是 Prop 與事件部分。
interface Props {
  /** 尺寸,直徑 */
  size?: string
}
const props = withDefaults(defineProps<Props>(), {
  size: '34rem'
});

const emit = defineEmits<{
  (e: 'trigger', data: { x: number, y: number }): void;
}>();
接著加入 template 與樣式部分。
src\components\gamepad-analog-stick.vue
<template>
  <div
    class="pad rounded-full bg-grey-10"
    @contextmenu="(e) => e.preventDefault()"
  >
    <div class="thumb" />
  </div>
</template>

<script setup lang="ts">
...
</script>

<style scoped lang="sass">
.pad
  width: v-bind('props.size')
  height: v-bind('props.size')
  display: flex
  justify-content: center
  align-items: center
.thumb
  width: 40%
  height: 40%
  background: white
  border-radius: 9999px
  opacity: 0.2
</style>
引入組件,看看外觀吧。
src\views\player-gamepad-lobby-the-first-penguin.vue
<template>
  <div...>
    <gamepad-analog-stick class="absolute bottom-5 left-8" />
    <gamepad-btn.../>
    ...
  </div>
</template>

<script setup lang="ts">
...
import GamepadAnalogStick from '../components/gamepad-analog-stick.vue';
...
</script>
...
讓我們依序加入功能吧,最重要的部分是偵測拉動事件,這裡使用 Quasar 提供的 Touch Pen 指令輕鬆實現!◝(≧∀≦)◟
src\components\gamepad-analog-stick.vue
<template>
<div
v-touch-pan.prevent="handleTouch"
class="pad rounded-full bg-grey-10"
...
>
...
</div>
</template>
<script setup lang="ts">
...
interface PenDetails {
touch: boolean;
mouse: boolean;
position: {
top: number;
left: number;
};
direction: 'up' | 'right' | 'down' | 'left';
isFirst: boolean;
isFinal: boolean;
duration: number;
distance: {
x: number;
y: number;
};
offset: {
x: number;
y: number;
};
delta: {
x: number;
y: number;
};
}
...
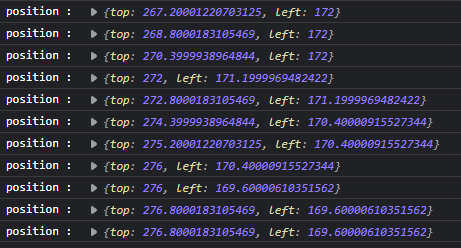
function handleTouch(details: PenDetails) {
const { position } = details;
console.log(`position : `, position);
}
</script>
...
現在在類比搖桿上拉動,應該會在 console 中出現如下圖訊息。
Quasar 真方便。◝(≧∀≦)◟
現在來實作 thumb 隨著手指移動的功能。
由於 Quasar 取得之 Touch Position 之基於畫面最左上角為原點,所以我們必須先取得 pad 的位置與尺寸,才有辦法換算出 thumb 需要偏移的距離。
首先取得 pad 位置與尺寸,並計算出 pad 中心點的 top 與 left。
<template>
  <div
    ref="pad"
    ...
  >
    <div class="thumb" />
  </div>
</template>

<script setup lang="ts">
import { useElementSize } from '@vueuse/core';
import { computed, reactive, ref } from 'vue';
...
const pad = ref<HTMLElement>();
const { width, height } = useElementSize(pad);

const padCenterPosition = computed(() => {
  const top = pad.value?.offsetTop ?? 0;
  const left = pad.value?.offsetLeft ?? 0;

  return {
    top: top + height.value / 2,
    left: left + width.value / 2,
  }
});
...
</script>
...
接著新增 thumb 相關變數。
const thumb = reactive({
  offset: {
    x: 0,
    y: 0
  },
  active: false,
});
const thumbStyle = computed(() => ({
  transform: `translate(${thumb.offset.x}px, ${thumb.offset.y}px)`,
  opacity: thumb.active ? 0.8 : undefined,
}));
調整 handleTouch() 內容。
function handleTouch(details: PenDetails) {
  const { position, isFirst, isFinal } = details;

  const offsetX = position.left - padCenterPosition.value.left;
  const offsetY = position.top - padCenterPosition.value.top;

  thumb.offset.x = offsetX;
  thumb.offset.y = offsetY;

  if (isFirst) {
    thumb.active = true;
  }

  if (isFinal) {
    thumb.offset.x = 0;
    thumb.offset.y = 0;
    thumb.active = false;
  }
}
最後把 thumbStyle 綁定至 template 中的 thumb 吧。
<template>
  <div ... >
    <div
      class="thumb"
      :style="thumbStyle"
    />
  </div>
</template>
現在 thumb 會和手指位置一起跑了!( ´ ▽ ` )ノ
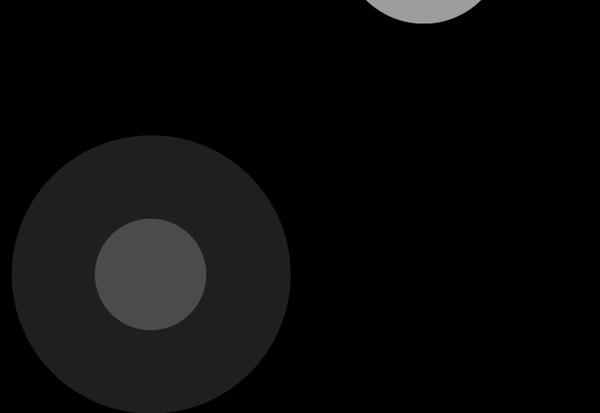
但是有一個問題,thumb 跑出 pad 範圍啦。(´● ω ●`)
讓我們限制一下 thumb 移動範圍,調整一下 handleTouch 內容。
function handleTouch(details: PenDetails) {
  const { position, isFirst, isFinal } = details;

  const offsetX = position.left - padCenterPosition.value.left;
  const offsetY = position.top - padCenterPosition.value.top;

  const vectorMagnitude = Math.sqrt(Math.pow(offsetX, 2) + Math.pow(offsetY, 2));

  const xMax = (offsetX / vectorMagnitude) * (width.value / 2);
  const yMax = (offsetY / vectorMagnitude) * (height.value / 2);

  thumb.offset.x = offsetX;
  thumb.offset.y = offsetY;

  if (Math.abs(offsetX) > Math.abs(xMax)) {
    thumb.offset.x = xMax;
  }
  if (Math.abs(offsetY) > Math.abs(yMax)) {
    thumb.offset.y = yMax;
  }

  if (isFirst) {
    thumb.active = true;
  }

  if (isFinal) {
    thumb.offset.x = 0;
    thumb.offset.y = 0;
    thumb.active = false;
  }
}
現在 thumb 會乖乖待在 pad 範圍內了。( ´ ▽ ` )ノ

最後讓我們加點回彈動畫,增加細節。
<style scoped lang="sass">
...
.thumb
  ...
  opacity: 0.2
  transition-duration: 0.3s
  transition-timing-function: cubic-bezier(0.000, 1.650, 0.190, 1.005)
  &.active
    transition-duration: 0s
</style>
最後讓我們 emit 資料出去吧,老樣子使用 throttle 避免 emit 過度頻繁。
<script setup lang="ts">
import { Vector2 } from '@babylonjs/core';
import { throttle } from 'lodash';
...
function handleTouch(details: PenDetails) {
  ...
  if (isFinal) {
    thumb.offset.x = 0;
    thumb.offset.y = 0;
    thumb.active = false;

    emit('trigger', {
      x: 0, y: 0
    });
  }

  // 轉為單位向量,讓 x、y 的範圍介於 -1 至 1 之間
  const vector = new Vector2(thumb.offset.x, thumb.offset.y).normalize();
  triggerThrottle(vector.x, vector.y);
}

const triggerThrottle = throttle((x: number, y: number) => {
  emit('trigger', {
    x, y
  });
}, 50, {
  leading: true,
  trailing: false,
});
</script>
...
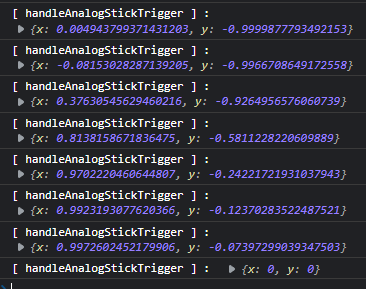
現在讓我們回到玩家搖桿畫面,來接收一下類比搖桿 emit 出來的資料。
新增 handleAnalogStickTrigger() 接收資料。
src\views\player-gamepad-lobby-the-first-penguin.vue
<template>
  <div ... >
    <gamepad-analog-stick
      class="absolute bottom-5 left-8"
      @trigger="(data) => handleAnalogStickTrigger(data)"
    />
    ...
  </div>
</template>

<script setup lang="ts">
...
function handleAnalogStickTrigger(data: { x: number, y: number }) {
  console.log(`[ handleAnalogStickTrigger ] : `, data);
}
...
</script>
...
現在拉動看看類比搖桿,會發現資料出現!( ‧ω‧)ノ╰(‧ω‧ )
以上程式碼已同步至 GitLab,大家可以前往下載:

