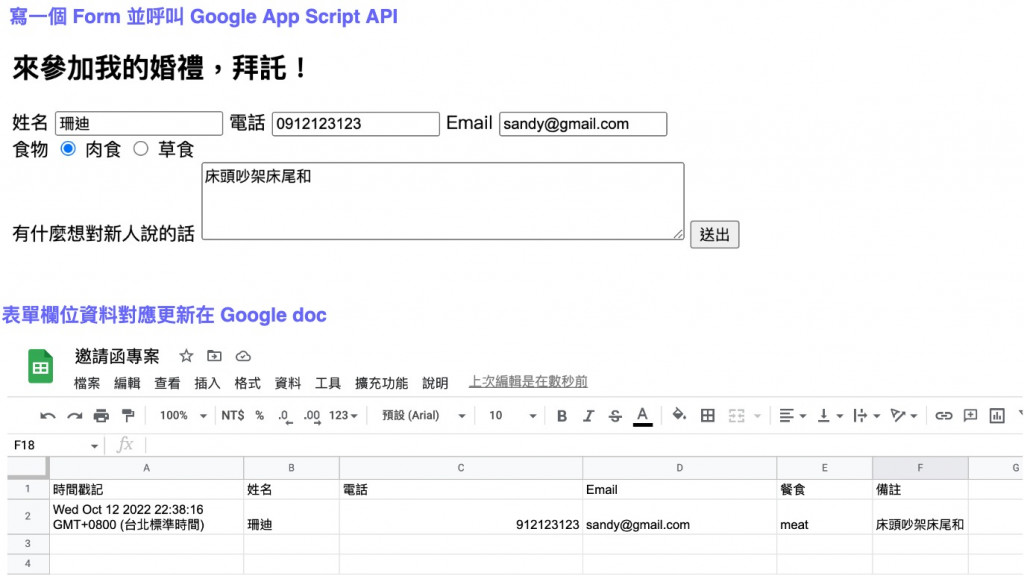
哇嗚!終於剩下不到幾天了,最後這幾天我們花一些篇章來完成 final project「Canvas 集大成,人生大事邀請函」,這個專案目標就是做一個邀請函,可以用在任何需要填表單的情境,這次的範例會以結婚宴客邀請函為例(真的人生大事!!)
人生大事邀請函將會以 Canvas 小遊戲做主要畫面效果,並串接 Google App Script 讓表單資料能被我們回收又不用寫 API 。因為內容比較長,將會拆成幾篇去做說明,而今天的目標是先讓資料能夠串接 Google App Script,並成功在 Google doc 中取得回填的資料。

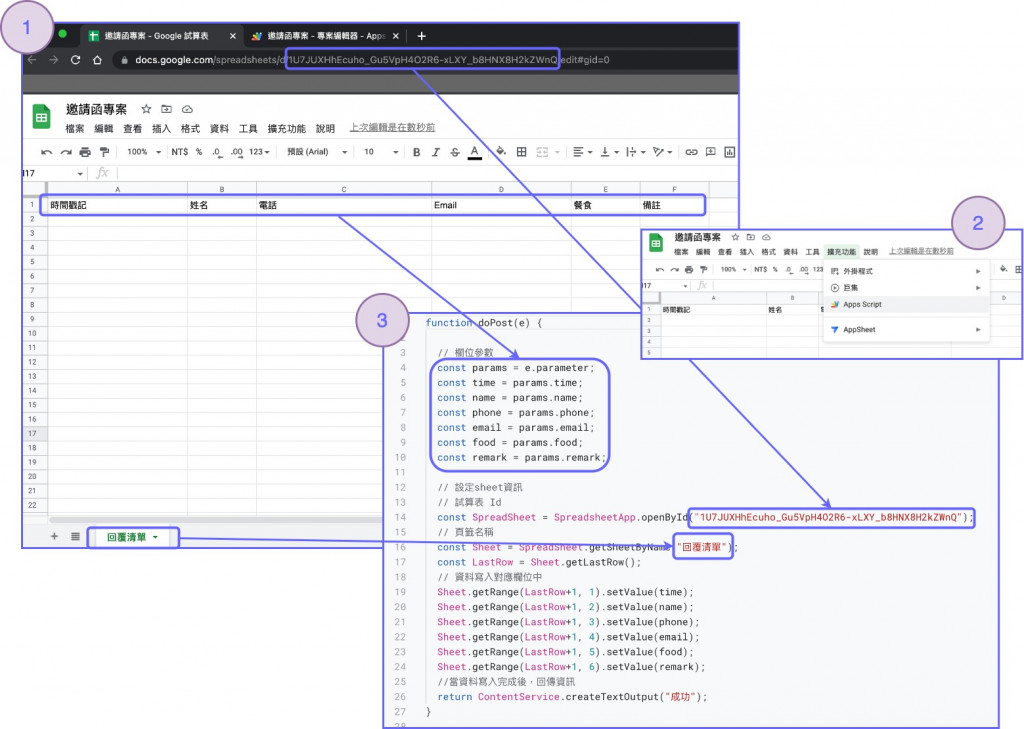
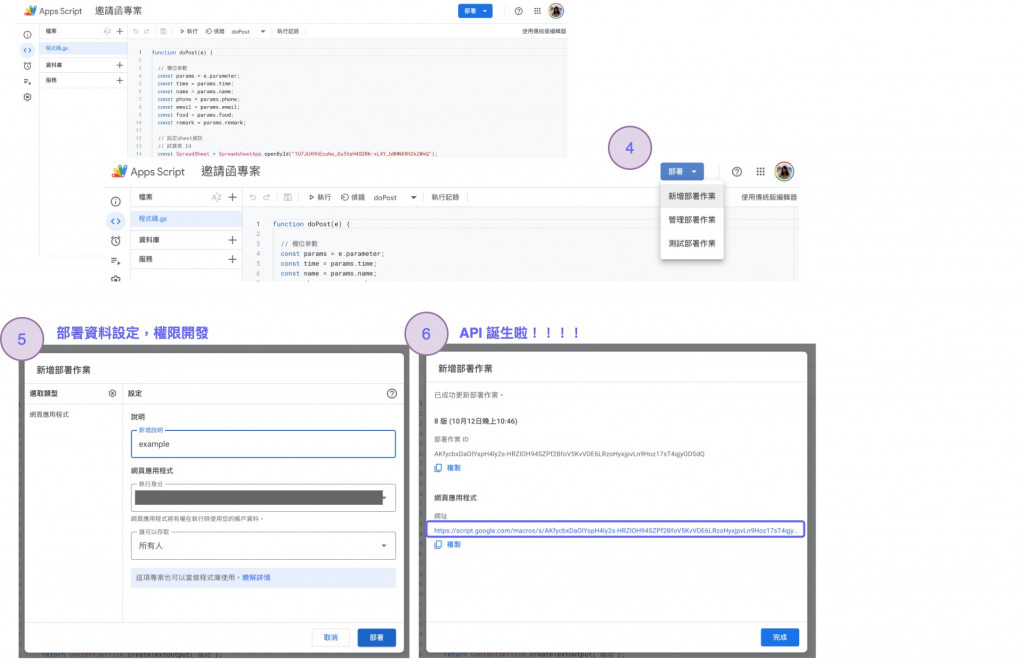
今天會先以功能說明為主,畫面未經美化請別擔心,我們再來慢慢優化,接著先來看看 Google App Script 的操作方式:

gs. 程式碼:
function doPost(e) {

  // 欄位參數
  const params = e.parameter;
  const time = params.time;
  const name = params.name;
  const phone = params.phone;
  const email = params.email;
  const food = params.food;
  const remark = params.remark;

  // 設定sheet資訊
  // 試算表 Id
  const SpreadSheet = SpreadsheetApp.openById("1U7JUXHhEcuho_Gu5VpH4O2R6-xLXY_b8HNX8H2kZWnQ");
  // 頁籤名稱
  const Sheet = SpreadSheet.getSheetByName("回覆清單");
  const LastRow = Sheet.getLastRow();
  // 資料寫入對應欄位中
  Sheet.getRange(LastRow+1, 1).setValue(time);
  Sheet.getRange(LastRow+1, 2).setValue(name);
  Sheet.getRange(LastRow+1, 3).setValue(phone);
  Sheet.getRange(LastRow+1, 4).setValue(email);
  Sheet.getRange(LastRow+1, 5).setValue(food);
  Sheet.getRange(LastRow+1, 6).setValue(remark);
  //當資料寫入完成後,回傳資訊
  return ContentService.createTextOutput("success");
}
這邊要注意的是每次更新 gs 程式碼都需要重新部署一次。

完成了 Google App Script 的部分,接下來讓我們看看前端如何串接這支 API 吧!我先以很原始的方式完成一個很簡陋的表單,表單的設計主要可以分為幾個步驟。
<html lang="zg">
<head>
  <meta charset="UTF-8">
  <meta http-equiv="X-UA-Compatible" content="IE=edge">
  <meta name="viewport" content="width=device-width, initial-scale=1.0">
  <link rel="stylesheet" href="styles.css">
  <title>邀請函表單範例</title>
</head>

<body>
  <section class="container">
    <div id="form">
      <h1>來參加我的婚禮,拜託!</h1>
      <label for="name">姓名</label>
      <input id="name" name='name' type="string">
      <label for="phone">電話</label>
      <input id="phone" name='phone' type="tel">
      <label for="email">Email</label>
      <input id="email" name='email' type="mail">
      <div>
        <label for="food">食物</label>
        <input type="radio" id="meat" name="food" value="meat">
        <label for="huey">肉食</label>
        <input type="radio" id="veg" name="veg" value="veg">
        <label for="louie">草食</label>
      </div>
      <label for="remark">有什麼想對新人說的話</label>
      <textarea id="remark" name='remark' type="string" rows="4" cols="50"></textarea>
      <button id="submit">送出</button>
    </div>
  </section>
  <script src="./index.js"></script>
</body>

</html>
const submitButton = document.getElementById("submit");
const form = document.getElementById("form");

let name = "";
let phone = "";
let email = "";
let food = "";
let remark = "";

form.addEventListener("change", (e) => {
  if (e.target.id === "name") {
    name = e.target.value;
  }
  if (e.target.id === "phone") {
    phone = e.target.value;
  }
  if (e.target.id === "email") {
    email = e.target.value;
  }
  if (e.target.id === "meat") {
    food = e.target.value;
  }
  if (e.target.id === "veg") {
    food = e.target.value;
  }
  if (e.target.id === "remark") {
    remark = e.target.value;
  }
});
監聽提交表單的 Button 後,我們將前面存起來的 API url 簡單的以 fetch 的方式呼叫,並以 FormData 的方式將使用者輸入的資料以及我們想紀錄的時間資料都提交給 Google App Script。
form.addEventListener("click", (e) => {
  if (e.target.id === "submit") {
    let formdata = new FormData();
    formdata.append("time", new Date());
    formdata.append("name", name);
    formdata.append("email", email);
    formdata.append("phone", phone);
    formdata.append("food", food);
    formdata.append("remark", remark);

    const config = { method: "POST", body: formdata, redirect: "follow" };
    //call api
    fetch(
      "https://script.google.com/macros/s/AKfycbxiTKylhrHboeacZ4J48tAnyHG6gbXU_xuGQA7a5ky1kLNRrO2znP38d6N73q-TTeAVRw/exec",
      config
    }
      .then((result) => {
        if (result === "success") {
          console.log("success");
        }
      })
      .catch((error) => console.log("error", error));
  }
});
呼叫完 API 之後,就可以立刻在 Google docs 中看到對應的新資料,大功告成。今天的目標就到這邊,明天繼續努力。
想看表單程式碼可以參考:我的 Codepen
參考資料來源:https://www.minwt.com/pc/22105.html
