如果您的 OCS Inventory 有整合 CVE-Search 的功能,那就可以每天把盤點到的所有軟體與 CPE 幾十多萬筆的受漏洞影響的產品進行比對,然後告知您是哪些 CVE 漏洞與資訊,可以說是相當實用的功能。
在此之前我們需要安裝 CVE-Search 伺服器以提供比對的資料庫,今天就來教大家如何在 Ubuntu 20.04 安裝 CVE-Search 伺服器吧。
CVE-Search
CVE-Search 是一個開源的工具,用於尋找與公開漏洞和安全漏洞有關的資訊。CVE 是「通用漏洞披露」(Common Vulnerabilities and Exposures)的縮寫,它是一個關於漏洞和安全漏洞的字典,它將每個漏洞分配一個唯一的識別號碼。
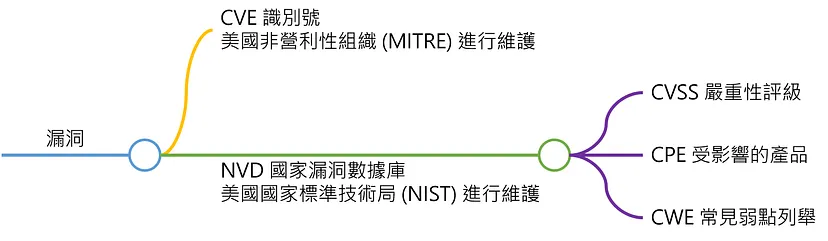
CVE-Search 的主要功能是從多個漏洞資料庫中搜尋並列出有關特定 CVE 編號的資訊,包括漏洞描述、CVSS(通用漏洞評分系統)評分、影響的產品和供應商、參考資料等。
由於鐵人賽 30 天的篇幅實在介紹不完,筆者會將其他相關的文章分享於個人部落格。
如果對公共漏洞和暴露 CVE 不了解的朋友,可以先看一下公共漏洞和暴露 CVE 簡介。
若您想要快速地體驗 CVE-Search 的話,也可以參考如何使用 Docker 安裝 CVE-Search 伺服器。
虛擬機器建立
根據筆者的安裝經驗,建議 Azure 虛擬機器的規格使用 Standard B4ms (4 vcpu,16 GiB 記憶體) 以上,將來在初始化資料庫時才不會卡住。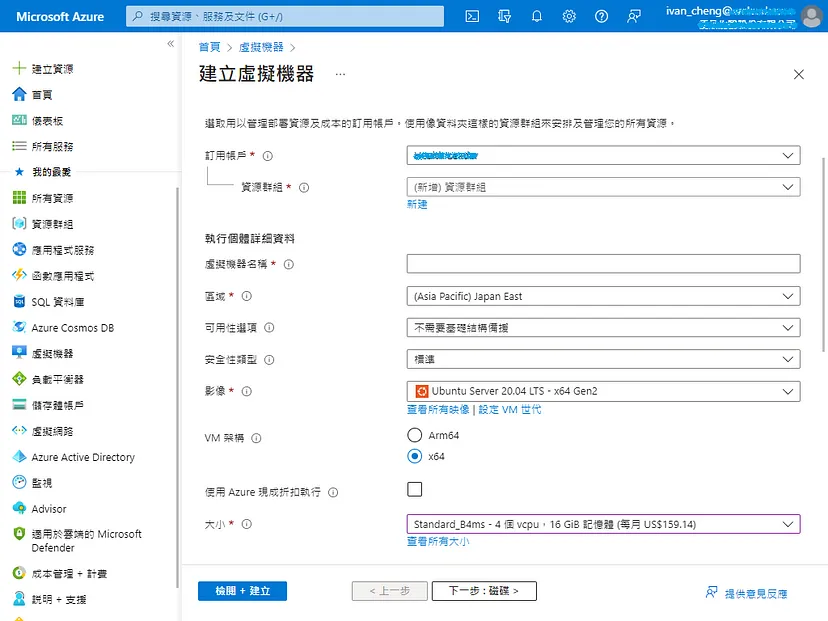
如何設定 Azure 虛擬機器自動開關機,請參考此篇文章。
設定虛擬機器時區
sudo timedatectl set-timezone Asia/Taipei
CVE-Search 架構
安裝之前先來了解一下系統架構,CVE-Search 使用 Flask 網頁應用程式框架作為前端,它提供了一個簡單的 Web 介面,讓使用者可以搜索 CVE 資訊。後端的資料庫則採用 MongoDB 來進行儲存,並使用 Redis 進行快取增加查詢反應速度。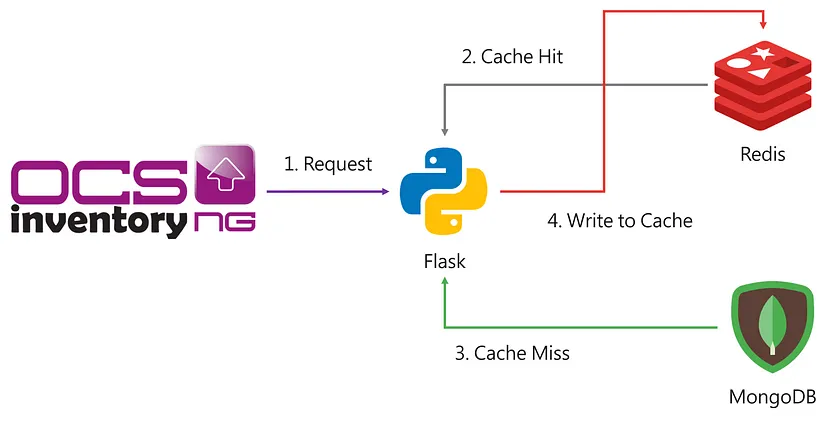
安裝 CVE-Search
從 GitHub 上取得 Repository
git clone https://github.com/cve-search/cve-search.git
cd cve-search/
安裝系統所需要套件
sudo apt-get update
xargs sudo apt-get install -y < requirements.system
安裝 CVE-Search 與 Python 相依套件
pip3 install -r requirements.txt
Successfully built Flask-plugins dicttoxml nested-lookup feedformatter visitor
ERROR: jinja2 3.0.3 has requirement MarkupSafe>=2.0, but you'll have markupsafe 1.1.0 which is incompatible.
Installing collected packages: itsdangerous, importlib-metadata, click, Werkzeug, Jinja2, Flask, Flask-Login, pytz, aniso8601, Flask-restx, Flask-Menu, Flask-Breadcrumbs, dominate, visitor, Flask-Bootstrap4, PyJWT, Flask-JWT-Extended, python-engineio, bidict, python-socketio, Flask-Socketio, WTForms, Flask-WTF, Flask-plugins, greenlet, zope.event, gevent, gevent-websocket, python-dateutil, pluggy, tomli, py, iniconfig, packaging, pytest, coverage, pytest-cov, charset-normalizer, requests, soupsieve, beautifulsoup4, Whoosh, tqdm, pymongo, dicttoxml, wrapt, deprecated, async-timeout, redis, ijson, jsonpickle, types-setuptools, requirements-parser, ansicolors, joblib, regex, nltk, nested-lookup, oauthlib, dnspython, feedformatter

  WARNING: The script flask is installed in '/home/azureadmin/.local/bin' which is not on PATH.
  Consider adding this directory to PATH or, if you prefer to suppress this warning, use --no-warn-script-location.
  WARNING: The scripts py.test and pytest are installed in '/home/azureadmin/.local/bin' which is not on PATH.
  Consider adding this directory to PATH or, if you prefer to suppress this warning, use --no-warn-script-location.
  WARNING: The scripts coverage, coverage-3.8 and coverage3 are installed in '/home/azureadmin/.local/bin' which is not on PATH.
  Consider adding this directory to PATH or, if you prefer to suppress this warning, use --no-warn-script-location.
  WARNING: The script normalizer is installed in '/home/azureadmin/.local/bin' which is not on PATH.
  Consider adding this directory to PATH or, if you prefer to suppress this warning, use --no-warn-script-location.
  WARNING: The script tqdm is installed in '/home/azureadmin/.local/bin' which is not on PATH.
  Consider adding this directory to PATH or, if you prefer to suppress this warning, use --no-warn-script-location.
  WARNING: The script nltk is installed in '/home/azureadmin/.local/bin' which is not on PATH.
  Consider adding this directory to PATH or, if you prefer to suppress this warning, use --no-warn-script-location.
Flask 預設使用 Jinja2 樣版引擎
錯誤提示,需要安裝 MarkupSafe 2.0 以上版本
pip3 install MarkupSafe==2.0.1
警告提示,檢查一下 PATH 的環境變數,看起來沒問題。
echo $PATH
/home/azureadmin/.local/bin:/usr/local/sbin:/usr/local/bin:/usr/sbin:/usr/bin:/sbin:/bin:/usr/games:/usr/local/games:/snap/bin
若有缺少,可以把 /home/azureadmin/.local/bin 上設定上去。
echo 'export PATH=/home/azureadmin/.local/bin:$PATH' >> ~/.bashrc
安裝 MongoDB
如果您是在 Ubuntu 22.04 安裝 MongoDB,還需要安裝 libssl1.1 套件。
echo "deb http://security.ubuntu.com/ubuntu impish-security main" | sudo tee /etc/apt/sources.list.d/impish-security.list

sudo apt-get update
sudo apt-get install libssl1.1
透過下列指令安裝 MongoDB
wget -qO - https://www.mongodb.org/static/pgp/server-4.4.asc | sudo apt-key add -

echo "deb [ arch=amd64,arm64 ] https://repo.mongodb.org/apt/ubuntu focal/mongodb-org/4.4 multiverse" | sudo tee /etc/apt/sources.list.d/mongodb-org-4.4.list

sudo apt-get update
sudo apt-get install mongodb-org
啟動 MongoDB 服務
sudo systemctl daemon-reload
sudo systemctl start mongod
檢查 MongoDB 服務狀態
sudo systemctl status mongod
開機時執行 MongoDB 服務
sudo systemctl enable mongod
初始化 CVE 資料庫
對於初始運行,您需要通過以下命令來填充 CVE 資料庫。
更新 CPE 字典
./sbin/db_mgmt_cpe_dictionary.py -p
共 429,059 筆,花了 5 分 43 秒。
2023-03-20 04:10:24,556 - CPEDownloads - INFO     - CPE Database population started
2023-03-20 04:10:24,608 - DatabaseIndexer - INFO     - Success to create index [('id', 1)] on cpe
2023-03-20 04:10:24,628 - DatabaseIndexer - INFO     - Success to create index [('vendor', 1)] on cpe
2023-03-20 04:10:24,644 - DatabaseIndexer - INFO     - Success to create index [('product', 1)] on cpe
Downloading files: 100%|███████████████████████████████████████████████████████████████████████████████████| 1/1 [00:09<00:00,  9.27s/it]
Processing downloaded files: 100%|█████████████████████████████████████████████████████████████████████████| 1/1 [03:23<00:00, 203.63s/it]
Transferring queue to database: 100%|██████████████████████████████████████████████████████████████████████| 429059/429059 [02:10<00:00, 3297.26it/s]
2023-03-20 04:16:07,778 - CPEDownloads - INFO     - Duration: 0:05:43.133037
2023-03-20 04:16:07,778 - CPEDownloads - INFO     - Finished CPE database population
更新 CVE 資料
./sbin/db_mgmt_json.py -p
共 209,513 筆,花了 41 分 39 秒。
2023-03-20 06:36:41,009 - CVEDownloads - INFO     - CVE database population started
2023-03-20 06:36:41,010 - CVEDownloads - INFO     - Starting CVE database population starting from year: 2002
2023-03-20 06:36:41,147 - DatabaseIndexer - INFO     - Success to create index [('id', 1)] on cves
2023-03-20 06:36:41,163 - DatabaseIndexer - INFO     - Success to create index [('vulnerable_configuration', 1)] on cves
2023-03-20 06:36:41,178 - DatabaseIndexer - INFO     - Success to create index [('vulnerable_product', 1)] on cves
2023-03-20 06:36:41,195 - DatabaseIndexer - INFO     - Success to create index [('Modified', 1)] on cves
2023-03-20 06:36:41,207 - DatabaseIndexer - INFO     - Success to create index [('Published', 1)] on cves
2023-03-20 06:36:41,226 - DatabaseIndexer - INFO     - Success to create index [('last-modified', 1)] on cves
2023-03-20 06:36:41,243 - DatabaseIndexer - INFO     - Success to create index [('cvss', 1)] on cves
2023-03-20 06:36:41,258 - DatabaseIndexer - INFO     - Success to create index [('cvss3', 1)] on cves
2023-03-20 06:36:41,276 - DatabaseIndexer - INFO     - Success to create index [('summary', 'text')] on cves
2023-03-20 06:36:41,290 - DatabaseIndexer - INFO     - Success to create index [('vendors', 1)] on cves
2023-03-20 06:36:41,305 - DatabaseIndexer - INFO     - Success to create index [('products', 1)] on cves
2023-03-20 06:36:41,324 - DatabaseIndexer - INFO     - Success to create index [('vulnerable_product_stems', 1)] on cves
2023-03-20 06:36:41,340 - DatabaseIndexer - INFO     - Success to create index [('vulnerable_configuration_stems', 1)] on cves
Transferring queue to database: 100%|██████████████████████████████████████████████████████████████████████| 429059/429059 [02:10<00:00, 3297.26it/s]
Downloading files: 100%|███████████████████████████████████████████████████████████████████████████████████| 22/22 [00:09<00:00,  2.24it/s]
Processing downloaded files: 100%|█████████████████████████████████████████████████████████████████████████| 22/22 [34:24<00:00, 93.82s/it]
Transferring queue to database: 100%|██████████████████████████████████████████████████████████████████████| 209513/209513 [07:05<00:00, 492.51it/s]
2023-03-20 07:18:20,867 - CVEDownloads - INFO     - Duration: 0:41:39.526824
2023-03-20 07:18:20,867 - CVEDownloads - INFO     - Finished CVE database population
導入可能需要一些時間,具體取決於您的硬體配置。
./sbin/db_updater.py -c # This will take >45minutes on a decent machine, please be patient
經過初始化之後,若想要手動更新 CVE 資料庫。
./sbin/db_updater.py -v
我們可以設定 crontab 更新每日的 CVE 數據
crontab -e
# For example, you can run a backup of all your user accounts
# at 5 a.m every week with:
# 0 5 * * 1 tar -zcf /var/backups/home.tgz /home/
#
# For more information see the manual pages of crontab(5) and cron(8)
#
# m h  dom mon dow   command

30 8 * * * cd /home/azureadmin/cve-search/ && python3 ./sbin/db_updater.py -v
預設情況下,日誌會記錄在 log/update_populate.log。
tail -n 10 log/update_populate.log
2023-03-23 08:32:16,610 - DatabaseIndexer - INFO     - Success to create index [('products', 1)] on cves
2023-03-23 08:32:16,610 - DatabaseIndexer - INFO     - Success to create index [('vulnerable_product_stems', 1)] on cves
2023-03-23 08:32:16,611 - DatabaseIndexer - INFO     - Success to create index [('vulnerable_configuration_stems', 1)] on cves
2023-03-23 08:32:16,611 - DatabaseIndexer - INFO     - Success to create index [('id', 1)] on via4
2023-03-23 08:32:16,612 - DatabaseIndexer - INFO     - Success to create index [('id', 1)] on mgmt_whitelist
2023-03-23 08:32:16,612 - DatabaseIndexer - INFO     - Success to create index [('id', 1)] on mgmt_blacklist
2023-03-23 08:32:16,613 - DatabaseIndexer - INFO     - Success to create index [('related_weakness', 1)] on capec
2023-03-23 08:32:16,613 - DBUpdater - INFO     - Starting schema
2023-03-23 08:32:16,618 - SchemaChecker - INFO     - Updating schema version
2023-03-23 08:32:16,625 - SchemaChecker - INFO     - Update schema version done!
重新初始化資料
這個操作可能需要一些時間,通常只有在 CVE-Search 中添加新的屬性解析時才需要進行操作。
./sbin/db_updater.py -v -f
更新完 CVE 資料庫,我們可以進入 MongoDB 看看。
sudo mongosh
Current Mongosh Log ID: 641bab213bf0234c8d657803
Connecting to:  mongodb://127.0.0.1:27017/?directConnection=true&serverSelectionTimeoutMS=2000
Using MongoDB:  4.4.19
Using Mongosh Beta: 0.12.1

For mongosh info see: https://docs.mongodb.com/mongodb-shell/

------
   The server generated these startup warnings when booting:
   2023-03-23T08:00:29.564+08:00: Using the XFS filesystem is strongly recommended with the WiredTiger storage engine. See http://dochub.mongodb.org/core/prodnotes-filesystem
   2023-03-23T08:00:31.427+08:00: Access control is not enabled for the database. Read and write access to data and configuration is unrestricted
   2023-03-23T08:00:31.427+08:00: /sys/kernel/mm/transparent_hugepage/enabled is 'always'. We suggest setting it to 'never'
------

>
透過下列指令查詢都同步了那些東西
> show dbs
admin     41 kB
config   111 kB
cvedb   2.19 GB
local   73.7 kB
> use cvedb
switched to db cvedb
> show tables
cpe
mgmt_whitelist
cpeother
schema
info
via4
capec
cves
cwe
mgmt_blacklist
> exit
啟動和停止網頁服務器
預設情況下,CVE-Search 假設了應用程序的某些方面配置。
若您想要修改預設的配置,建議將 configuration.ini.sample 複製到 configuration.ini 再進行相應的調整。
cp etc/configuration.ini.sample etc/configuration.ini
vi etc/configuration.ini
配置內容如下,記得將 Host 的 127.0.0.1 開放為 0.0.0.0
[Webserver]
Host: 0.0.0.0
Port: 5000
Debug: True
PageLength: 50
LoginRequired: False
OIDC: False
CLIENT_ID: xx
CLIENT_SECRET: xx
IDP_DISCOVERY_URL: xx
SSL_VERIFY: False
SSL: True
Certificate: ssl/cve-search.crt
Key: ssl/cve-search.key
WebInterface: Full
MountPath: /MOUNTY/MC/MOUNT
手動啟動網頁伺服器,按 Control + C 即可停止
python3 web/index.py
2023-03-23 11:27:03,571 - lib.Authentication - WARNING  - Could not find auth loader file!
2023-03-23 11:27:03,595 - __main__ - INFO     - Running version: 4.2.1.dev23
2023-03-23 11:27:03,782 - __main__ - INFO     - Running async mode: gevent
2023-03-23 11:27:03,782 - __main__ - INFO     - Server starting...
^CKeyboardInterrupt
註冊服務
每次都透過下指令的方式啟動太麻煩了,可以配置 systemd 將 CVE-Search Web 作為服務運行。
創建一個 Systemd 設定檔
sudo vi /etc/systemd/system/cvesearch.web.service
添加以下內容
[Unit]
Description=circl dot lu CVE-Search Web Server
Requires=mongod.service
After=network.target mongod.service
Documentation=https://cve-search.github.io/cve-search/webgui/webgui.html

[Service]
WorkingDirectory=/home/azureadmin/cve-search
ExecStart=python3 ./web/index.py
User=azureadmin
Type=simple
SyslogIdentifier=cvesearch.web
Restart=always
RestartSec=5
MemoryHigh=2G
MemoryMax=3G

[Install]
WantedBy=multi-user.target
啟動 CVE-Search Web 服務
sudo service cvesearch.web start
檢查 CVE-Search Web 服務狀態
sudo service cvesearch.web status
開機時執行 CVE-Search Web 服務
sudo systemctl enable cvesearch.web
打開瀏覽器 http://your_cve_server_ip:5000/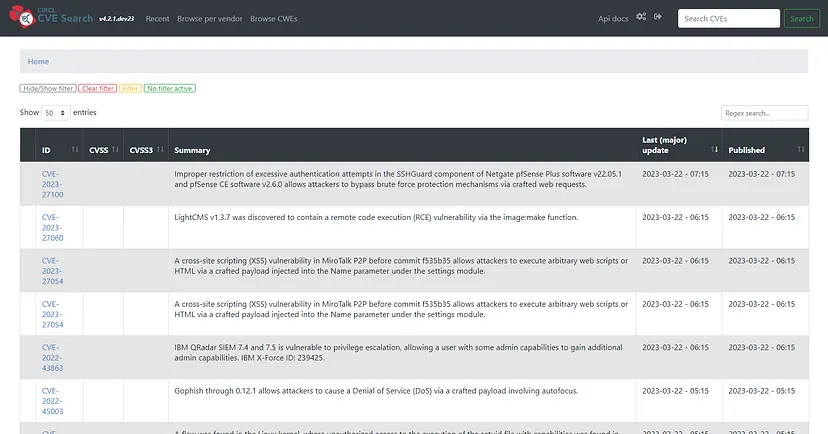
我們可以透過網頁或命令行介面使用,使用 CVE Search 可以幫助安全專業人員更快速地查找漏洞相關資訊,以便進行漏洞分析、風險評估和安全修補等工作。
預設不啟用認證,登入管理介面 http://your_cve_server_ip:5000/admin
可檢視目前資料庫的狀態,並手動執行 CVE 資料庫更新。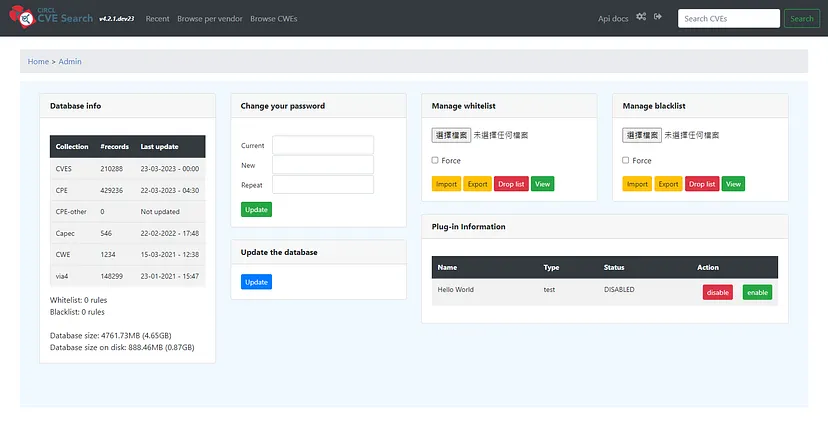
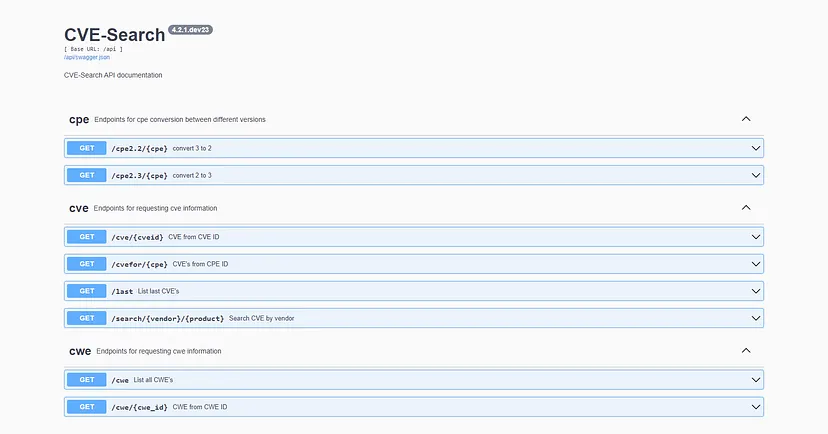
當然也支援 REST API 來取得漏洞的資訊
http://your_cve_server_ip:5000/api
完成初始化資料庫之後,我們也可以將 Azure 虛擬機器的規格更改為 Standard B2ms (2 vcpu,8 GiB 記憶體)來節省雲端的費用支出。
如果你發現 CVE-Search 重開機後,嘗試更新資料庫失敗 AuthenticationError,請參考此篇文章。
下一篇我們將介紹如何在 OCS Inventory 使用 CVE 報告,把每天盤點到的所有軟體與 CPE 幾十多萬筆的受漏洞影響的產品進行比對,然後告知您是哪些 CVE 漏洞與資訊,敬請期待。
參考文件

