# ansible佈屬腳本目錄
[root@ansible ansible]# ll
總計 24
-rw-r--r--.  1 root root 12593  9月 11 22:52 hosts
drwxr-xr-x. 33 root root  4096  9月 12 21:05 roles
-rw-r--r--.  1 root root  2091  9月 11 22:38 site.yml

# 主機清單
[root@ansible ansible]# cat hosts
[redis]
192.168.1.11 ansible_nodename=redis01
192.168.1.12 ansible_nodename=redis02
192.168.1.13 ansible_nodename=redis03
192.168.1.14 ansible_nodename=redis04

# 選擇要佈屬的主機和角色,使用become: yes(sudo su -)
[root@ansible ansible]# cat site.yml
- hosts: redis
  remote_user: root
  gather_facts: false
  become: yes
  roles:
    - roles/redis

# 要佈屬的任務腳本
[root@ansible ansible]# cat roles/redis/tasks/main.yml

# 執行佈屬
[root@ansible ansible]# ansible-playbook -i hosts site.yml --ask-pass


PLAY RECAP *******************************************************************************************************************
192.168.1.11               : ok=46   changed=45   unreachable=0    failed=0    skipped=0    rescued=0    ignored=2
192.168.1.12               : ok=46   changed=45   unreachable=0    failed=0    skipped=0    rescued=0    ignored=2
192.168.1.13               : ok=46   changed=45   unreachable=0    failed=0    skipped=0    rescued=0    ignored=2
192.168.1.14               : ok=46   changed=45   unreachable=0    failed=0    skipped=0    rescued=0    ignored=2
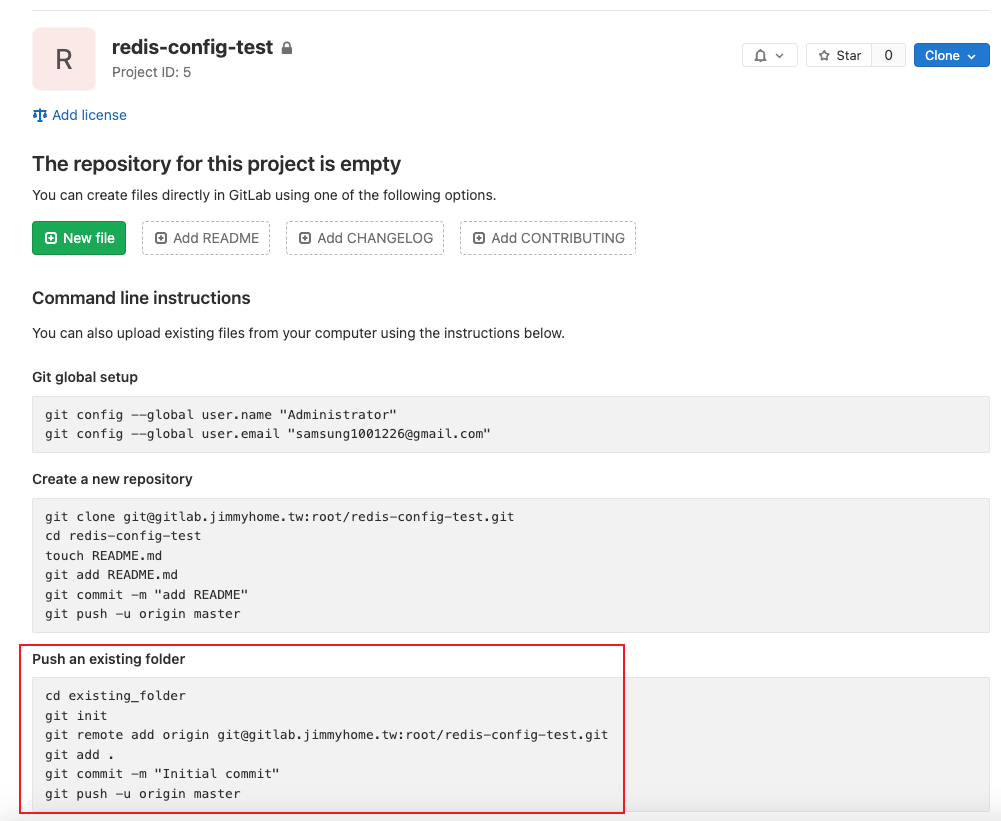
# 使用已存在目錄的方式,將設定檔傳入

# 當前目錄
chenqingze@chenqingze-MBP redis-config-test % ll
total 0
drwxr-xr-x@ 5 chenqingze  staff  160  9 12 22:49 batch
drwxr-xr-x@ 4 chenqingze  staff  128  9 12 22:44 t1zone
drwxr-xr-x@ 4 chenqingze  staff  128  9 12 22:45 t2zone

# 傳入gitlab

chenqingze@chenqingze-MBP redis-config-test % git init
Initialized empty Git repository in /Users/chenqingze/Desktop/redis-config-test/redis-config-test/.git/

chenqingze@chenqingze-MBP redis-config-test % git remote add origin http://gitlab.jimmyhome.tw/root/redis-config-test.git

chenqingze@chenqingze-MBP redis-config-test % git add .

chenqingze@chenqingze-MBP redis-config-test % git commit -m "Initial commit"

chenqingze@chenqingze-MBP redis-config-test % git branch -m main master

chenqingze@chenqingze-MBP redis-config-test % git push -u origin master


Enumerating objects: 19, done.
Counting objects: 100% (19/19), done.
Delta compression using up to 10 threads
Compressing objects: 100% (19/19), done.
Writing objects: 100% (19/19), 45.79 KiB | 7.63 MiB/s, done.
Total 19 (delta 6), reused 0 (delta 0), pack-reused 0
To http://gitlab.jimmyhome.tw/root/redis-config-test.git
 * [new branch]      master -> master
branch 'master' set up to track 'origin/master'.
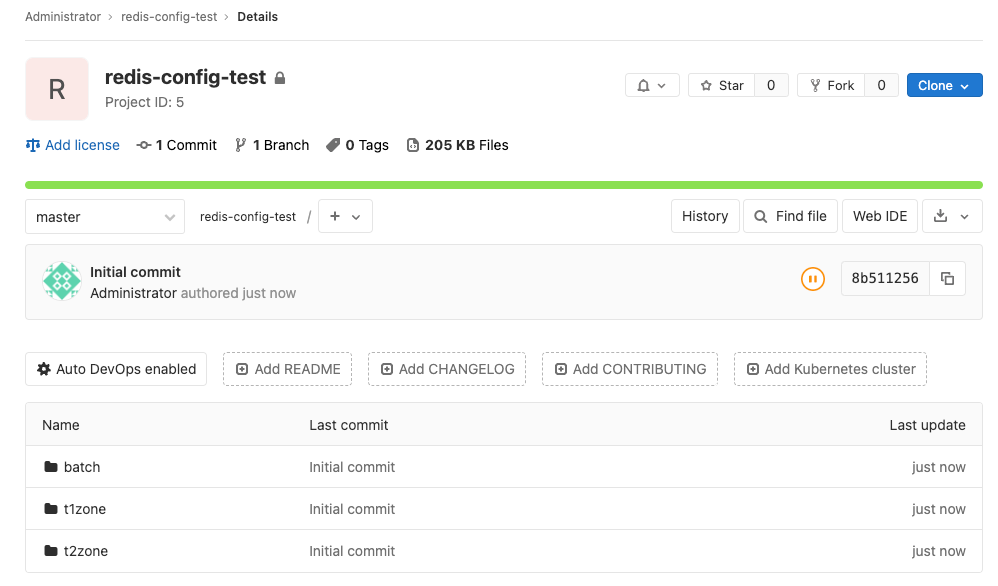
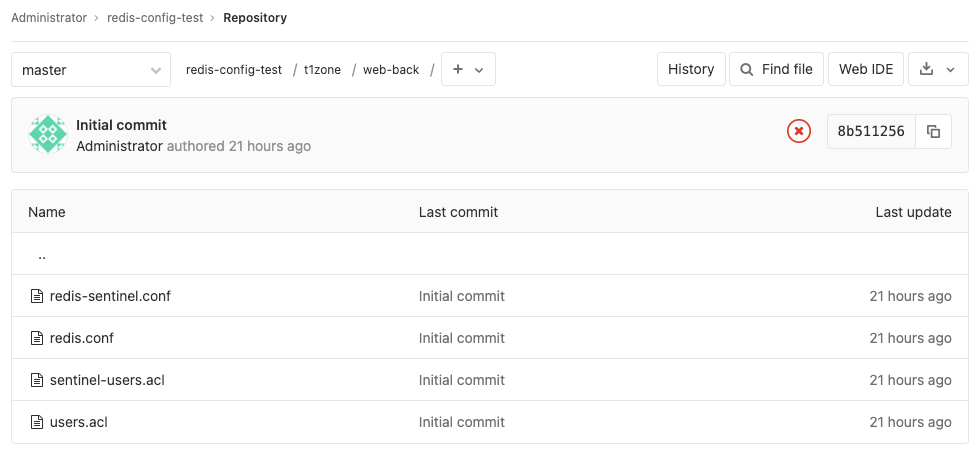
redis-sentinel.conf -> redis-sentinel設定檔
redis.conf -> redis設定檔
sentinel-users.acl -> redis-sentinel的acl設定檔
users.acl -> redis的acl設定檔
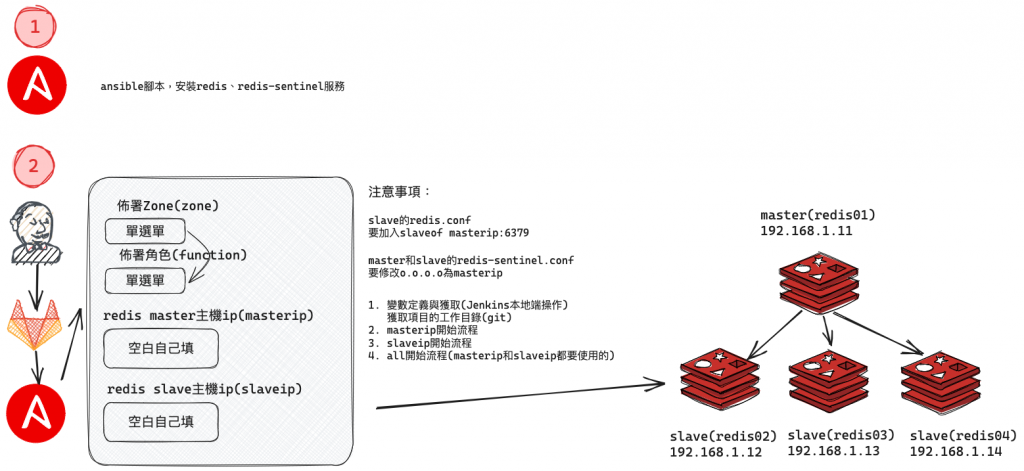
1. 變數定義與獲取、判斷輸入選項(Jenkins本地端操作)
	1. 獲取項目的工作目錄 {{ workspace.stdout }}
	2. 確認function是否沒有選擇,沒有選擇,報錯終止流程
	3. 確認masterip不能沒有輸入,沒有輸入,報錯終止流程
	4. 確認masterip只能一個,一個以上則報錯,報錯終止流程
	5. 確認slaveip不能沒有輸入,沒有輸入,報錯終止流程
2. masterip開始流程
	0. 確認Redis服務是否活著,活著的話,報錯終止流程
	0. 確認Redis-Sentinel服務是否活著,活著的話,報錯終止流程
	1. 拷貝檔案至遠端主機
	2. 替換redis-sentinel.conf配置文件,將masterip寫入
3. slaveip開始流程
	0. 確認Redis服務是否啟動,啟動的話,報錯終止流程
	0. 確認Redis-Sentinel服務是否啟動,啟動的話,報錯終止流程
	1. 拷貝檔案至遠端主機
	2. 替換redis-sentinel.conf配置文件,將masterip寫入
	3. 將slaveof masterip 6379寫入redis.conf配置文件
4. all開始流程
	0. 確認Redis服務是否啟動,啟動的話,報錯終止流程
	0. 確認Redis-Sentinel服務是否啟動,啟動的話,報錯終止流程
    1. 啟動,開機自啟動redis服務
    2. 確認Redis服務是否正常啟動,不啟動的話,報錯終止流程
    3. 啟動,開機自啟動redis-sentinel服務
    4. 確認Redis-Sentinel服務是否正常啟動,不啟動的話,報錯終止流程
		redis-sentinel剛啟動連接,需要一點時間偵測,所以流程暫停5秒
	5. 查看Redis-Sentinel狀態連接狀態(/usr/local/bin/redis-cli -p 26379 info | grep -i {{ function }})
[root@ansible ansible]# cat se_redis-config-test_deploy.yml
##################變數定義與獲取、判斷輸入選項(Jenkins本地端操作)###################
- hosts: all
  gather_facts: no
  tasks:
    # 1. 獲取項目的工作目錄 {{ workspace.stdout }}
    - name: Get WorkSpace Work Path
      shell:
        cmd: "echo ${WORKSPACE}"
      register: workspace
      delegate_to: 127.0.0.1
    # 2. 確認function是否沒有選擇,沒有選擇,報錯終止流程
    - name: Check Function Choice
      shell:
        cmd: "echo {{ function }} | wc -w"
      register: is_function
      delegate_to: 127.0.0.1
      failed_when: "'0' == is_function.stdout"
    # 3. 確認masterip不能沒有輸入,沒有輸入,報錯終止流程
    - name: Check Masterip Input
      shell:
        cmd: "echo {{ masterip }} | wc -w"
      register: is_masterip
      delegate_to: 127.0.0.1
      failed_when: "'0' == is_masterip.stdout"
    # 4. 確認masterip只能一個,一個以上則報錯,報錯終止流程
    - name: Check Masterip Count
      shell:
        cmd: "echo -e '{{ masterip }}' | wc -l"
      register: is_masterip
      delegate_to: 127.0.0.1
      failed_when: "is_masterip.stdout > '1'"
    # 5. 確認slaveip不能沒有輸入,沒有輸入,報錯終止流程
    - name: Check Slaveip Input
      shell:
        cmd: "echo {{ slaveip }} | wc -w"
      register: is_slaveip
      delegate_to: 127.0.0.1
      failed_when: "'0' == is_slaveip.stdout"


################################masterip開始流程###################################
- hosts: "{{ masterip }}"
  gather_facts: no
  tasks:
    # 0. 確認Redis服務是否活著,活著的話,報錯終止流程
    - name: Check Redis Service
      command: /usr/bin/systemctl is-active redis
      register: command_result
      failed_when: "'active' == command_result.stdout"
    # 0. 確認Redis-Sentinel服務是否活著,活著的話,報錯終止流程
    - name: Check Redis-Sentinel Service
      command: /usr/bin/systemctl is-active redis-sentinel
      register: command_result
      failed_when: "'active' == command_result.stdout"
    # 1. 拷貝檔案至遠端主機
    - name: Copy Filepath To Remote Server
      copy:
        src: "{{ workspace.stdout }}/{{ zone }}/{{ function }}/"
        dest: "/usr/local/redis/"
        owner: redis
        group: redis
        mode: '0644'
    # 2. 替換redis-sentinel.conf配置文件,將masterip寫入
    - name: Replace Masterip To redis-sentinel.conf
      shell: "sed -i 's/o.o.o.o/{{ masterip }}/g' /usr/local/redis/redis-sentinel.conf"


################################slaveip開始流程###################################
- hosts: "{{ slaveip }}"
  gather_facts: no
  tasks:
    # 0. 確認Redis服務是否啟動,啟動的話,報錯終止流程
    - name: Check Redis Service
      command: /usr/bin/systemctl is-active redis
      register: command_result
      failed_when: "'active' == command_result.stdout"
    # 0. 確認Redis-Sentinel服務是否啟動,啟動的話,報錯終止流程
    - name: Check Redis-Sentinel Service
      command: /usr/bin/systemctl is-active redis-sentinel
      register: command_result
      failed_when: "'active' == command_result.stdout"
    # 1. 拷貝檔案至遠端主機
    - name: Copy Filepath To Remote Server
      copy:
        src: "{{ workspace.stdout }}/{{ zone }}/{{ function }}/"
        dest: "/usr/local/redis/"
        owner: redis
        group: redis
        mode: '0644'
    # 2. 替換redis-sentinel.conf配置文件,將masterip寫入
    - name: Replace Masterip To redis-sentinel.conf
      shell: "sed -i 's/o.o.o.o/{{ masterip }}/g' /usr/local/redis/redis-sentinel.conf"

    # 3. 將slaveof masterip 6379寫入redis.conf配置文件
    - name: Add Slaveof To redis.conf
      blockinfile:
        path: /usr/local/redis/redis.conf
        block: |
          slaveof {{ masterip }} 6379


##################################all開始流程#####################################
- hosts: all
  gather_facts: no
  tasks:
    # 0. 確認Redis服務是否啟動,啟動的話,報錯終止流程
    - name: Check Redis Service
      command: /usr/bin/systemctl is-active redis
      register: command_result
      failed_when: "'active' == command_result.stdout"
    # 0. 確認Redis-Sentinel服務是否啟動,啟動的話,報錯終止流程
    - name: Check Redis-Sentinel Service
      command: /usr/bin/systemctl is-active redis-sentinel
      register: command_result
      failed_when: "'active' == command_result.stdout"
    # 1. 啟動,開機自啟動redis服務
    # 2. 確認Redis服務是否正常啟動,不啟動的話,報錯終止流程
    - name: Enabled、Started Redis
      systemd:
        name: redis
        enabled: true
        state: started
    - name: Check Redis Service
      command: /usr/bin/systemctl is-active redis
      register: command_result
      failed_when: "'failed' in command_result.stdout or 'unknown' in command_result.stdout or 'inactive' in command_result.stdout"

    # 3. 啟動,開機自啟動redis-sentinel服務
    # 4. 確認Redis-Sentinel服務是否正常啟動,不啟動的話,報錯終止流程
    - name: Enabled、Started Redis-Sentinel
      systemd:
        name: redis-sentinel
        enabled: true
        state: started
    - name: Check Redis-Sentinel Service
      command: /usr/bin/systemctl is-active redis-sentinel
      register: command_result
      failed_when: "'failed' in command_result.stdout or 'unknown' in command_result.stdout or 'inactive' in command_result.stdout"

    # redis-sentinel剛啟動連接,需要一點時間偵測,所以流程暫停5秒
    - name: Pause for 5 seconds to build app cache
      pause:
        seconds: 5

    # 5. 查看Redis-Sentinel狀態連接狀態(/usr/local/bin/redis-cli -p 26379 info | grep -i web-front)
    - name: Check Redis-Sentinel info
      shell: "/usr/local/bin/redis-cli -p 26379 info | grep -i {{ function }}"
      register: "command_result"
      args:
        warn: no
      ignore_errors: True
    - name: Runcommand Redis-Sentinel info Msg
      debug:
        msg: "{{ command_result.stdout_lines }}"
      ignore_errors: True
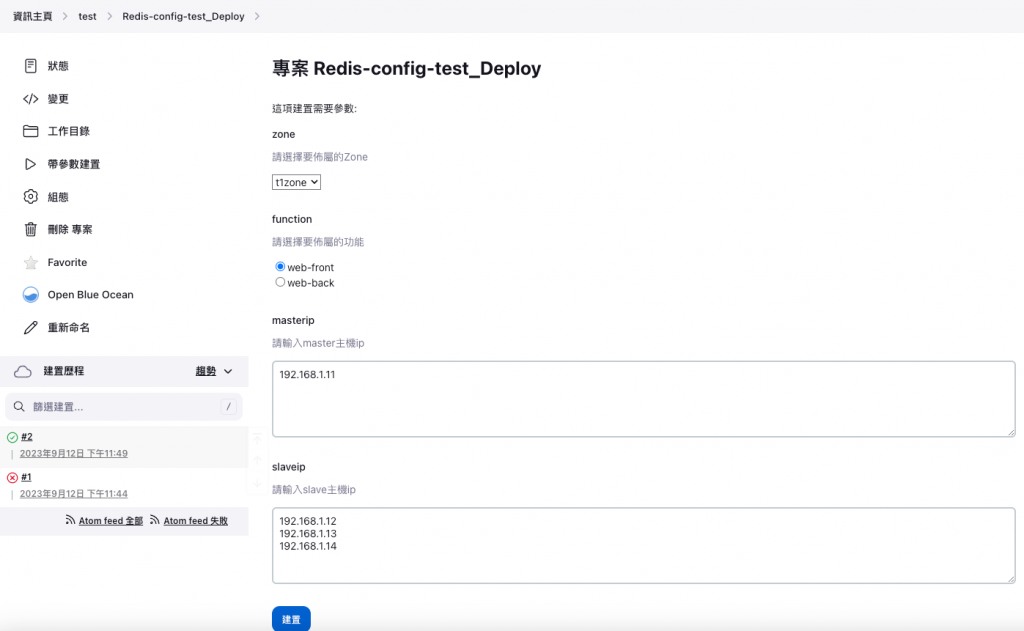
Active Choices Parameter
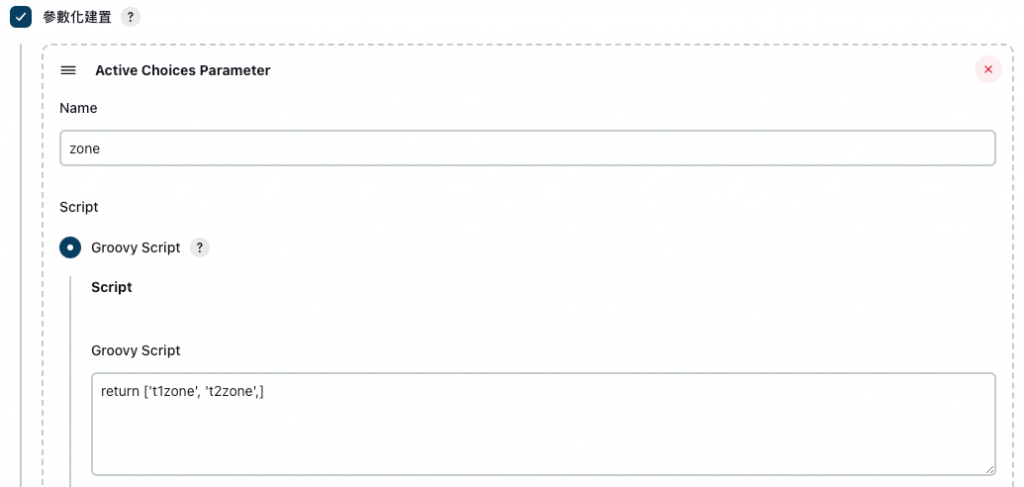
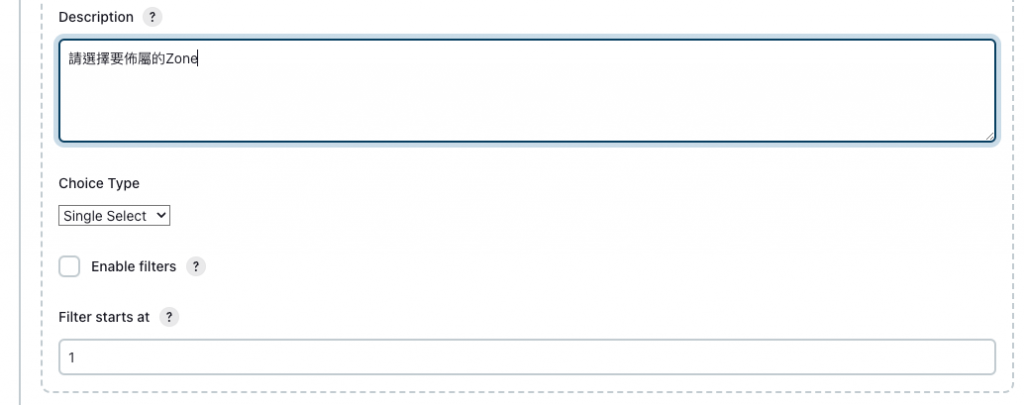
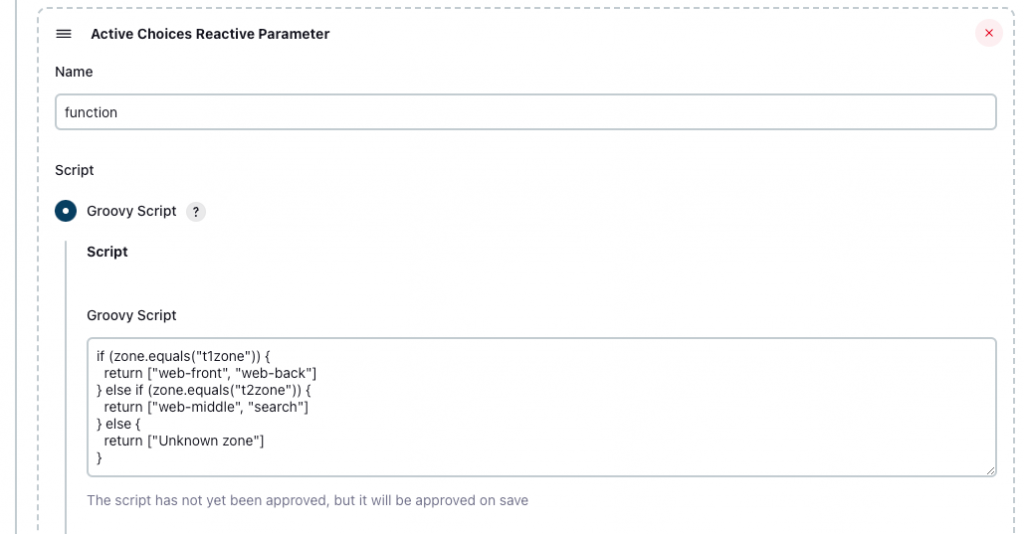
Active Choices Reactive Parameter

文字參數
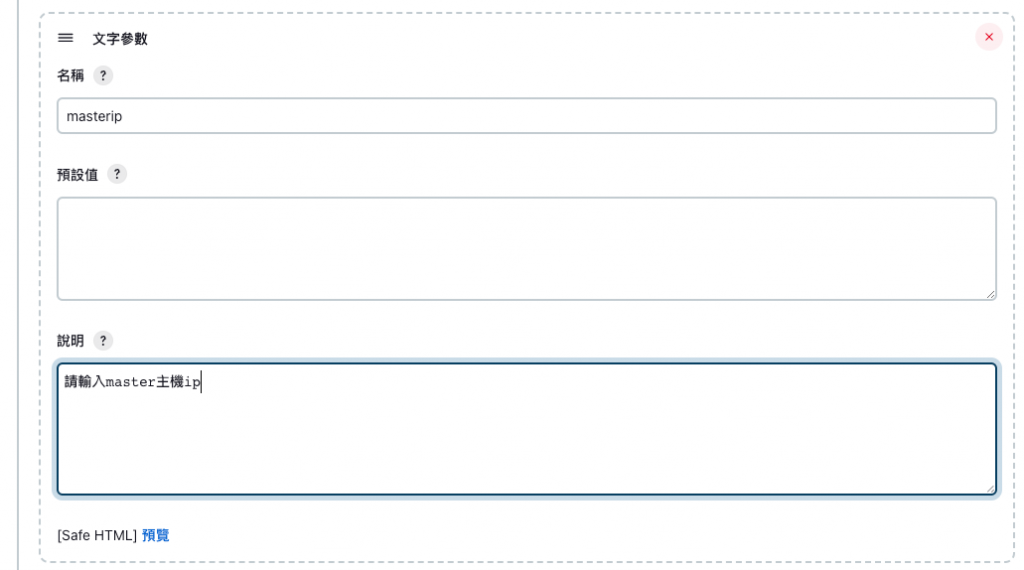
文字參數

使用ansible這台主機來跑佈屬流程

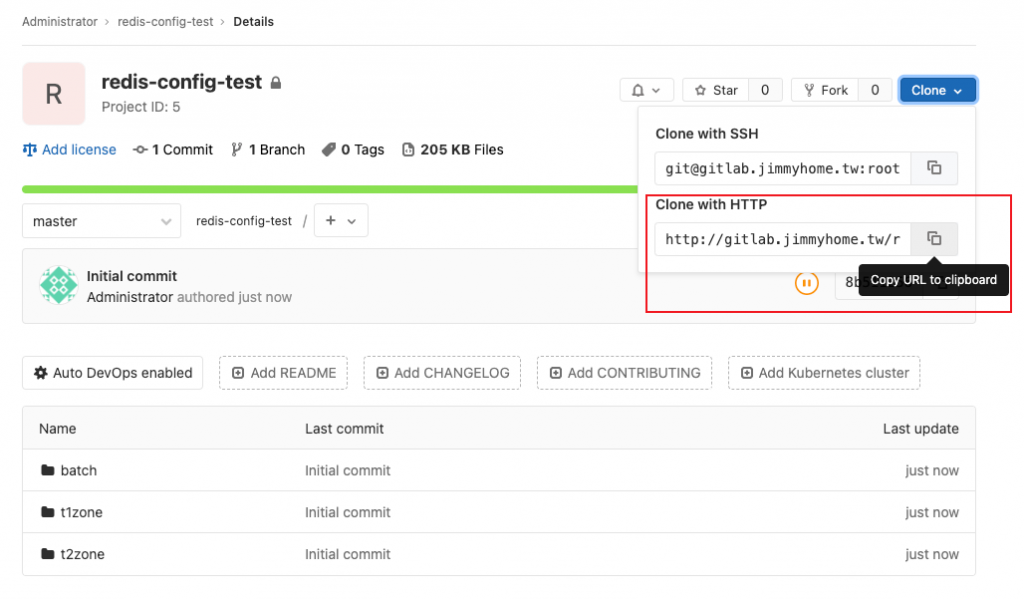
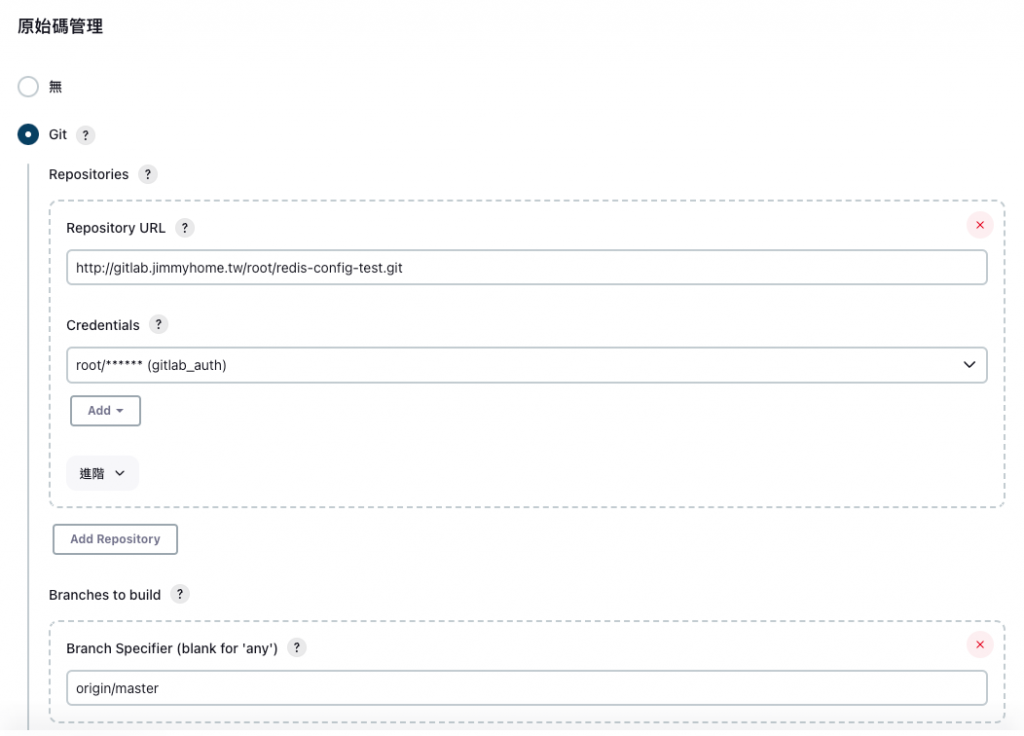
原始碼管理(連接Gitlab)
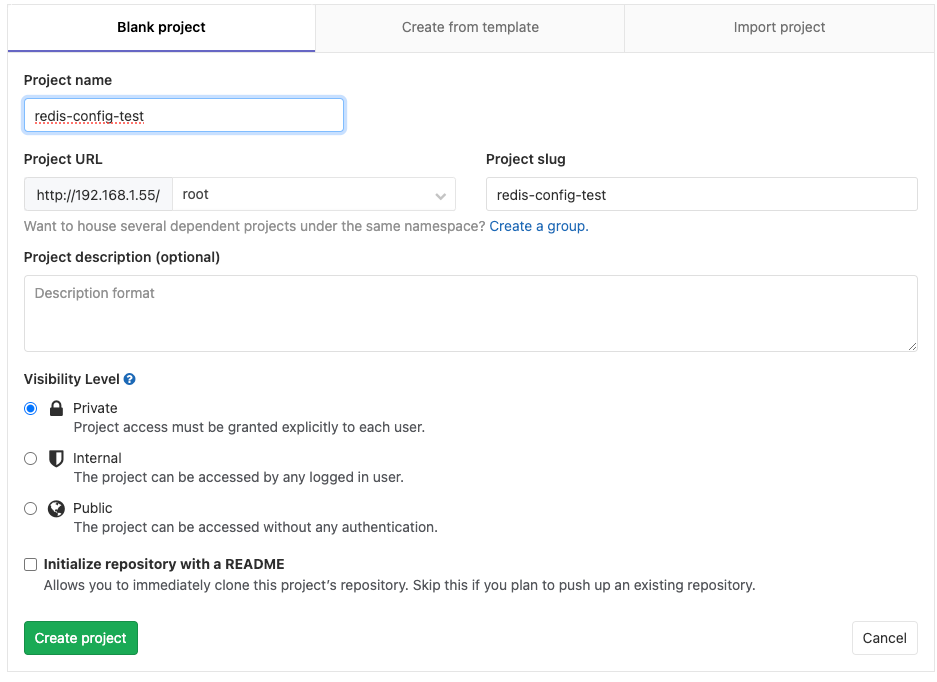
##### Gitlab複製下來的clone
http://gitlab.jimmyhome.tw/root/redis-config-test.git
##### Credential
連接gitlab帳號和密碼
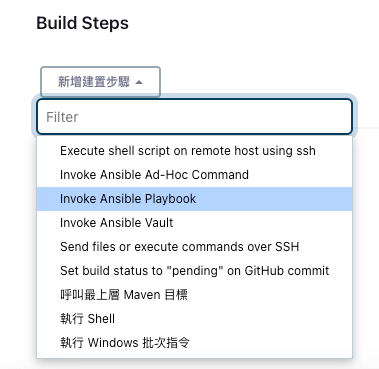
Invoke Ansible Playbook
##### ansible腳本位置
Playbook path: /root/ansible/se_redis-config-test_deploy.yml

##### Inventory主機IP
以下撰寫方式,ip都會傳入
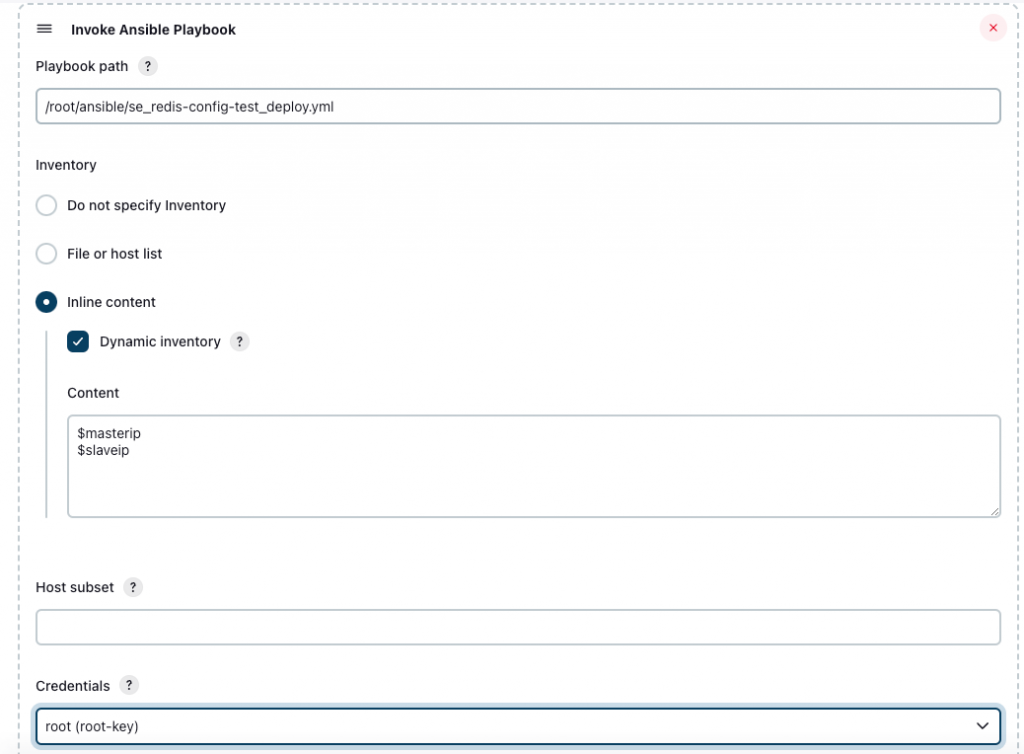
連接要佈屬的主機,使用帳號,我這裡用key,
所以我有從ansible主機,產生key,ssh-copy-id 要佈屬的主機
[root@ansible ~]# ssh-copy-id 192.168.1.11
/usr/bin/ssh-copy-id: INFO: Source of key(s) to be installed: "/root/.ssh/id_rsa.pub"
/usr/bin/ssh-copy-id: INFO: attempting to log in with the new key(s), to filter out any that are already installed
/usr/bin/ssh-copy-id: INFO: 1 key(s) remain to be installed -- if you are prompted now it is to install the new keys
root@192.168.1.11's password:

Number of key(s) added: 1

Now try logging into the machine, with:   "ssh '192.168.1.11'"
and check to make sure that only the key(s) you wanted were added.

[root@ansible ~]# ssh-copy-id 192.168.1.12
[root@ansible ~]# ssh-copy-id 192.168.1.13
[root@ansible ~]# ssh-copy-id 192.168.1.14
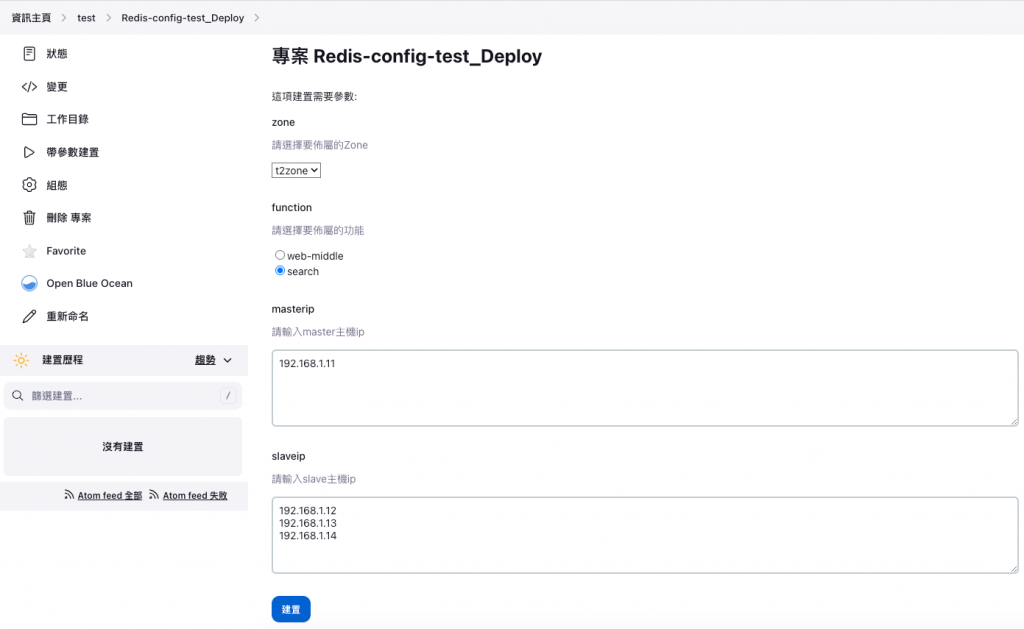
Jenkins參數,要傳入ansible內
Extra Variables
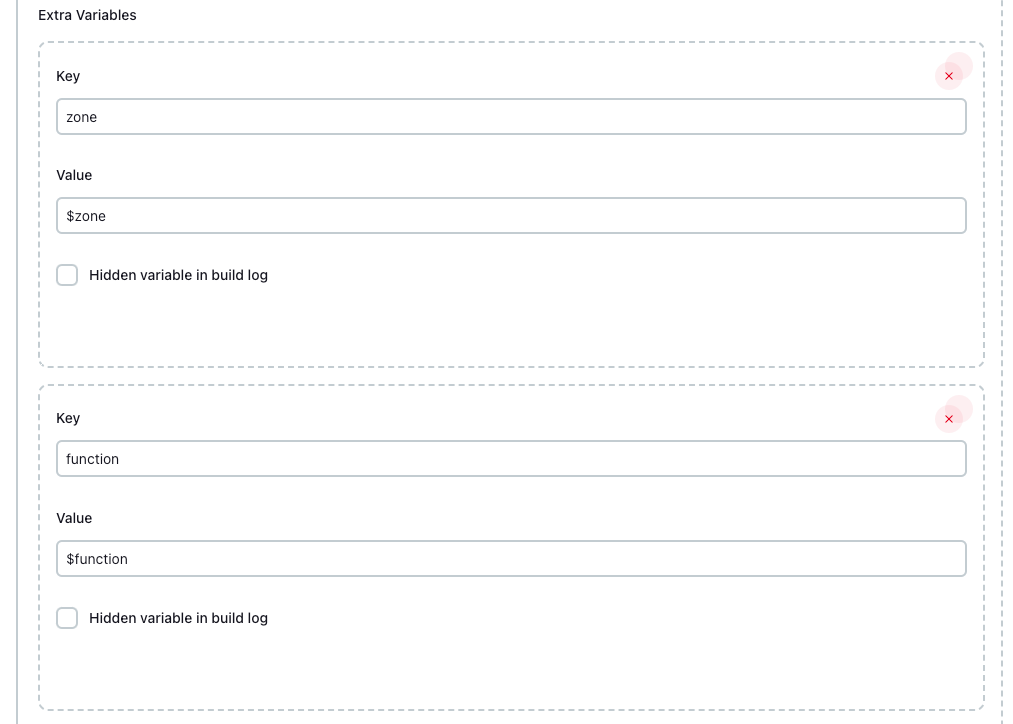
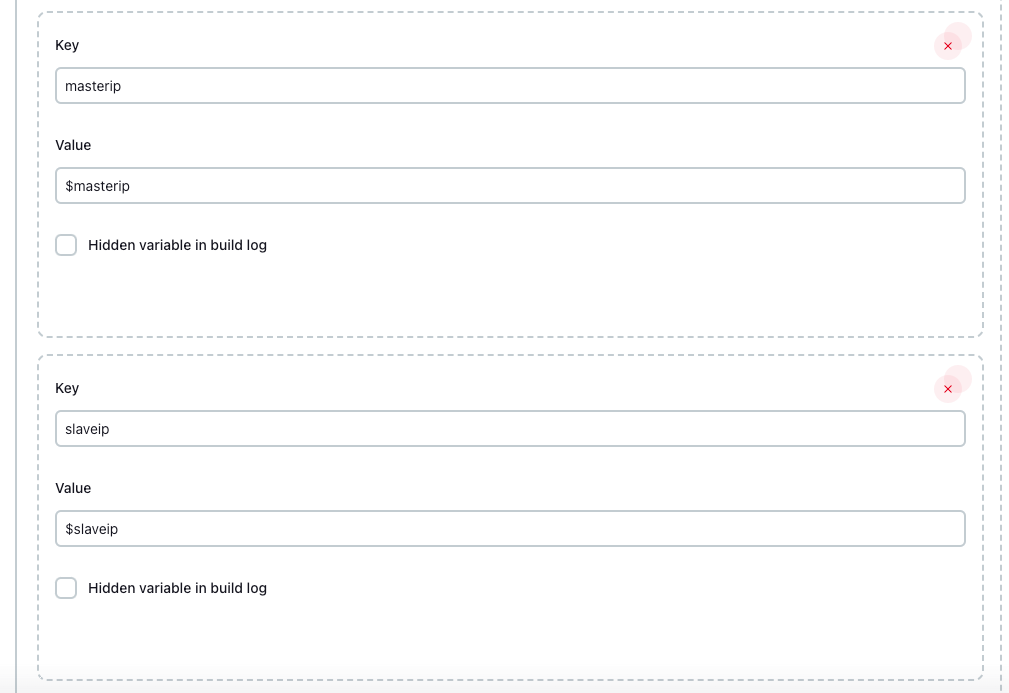
可以看到,zone選擇,function也會跟著變動
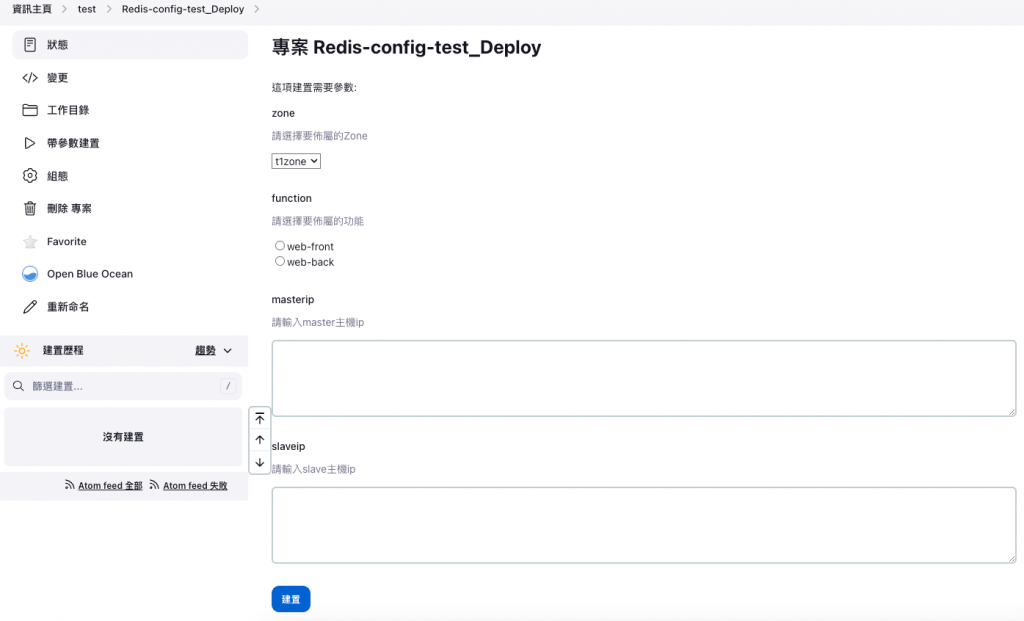
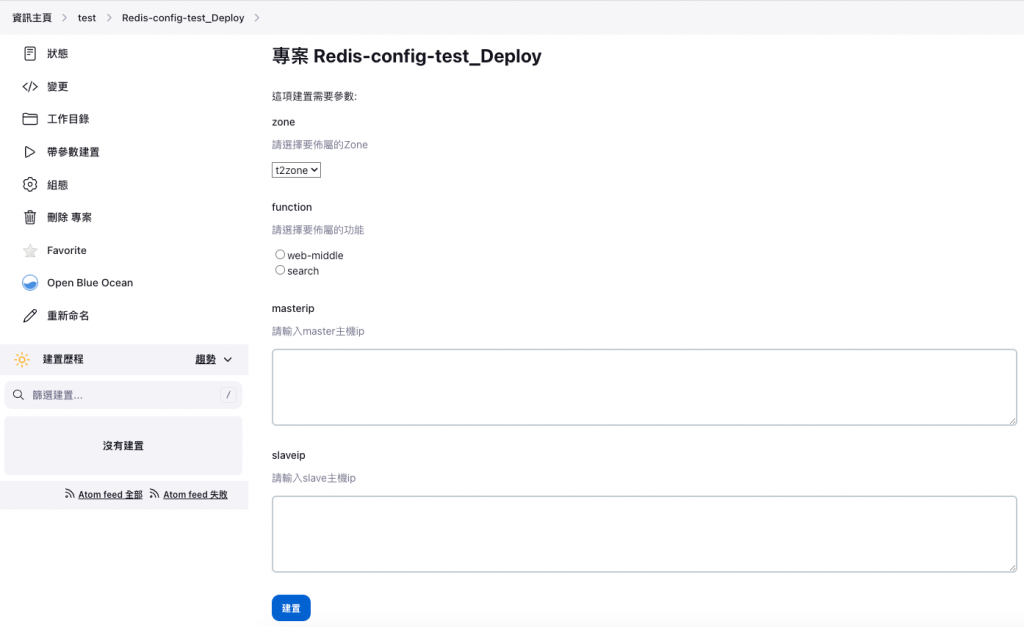
輸入IP處,slaveip可以輸入多個

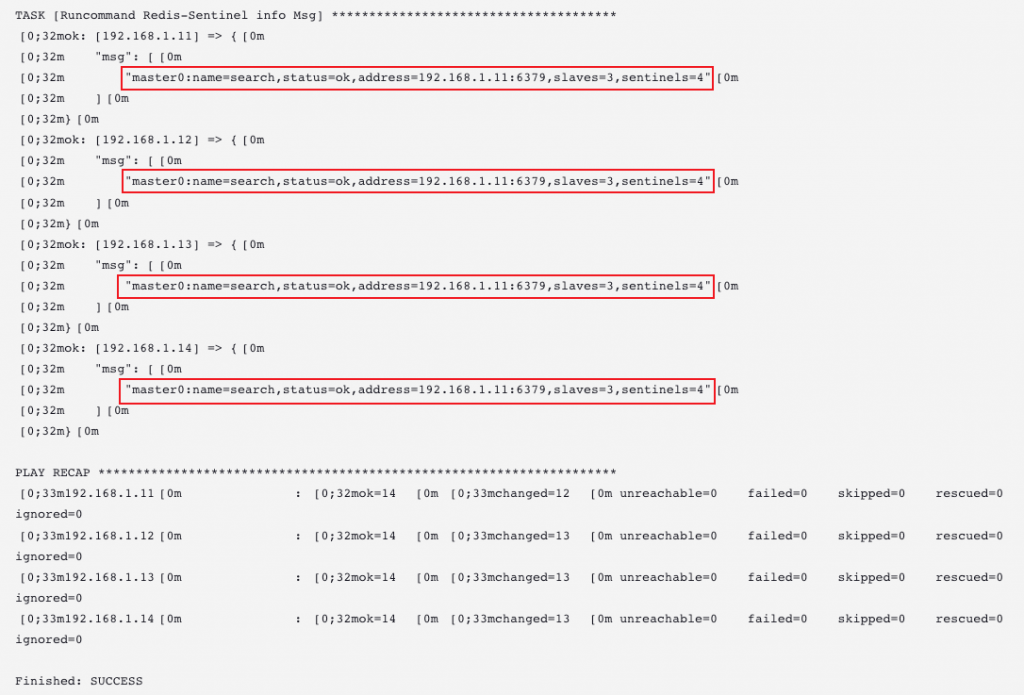
可以看到,redis-sentinel已經成功啟動,有偵測到目前master是誰,也偵測到slaves主機有3台,總共4台主機啟動sentinel服務
進redis主機直接確認,使用redis-cli登入,選擇index 1,
set 1個key為test value為1
get key test,value為1
[root@redis01 redis]# redis-cli
127.0.0.1:6379> select 1
OK
127.0.0.1:6379[1]> set test 1
OK
127.0.0.1:6379[1]> get test
"1"

[root@redis01 redis]# redis-cli -p 26379
master0:name=search,status=ok,address=192.168.1.11:6379,slaves=3,sentinels=4
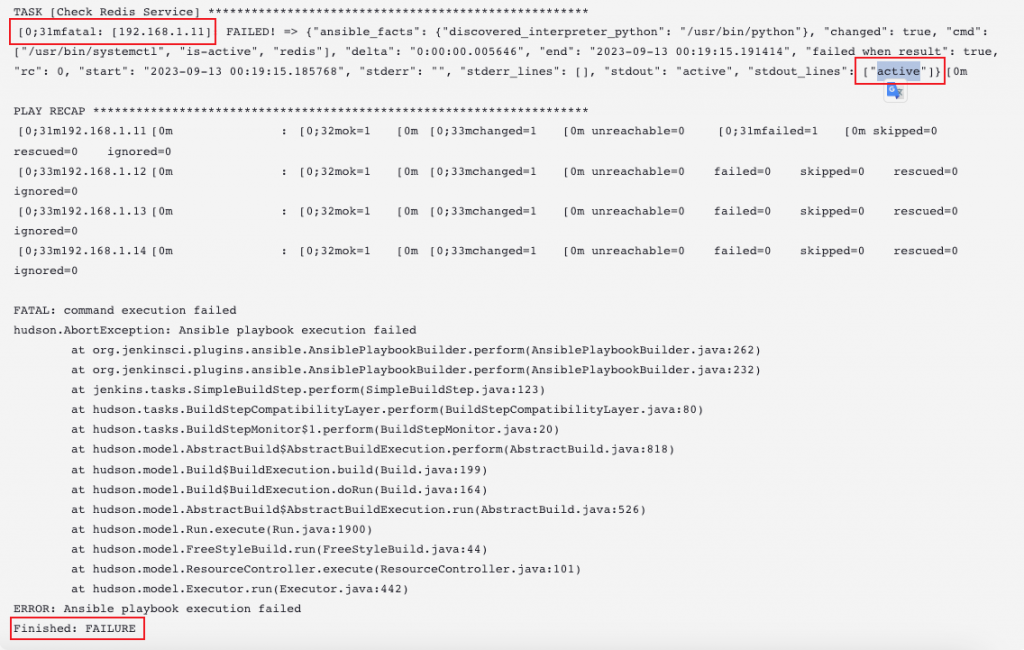
可以看到,如果再次佈屬,會顯示失敗,因為主機redis和redis-sentinel服務如果是active狀態,就不能佈屬(腳本一開始就有添加此段),
防止輸入IP輸錯,導致設定檔覆蓋,營運中的redis服務異常

https://blog.goldfishbrain-fighting.com/2023/devops-jenkins-gitlab-ansible-redis/
 翻轉吧金魚腦
