目前為止我們已經學了一部分 JSX 、 React 和 React Native 的內容,為了幫助大家消化知識,在這一節裡我們要實作一個 Tab 選擇器的元件。功能很簡單,點擊上面不同的 Tab ,就顯示不同內容出來。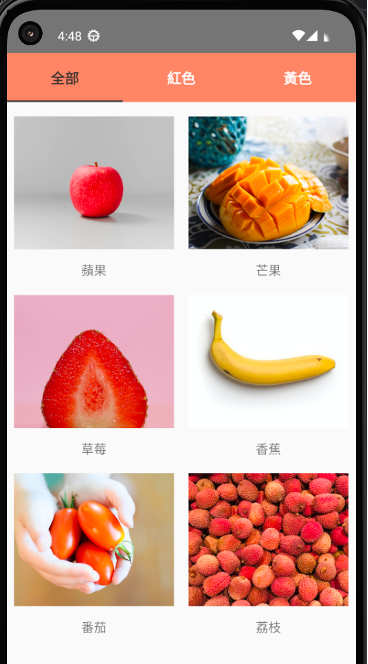
觀察上面的圖,可以發現能拆成兩個元件:最上面的橘色 Tab 選擇器和下面的水果卡片: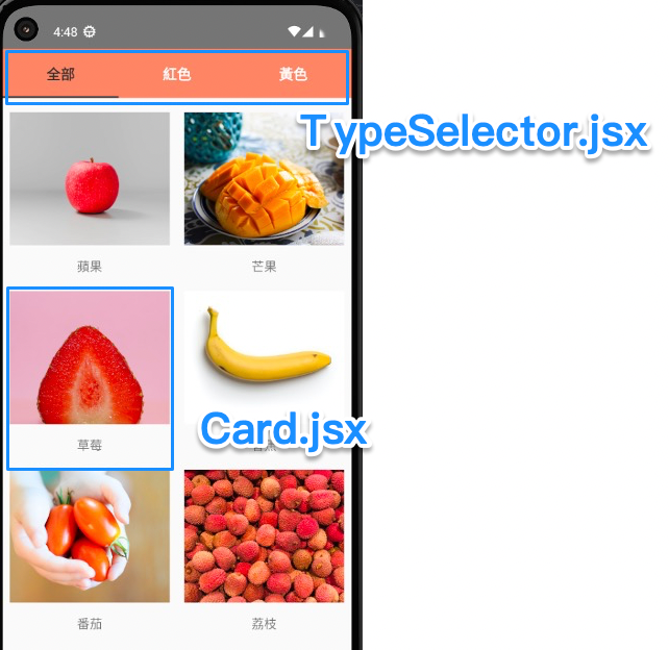
先放入 fruits 資料。
function App() {
  const [fruits, setFruits] = useState([
    {
      title: '蘋果',
      color: '紅色',
      imgUrl:
        'https://images.unsplash.com/photo-1568702846914-96b305d2aaeb?ixlib=rb-4.0.3&ixid=M3wxMjA3fDB8MHxwaG90by1wYWdlfHx8fGVufDB8fHx8fA%3D%3D&auto=format&fit=crop&w=1770&q=80',
    },
    {
      title: '芒果',
      color: '黃色',
      imgUrl:
        'https://images.unsplash.com/photo-1635716279493-d1e30afc25a0?ixlib=rb-4.0.3&ixid=M3wxMjA3fDB8MHxwaG90by1wYWdlfHx8fGVufDB8fHx8fA%3D%3D&auto=format&fit=crop&w=1770&q=80',
    },
    {
      title: '草莓',
      color: '紅色',
      imgUrl:
        'https://images.unsplash.com/photo-1554118879-e459bb1fe1ca?ixlib=rb-4.0.3&ixid=M3wxMjA3fDB8MHxwaG90by1wYWdlfHx8fGVufDB8fHx8fA%3D%3D&auto=format&fit=crop&w=712&q=80',
    },
    {
      title: '香蕉',
      color: '黃色',
      imgUrl:
        'https://images.unsplash.com/photo-1587132137056-bfbf0166836e?ixlib=rb-4.0.3&ixid=M3wxMjA3fDB8MHxwaG90by1wYWdlfHx8fGVufDB8fHx8fA%3D%3D&auto=format&fit=crop&w=1160&q=80',
    },
    {
      title: '番茄',
      color: '紅色',
      imgUrl:
        'https://images.unsplash.com/photo-1502236876560-243e78f715f7?ixlib=rb-4.0.3&ixid=M3wxMjA3fDB8MHxwaG90by1wYWdlfHx8fGVufDB8fHx8fA%3D%3D&auto=format&fit=crop&w=1770&q=80',
    },
    {
      title: '荔枝',
      color: '紅色',
      imgUrl:
        'https://images.unsplash.com/photo-1642063412059-faa1c79531ce?ixlib=rb-4.0.3&ixid=M3wxMjA3fDB8MHxwaG90by1wYWdlfHx8fGVufDB8fHx8fA%3D%3D&auto=format&fit=crop&w=1374&q=80',
    },
  ]);
}
建立 TypeSelector 和 Card 兩個元件檔,先從比較簡單的 Card 開始。
return (
  <SafeAreaView>
    <ScrollView>
      <View style={styles.cardList}>
        {fruits &&
          fruits.map(fruit => (
            <Card
              title={fruit.title}
              imgUrl={fruit.imgUrl}
              key={fruit.title}
            />
          ))}
      </View>
    </ScrollView>
  </SafeAreaView>
);

const styles = StyleSheet.create({
  cardList: {
    flexDirection: 'row',
    justifyContent: 'space-around',
    flexWrap: 'wrap',
  },
});
在 JSX 中可以很方便的直接使用 JS 來處理很多事情,例如要渲染陣列可以直接使用 map 。 map 會將陣列中的值一一取出,處理後產生新的陣列,是我們在 React 中會頻繁使用到的語法之一。
在畫面上渲染陣列時,要注意兩點:
同時為確保渲染時已經有 fruits 這筆資料,則用 && 來處理。 && 有一個特性,是會從左至右判斷是否為 true ,其中一個不是時就停住,只有全都是 true 時會返回最終結果。因此可以用來解決這裡遇到的問題:當有 fruits 時,才跑右邊的程式碼。
接著來處理 Card 元件本身:
function Card({title, imgUrl}) {
  return (
    <View style={styles.cardContainer}>
      <Image source={{uri: imgUrl}} style={styles.cardImg} />
      <Text style={styles.cardText}>{title}</Text>
    </View>
  );
}

const styles = StyleSheet.create({
  cardContainer: {
    marginBottom: 20,
  },
  cardImg: {
    width: 180,
    height: 150,
    marginBottom: 12,
  },
  cardText: {
    textAlign: 'center',
  },
});
到這裡為止,會有一個基本的樣子: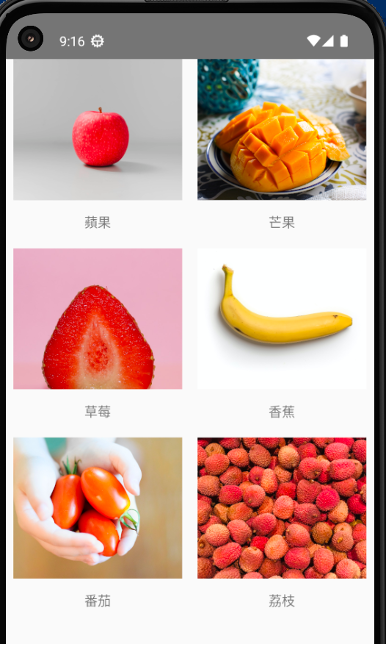
Tips :如果你安裝的模擬器和筆者不同,圖片寬高上需自行調整大小。關於如何在各種裝置都達成自適應效果,會在後面的章節教學。
再來處理 TypeSelector 的邏輯。因為「全部」、「紅色」、「黃色」長得都一樣,我們一樣可以放進陣列用 map 來處理:
function TypeSelector() {
  const types = ['全部', '紅色', '黃色'];

  return (
    <View style={styles.row}>
      {types &&
        types.map((type, key) => (
          <TouchableOpacity
            style={styles.btn}
            key={type}
          >
            <Text
              style={styles.btnText}>
              {type}
            </Text>
          </TouchableOpacity>
        ))}
    </View>
  );
}

const styles = StyleSheet.create({
  row: {
    flexDirection: 'row',
    marginBottom: 16,
    backgroundColor: '#f58b6c',
  },
  btn: {
    flex: 1,
    paddingVertical: 16,
  },
  btnText: {
    textAlign: 'center',
    fontSize: 16,
    fontWeight: 'bold',
    color: '#fff',
  },
});
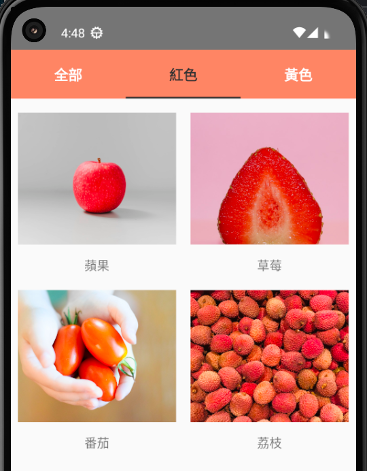
為讓按鈕點擊時切換到對應的 tab ,需要標示出哪個是現在切換到的 type ,點擊 tab 按鈕時也需要跟著切換 type 。因此回到父元件 App ,設定一個 filterType 來判斷現在在哪個 tab 上,當按下其他 tab 則透過 handlePress() 來呼叫 setFilterType 並更新 filterType 。
function App() {
  const [filterType, setFilterType] = useState('全部');

  const handlePress = type => {
    setFilterType(type);
  };

  return (
    <SafeAreaView>
      <ScrollView>
        <TypeSelector activeType={filterType} handlePress={handlePress} />
再次回到 TypeSelector 將 Props 引入。為讓選到的 tab 更明確的顯示,我使用三元運算子來判斷。當被 map 一一渲染的 tab type 等於父元件的 activeType 時,代表他是被選中的 tab 按鈕,則加上 activeBtn 和 activeBtnText 兩個樣式。
function TypeSelector({activeType, handlePress}) {
  const types = ['全部', '紅色', '黃色'];

  return (
    <View style={styles.row}>
      {types &&
        types.map(type => (
          <TouchableOpacity
            style={[styles.btn, type === activeType ? styles.activeBtn : null]}
            key={type}
            onPress={() => handlePress(type)}>
            <Text
              style={[
                styles.btnText,
                type === activeType ? styles.activeBtnText : null,
              ]}>
              {type}
            </Text>
          </TouchableOpacity>
        ))}
    </View>
  );
}

const styles = StyleSheet.create({
  … 省略
  activeBtn: {
    borderBottomColor: '#333',
    borderBottomWidth: 2,
  },
  activeBtnText: {
    color: '#333',
  },
});
因為篇幅太長的緣故,今天先做到這邊,明天我們再繼續看怎樣讓下方的水果卡片,以不同的 filterType 篩選後渲染出來。