
昨天介紹了runtime field,也就是schema on read,相當於將存在索引的資料在讀取前進行處理
如果我們對於數據處理有想法了
有辦法在進入索引前透過ES內建的功能處理嗎?
今天要介紹的ingest pipeline就有這樣數據預處理的功能
Ingest Pipeline:
可以在資料進入索引前進行預處理,資料經過不同processors的處理後,再將處理過的資料存入索引中。如果要使用的話,叢集設定中,需要有至少一個node有設置以下配置
node.roles: [ ingest ]
而其中processors的功能又有以下幾種:
1. grok
像是log出來的message,裡面包含ip、ua等等,使用grok可以將其分割來再給下面其他processors做進一步處理
{
	"grok": {
		"field": "message",
    "patterns": ["%{IP:client} %{WORD:method} %{URIPATHPARAM:request} %{NUMBER:bytes:int} %{NUMBER:duration:double}"]
	}
}
2. date
將資料來源欄位,根據設定進行解析最終傳至目標欄位,並且也能調整解析後的格式
{
	"date" : {
		"field" : "initial_date", // 資料來源
    "target_field" : "timestamp", // option 解析後儲存欄位
    "formats" : ["dd/MM/yyyy HH:mm:ss"], // 資料來源的時間格式
    "timezone" : "Europe/Amsterdam" // option 用來輔助分析時間
		"output_format": "yyyy-MM-dd'T'HH:mm:ss.SSSXXX" // option 決定儲存時的格式
	}
}
3. GeoIP
默認使用MaxMind的資料,根據IPv4或是IPv6的ip位置,取得相關的地理位置資訊
{
	"geoip" : {
	  "field" : "ip", // 取得ip位置的欄位
    "target_field" : "geo", // option 從MaxMind資料庫取得的地理資訊
  }
}
還有像是script、user-agent等等這邊就不一一列舉了~
這邊舉幾個讓大家有個初步的概念就好,很好奇自己的資料有沒有可以先ingest的可以看以下文檔:
(進去連接後看左邊的下拉選單有很多欄位可以看)
https://www.elastic.co/guide/en/elasticsearch/reference/current/processors.html
製作與更新pipeline:
PUT /_ingest/pipeline/my_pipline-name
{
  "version": 1,
  "description" : "pipeline description",
  "processors" : [
			{
			"lowercase" : {
			        "field": "my-field",
					"ignore_failure": true,
					"on_failure": [
                        {
                            "set": {
                              "description": "error-message",
				              "field": "error.message",
				              "value": "contain Chinese. Cannot lowercase",
				              "override": false
				            }
				          }
				     ]
			    }
			}
  ],
  "_meta": {
    "reason": "your reason",
		"serialization": "lowercase-type-pipeline"
  }


}
"processors": [
    {
      "dot_expander": {
        "description": "using for object field",
        "field": "object-field.property"
      }
    }
]
PUT _ingest/pipeline/my-pipeline
{
  "processors": [ ... ],
  "on_failure": [
    {
      "set": {
        "description": "Index document to 'failed-<index>'",
        "field": "_index",
        "value": "failed-{{{ _index }}}"
      }
    }
  ]
}
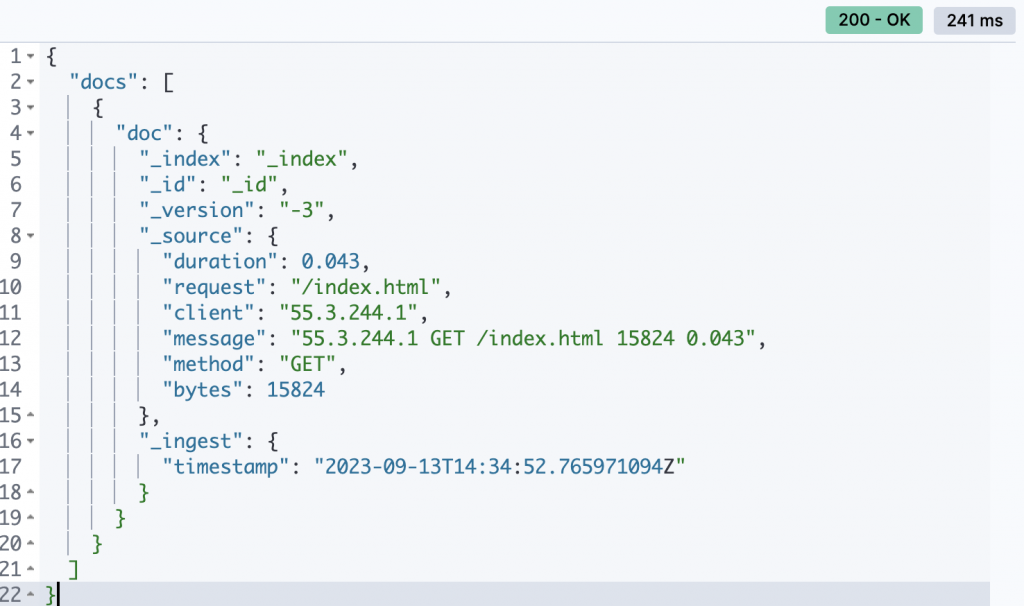
測試pipeline:
先創建好pipeline,再調用simulate pipeline API做測試
// 創建pipeline
PUT /_ingest/pipeline/my_log_pipeline
{
  "version": 1,
  "description" : "manage log doc",
  "processors" : [
			{
        "grok": {
          "field": "message",
          "patterns": ["%{IP:client} %{WORD:method} %{URIPATHPARAM:request} %{NUMBER:bytes:int} %{NUMBER:duration:double}"]
        }
      }
  ]
}

// 模擬測試
POST _ingest/pipeline/my_log_pipeline/_simulate
{
  "docs":[
    {
      "_source": {
        "message": "55.3.244.1 GET /index.html 15824 0.043"
      }
    }
  ]
}
或是直接調用
POST _ingest/pipeline/_simulate
{
  "pipeline": {
    "processors" : [
			{
        "grok": {
          "field": "message",
          "patterns": ["%{IP:client} %{WORD:method} %{URIPATHPARAM:request} %{NUMBER:bytes:int} %{NUMBER:duration:double}"]
        }
      }
  ]
  },
  "docs":[
    {
      "_source": {
        "message": "55.3.244.1 GET /index.html 15824 0.043"
      }
    }
  ]
}
查看pipeline:
// 看全部pipeline
GET /_ingest/pipeline
也可以使用node state API
裡面的count以及time_in_millis可以幫助我們去看pipeline處理過程的重要資訊
GET _nodes/stats/ingest?filter_path=nodes.*.ingest

// 輸出
"pipline-name": {
            "count": 0,
            "time_in_millis": 0,
            "current": 0,
            "failed": 0,
            "processors": [
              {
                "set": {
                  "type": "set",
                  "stats": {
                    "count": 0,
                    "time_in_millis": 0,
                    "current": 0,
                    "failed": 0
                  }
                }
              }
            ]
          }
刪除pipeline:
DELETE /_ingest/pipeline/pipeline_name
在創建索引時也能透過特定參數來調控:
index.default_pipeline:在資料索引前調用,但是如果在indexing的請求中有聲明其他pipeline會被蓋掉
index.final_pipeline:會在default跟request的pipeline之後才調用
在Beat家族匯入資料時,也能在yml檔中指定pipeline
output.elasticsearch:
  hosts: ["localhost:9200"]
  pipeline: my-pipeline-name
在使用index、bulk與reindex API以及update_by_query也能透過參數調用
POST my-data-stream/_doc?pipeline=my-pipeline-name
最後來提及一下pipeline的重要功能:
可以使用enrich processor去豐富你要存入的文檔,資料來源則是已經存在的索引
使用步驟如下:
製作enrich policy:
PUT /_enrich/policy/policy_name
{
  "match": {
    "indices": "users",
    "match_field": "email",
    "enrich_fields": ["first_name", "last_name", "city", "zip", "state"]
  }
}
執行enrich policy:
PUT /_enrich/policy/policy_name/_execute
ingest pipeline設置enrich processor:
PUT /_ingest/pipeline/pipeline_name
{
  "processors": [
    {
      "enrich": {
        "description": "",
        "policy_name": "your_policy_name",
        "field": "",
        "target_field": ""
      }
    }
  ]
}
在processor中設置,並且附上policy_name
整體流程如下: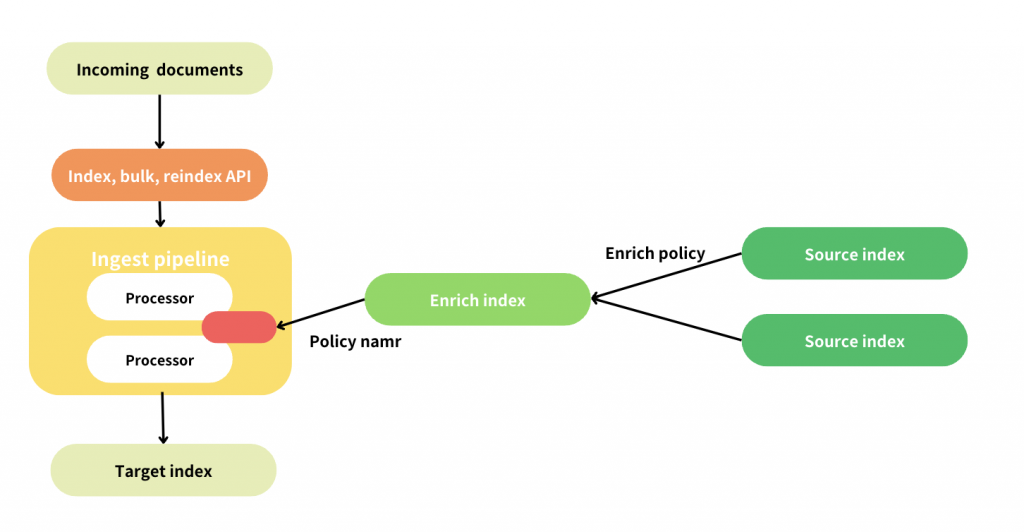
構圖參考:https://www.elastic.co/guide/en/elasticsearch/reference/current/enrich-setup.html
今天介紹完了ingest pipeline,但是我們還會在mapping的這個大主體待兩天
明天會介紹我們在設置mapping時,還有哪些參數是我們要注意的
以及在開發過程適合哪些設定等等~
參考資料
ingest pipelines:
https://www.elastic.co/guide/en/elasticsearch/reference/current/ingest.html
grok processor:
https://www.elastic.co/guide/en/elasticsearch/reference/current/grok-processor.html
date processor:
https://www.elastic.co/guide/en/elasticsearch/reference/current/date-processor.html
index pipeline settings:
https://www.elastic.co/guide/en/elasticsearch/reference/current/index-modules.html#index-default-pipeline
enrich policy:
https://www.elastic.co/guide/en/elasticsearch/reference/current/enrich-setup.html
https://www.elastic.co/guide/en/elasticsearch/reference/current/put-enrich-policy-api.html
https://www.elastic.co/guide/en/elasticsearch/reference/current/execute-enrich-policy-api.html

 iThome鐵人賽