上一章節將資料表對應與資料庫設定完成,本次章節便可以實作針對資料庫的CRUD。
我們針對顧客資料實作新增顧客資料、拿取顧客資料、更新顧客資料、刪除顧客資料四個動作。
首先我們在src中新增 schemas.py 檔,該檔案將會儲存定義輸入輸出的 Pydantic model,我們在此檔案中定義新增顧客資料時所需要輸入的資料。
# src/schemas.py

from pydantic import BaseModel, Field, validator
from datetime import datetime

class DateTimeBase(BaseModel):
    created_at: str
    updated_at: str

    @validator("created_at", "updated_at", pre=True)
    def datetime_to_str(cls, v: datetime):
        if isinstance(v, datetime):
            return datetime.strftime(v, "%Y-%m-%d %H:%M:%S")
        return str(v)

class Customer(DateTimeBase):
    id: str
    customer_name: str

    class Config:
        orm_mode = True

class CustomerCreateInput(BaseModel):
    customer_name: str = Field(max_length=30, title="Customer name")
這裡首先定義了三個 pydantic 模型,來使接口可以根據定義的模型驗證輸入輸出。
class DateTimeBase(BaseModel):
    created_at: str
    updated_at: str

    @validator("created_at", "updated_at", pre=True)
    def datetime_to_str(cls, v: datetime):
        if isinstance(v, datetime):
            return datetime.strftime(v, "%Y-%m-%d %H:%M:%S")
        return str(v)
DateTimeBase 模型幫助我們將 created_at 跟 updated_at 在回傳給前端時能從 datetime 物件轉換成我們所需格式的字串。
class Customer(DateTimeBase):
    id: str
    customer_name: str

    class Config:
        orm_mode = True
Customer 繼承 DateTimeBase 模型,在原先的基礎上多回傳 id 與 customer_name,並在 Config 中將 orm_mode 開啟,使該模型可以將 SQLAlchemy 的資料庫物件轉換為 pydantic 的物件。
class CustomerCreateInput(BaseModel):
    customer_name: str = Field(max_length=30, title="Customer name")
CustomerCreateInput 定義輸入時需要輸入什麼樣的資料型態,並使用 Field 來定義輸入限制。
接著我們在 src 中新增一個 exceptions.py 檔案,該檔案存放程式發生非預期情況時須要回傳給前端的 exceptions。
# src/exceptions.py

class DetailedHTTPException(HTTPException):
    STATUS_CODE = status.HTTP_500_INTERNAL_SERVER_ERROR
    DETAIL = "Server error"

    def __init__(self, **kwargs: dict[str, Any]) -> None:
        super().__init__(status_code=self.STATUS_CODE, detail=self.DETAIL, **kwargs)

class ServerError(DetailedHTTPException):
    STATUS_CODE = status.HTTP_500_INTERNAL_SERVER_ERROR

    def __init__(self, detail: str) -> None:
        self.DETAIL = detail
        super().__init__()
我們自訂一個 DetailedHTTPException 用來回傳 exception 給前端,接著定義常見的 ServerError 類型,繼承 DetailedHTTPException ,在程式發生錯誤時回傳給前端 500 INTERNAL SERVER ERROR。
接著我們在 src 中新增一個 service.py 檔案,該檔案存放模組的商業邏輯程式,我們會在其中撰寫 create 的程式碼。
from sqlalchemy.orm import Session

from src import models, schemas, exceptions

def create_customer(db: Session, customer: schemas.CustomerCreateInput):
    db_customer = models.Customer(**customer.dict())

    db.add(db_customer)
    try:
        db.commit()
        db.refresh(db_customer)
    except Exception as e:
        db.rollback()
        print(e)
        raise exceptions.ServerError("Error creating customer")

    return db_customer
create_customer 使用傳入的輸入實體化一個 SQLAlchemy model 並使用 db session 將其新增到資料庫中,若過程有發生錯誤便會將更動 rollback 並發起一個 ServerError。
完成以上步驟後我們便可以在 main.py 中新增一個接口,將資料庫操作串接起來。
from fastapi import FastAPI, status, Depends
from sqlalchemy.orm import Session

from src import schemas, service
from src.database import get_db

app = FastAPI()

@app.post(
    "/customers",
    status_code=status.HTTP_201_CREATED,
    response_model=schemas.Customer,
)
def create_customer(
    customer: schemas.CustomerCreateInput, db: Session = Depends(get_db)
):
    return service.create_customer(db, customer)
我們建立一個 post 的接口,路徑設為 /customer,請求成功時回傳的狀態碼為 201 created,將會回傳一個 schemas.Customer 的物件。
使用者必須在 request body 中輸入 schemas.CustomerCreateInput 物件格式的JSON字串,並使用依賴注入的方式獲得一個 database session,再將獲取到的資料傳入 create 方法中。

成功呼叫後會獲得像上圖一樣的回傳,表示資料已經新增到資料庫中了。
這裡我們實作拿取全部顧客及個別顧客資料的接口作為範例。
# src/service.py
from sqlalchemy.orm import Session, noload
from sqlalchemy import select

def get_customer_by_id(db: Session, id: str) -> models.Customer:
    query = select(models.Customer).where(models.Customer.id == id)
    customer = db.execute(query).scalar()
    return customer

def get_all_customers(db: Session):
    query = select(models.Customer).options(noload(models.Customer.orders))
    customers = db.execute(query).scalars().all()
    return customers

"""
def get_all_customers(db: Session):
    query = select(models.Customer)
    customers = db.execute(query).unique().scalars().all()
    return customers
"""
service 中新增兩個方法,分別為拿取全部顧客與根據給予的id拿取顧客資料。在拿取全部顧客資料時因為定義資料表關聯時有定義 join 訂單資料,所以在這邊需要先使用 options 使訂單資料不被 join 進來,或是呼叫 unique 方法使 all 方法可以正確回傳資料。
# src/exceptions.py

class NotFound(DetailedHTTPException):
    STATUS_CODE = status.HTTP_404_NOT_FOUND

class CustomerNotFound(NotFound):
    DETAIL = "Customer not found"

# src/main.py

@app.get(
    "/customers",
    response_model=schemas.Customer,
    responses={404: {"description": "Customer not found"}},
)
def get_customer_by_id(id: UUID, db: Session = Depends(get_db)):
    """
    Get a customer by id
    """
    id = str(id)
    customer = service.get_customer_by_id(db, id)
    if not customer:
        raise exceptions.CustomerNotFound()
    return customer

@app.get("/customers/all", response_model=list[schemas.Customer | None])
def get_all_customers(db: Session = Depends(get_db)):
    """
    Get all customers
    """
    return service.get_all_customers(db)
在 main 中也新增兩個路徑操作參數,可以使用 responses 定義不同的狀態碼代表的意義,這樣在API文件中也可顯示出來。
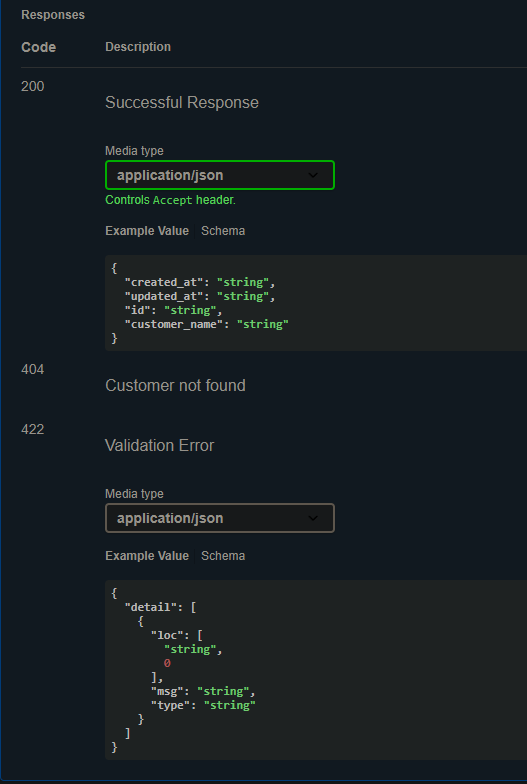
可以看到 404 的地方是我們定義的敘述。

若成功會得到上圖中的結果。
# src/schemas.py

from typing import Optional

class CustomerUpdateInput(BaseModel):
    customer_name: Optional[str] = Field(max_length=30, title="Customer name")
在 schemas 中新增一個 model 用來定義更新時要傳入什麼資料,若是欄位眾多時可以使用 Optional 使欄位變為非必填,只更新有輸入的欄位。
# src/service.py

def update_customer(
    db: Session, update_data: schemas.CustomerUpdateInput, customer: models.Customer
) -> models.Customer:
    update_data: dict = update_data.model_dump(exclude_unset=True, exclude_none=True)
    for key, value in update_data.items():
        setattr(customer, key, value)

    try:
        db.commit()
        db.refresh(customer)
    except Exception as e:
        db.rollback()
        print(e)
        raise exceptions.ServerError("Error updating customer")

    return customer
在 service 的 update 方法中,我們將輸入的 pydantic model 轉換成字典,並去除無設置的參數或 None 值,再對字典進行迭代以對資料庫物件進行更新。
# src/main.py

@app.patch(
    "/customers",
    response_model=schemas.Customer,
    responses={404: {"description": "Customer not found"}},
)
def update_customer(
    id: UUID, update_data: schemas.CustomerUpdateInput, db: Session = Depends(get_db)
):
    """
    Update a customer
    """
    id = str(id)
    customer = service.get_customer_by_id(db, id)
    if not customer:
        raise exceptions.CustomerNotFound()
    return service.update_customer(db, update_data, customer)
在 main 中新增路徑操作函式,一樣呼叫 service 的 update 方法。
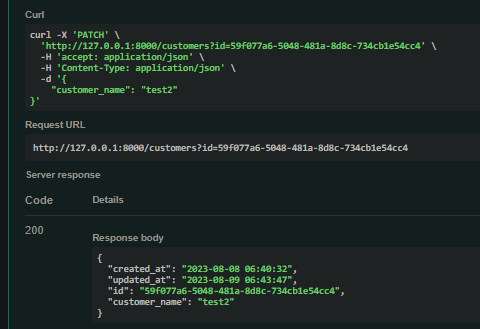
成功執行結果如上。
# src/service.py

def delete_customer(db: Session, customer: models.Customer):
    try:
        db.delete(customer)
        db.commit()
    except Exception as e:
        db.rollback()
        print(e)
        raise exceptions.ServerError("Error deleting customer")
在 service 中對 session 呼叫 delete 方法便可刪除資料表物件。
# src/main.py

@app.delete(
    "/customers",
    status_code=status.HTTP_204_NO_CONTENT,
    responses={404: {"description": "Customer not found"}},
)
def delete_customer(id: UUID, db: Session = Depends(get_db)):
    """
    Delete a customer
    """
    id = str(id)
    customer = service.get_customer_by_id(db, id)
    if not customer:
        raise exceptions.CustomerNotFound()
    service.delete_customer(db, customer)
在刪除中我們成功時回傳的狀態碼通常為 204 No Content,此狀態碼的情況下 response body 不可有資料,所以我們也不用回傳任何東西。
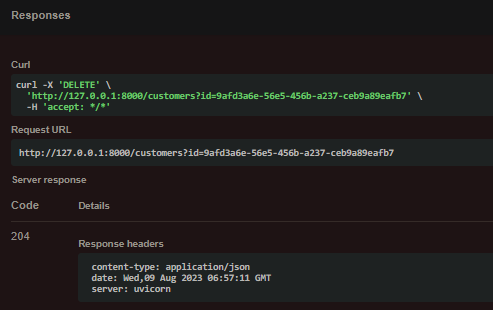
成功結果如上。
以上我們已經做完顧客資料表的 CRUD 了,剩下兩張表就交給各位去做練習。
下一章節,我們將針對安全性來做介紹。