今天要接續來介紹線上地圖,這次使用的是Google Map的套件下面也會介紹如何使用,那就開始吧!!
這個是線上地圖的畫面。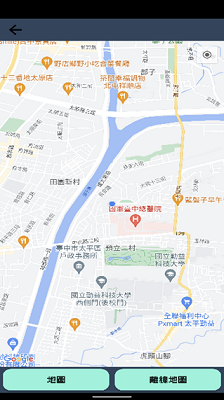
    implementation 'com.google.maps.android:android-maps-utils:2.2.0'
    implementation 'com.google.android.gms:play-services-maps:18.1.0'
    implementation 'com.google.android.gms:play-services-location:21.0.1'
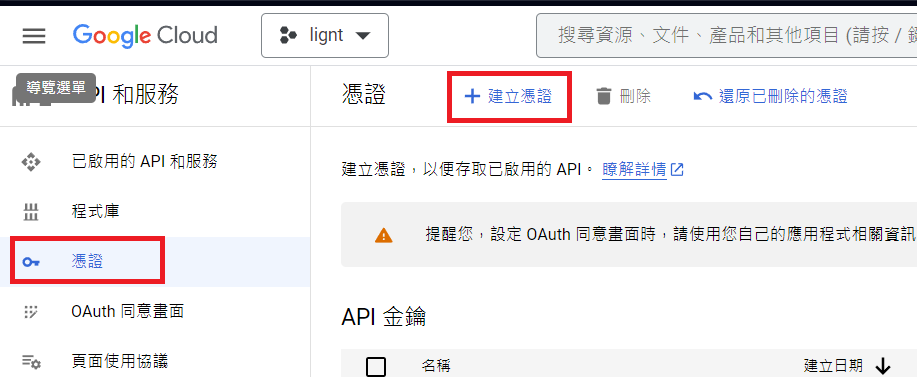
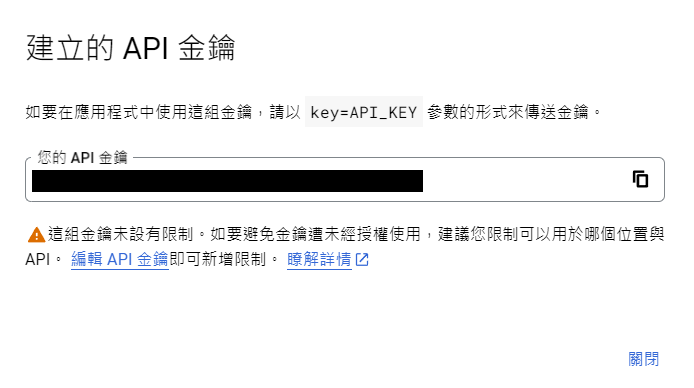
3. 然後到 AndroidManifest.xml 加入 API KEY
 <meta-data
    android:name="com.google.android.geo.API_KEY"
    android:value="API KEY" />
<fragment xmlns:android="http://schemas.android.com/apk/res/android"
    xmlns:tools="http://schemas.android.com/tools"
    android:id="@+id/map"
    android:name="com.google.android.gms.maps.SupportMapFragment"
    android:layout_width="match_parent"
    android:layout_height="match_parent"
    tools:context=".ui.map.GoogleMapFragment" />
public class GoogleMapFragment extends Fragment {
    private GoogleMap mMap; // Google 地圖物件
    private Context context; // 上下文
    private FusedLocationProviderClient fusedLocationClient; // 用於獲取位置信息的客戶端

    // 建構函數,接受一個 Activity 對象作為參數
    public GoogleMapFragment(Activity activity) {
        this.context = activity; // 初始化上下文
        fusedLocationClient = LocationServices.getFusedLocationProviderClient(activity); // 初始化位置客戶端
    }

    // 地圖準備回調
    private OnMapReadyCallback callback = new OnMapReadyCallback() {
        @Override
        public void onMapReady(GoogleMap googleMap) {
            mMap = googleMap; // 初始化 Google 地圖

            // 檢查位置權限是否已授予
            if (ActivityCompat.checkSelfPermission(context, Manifest.permission.ACCESS_FINE_LOCATION) != PackageManager.PERMISSION_GRANTED
                    && ActivityCompat.checkSelfPermission(context, Manifest.permission.ACCESS_COARSE_LOCATION) != PackageManager.PERMISSION_GRANTED) {
                return; // 如果未授予權限,則不執行後續操作
            }

            // 啟用 "我的位置" 顯示
            googleMap.setMyLocationEnabled(true);
            mMap.getUiSettings().setMapToolbarEnabled(true); // 啟用地圖工具欄
            mMap.moveCamera(CameraUpdateFactory.zoomTo(15.0f)); // 設定初始地圖縮放級別

            // 獲取並移動到當前位置
            fusedLocationClient.getLastLocation()
                    .addOnSuccessListener(new OnSuccessListener<Location>() {
                        @Override
                        public void onSuccess(Location location) {
                            if (location != null) {
                                // 當前位置獲取成功
                                double latitude = location.getLatitude();
                                double longitude = location.getLongitude();

                                // 在此處移動 Google 地圖到當前位置
                                LatLng currentLatLng = new LatLng(latitude, longitude);
                                mMap.moveCamera(CameraUpdateFactory.newLatLng(currentLatLng));
                            }
                        }
                    });
        }
    };

    // 創建視圖
    @Nullable
    @Override
    public View onCreateView(@NonNull LayoutInflater inflater,
                             @Nullable ViewGroup container,
                             @Nullable Bundle savedInstanceState) {
        return inflater.inflate(R.layout.fragment_google_map, container, false); // 返回指定的佈局視圖
    }

    // 在視圖創建後執行進一步的初始化操作
    @Override
    public void onViewCreated(@NonNull View view, @Nullable Bundle savedInstanceState) {
        super.onViewCreated(view, savedInstanceState);

        // 檢查是否已授予位置權限,如果未授予權限,則不執行後續操作
        if (ActivityCompat.checkSelfPermission(context, Manifest.permission.ACCESS_FINE_LOCATION) != PackageManager.PERMISSION_GRANTED
                && ActivityCompat.checkSelfPermission(context, Manifest.permission.ACCESS_COARSE_LOCATION) != PackageManager.PERMISSION_GRANTED) {
            return;
        }

        // 獲取 SupportMapFragment,它用於顯示 Google 地圖
        SupportMapFragment mapFragment =
                (SupportMapFragment) getChildFragmentManager().findFragmentById(R.id.map);

        if (mapFragment != null) {
            mapFragment.getMapAsync(callback); // 開始異步初始化 Google 地圖
        }
    }
}
接下來就是介紹離線地圖了!!