工程師視角:
PM不知道在做什麼,反正今天沒人來煩我。
來補充說明一下Flame的特色,並且先把一些必定會有的功能模組化好了~
像 換頁、按鈕、位移、操控、動畫。
在Flame裡,這些都和他的Component有關。
簡單的概念如下:
就會出現在畫面上囉~
Components 樹狀結構
所有的Components都繼承自抽象父類別Component,
而且裡面都有add()方法可以加入新的Components。
Components 生命週期與參數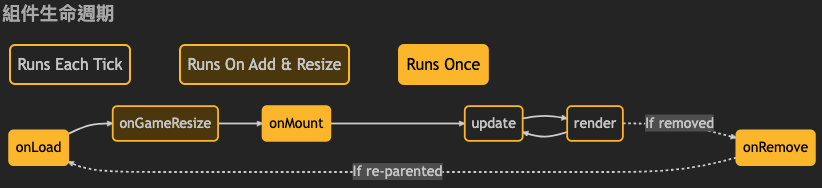
觸發時機:
Priority:
每個Component都有記錄優先級的整數(int),priority。
數值越大就越靠近畫面(Z軸)
Component Keys:
可以給定Component一個KEY的名稱,這樣之後就可以用這個名稱來找到他。
像Android的findViewById,或js的getElementById()
final myComponent = Component(
  key: ComponentKey.named('player'),
);

flameGame.findByKey(ComponentKey.named('player'));
import 'package:flame/game.dart' as g;

class MyGame extends g.FlameGame {
  late final g.RouterComponent router;

  @override
  Future<void> onLoad() async {
    add(
      router = g.RouterComponent(
        routes: {
          'splash': g.Route(SplashScreenPage.new),
          'home': g.Route(HomePage.new),
        },
        initialRoute: 'splash',
      ),
    );
  }
}
然後在其他頁要繼承Component、實作HasGameReference
class SplashScreenPage extends Component with TapCallbacks, HasGameReference<MyGame>{
  @override
  Future<void> onLoad() async {
    addAll([
      TextBoxComponent(
        text: 'Start!',
        textRenderer: TextPaint(
          style: const TextStyle(
            color: Color(0xffffffff),
            fontSize: 48,
          ),
        ),
        align: Anchor.center,
        size: game.canvasSize,
      ),
    ]);
  }

  @override
  bool containsLocalPoint(Vector2 point) => true;

  @override
  void onTapUp(TapUpEvent event) => game.router.pushNamed('home');
}
上面的code就會在最一開始顯示SplashScreenPage,
然後我在那面上有放一個「Start」的文字(用下面的TextBoxComponent做的),
當按下時就會自動導向HomePage了~
class RoundedButton extends PositionComponent with TapCallbacks{

}
到時候使用時,我們會想傳入文字、顏色、框、要觸發的事件
class RoundedButton extends PositionComponent with TapCallbacks{

  final String text;                     ///文字
  final void Function() action;          ///事件
  final TextPainter _textDrawable;       ///文字drawable
  late final Offset _textOffset;         ///算出Offset,讓文字置中
  late final RRect _rrect;               ///畫出按鈕的形狀
  late final Paint _borderPaint;         ///框線畫筆
  late final Paint _bgPaint;             ///背景色畫筆

  RoundedButton({
    required this.text,
    required this.action,
    required Color color,                ///顏色
    required Color borderColor,          ///框線
    super.anchor = Anchor.center,        ///位置,沒傳入的話就在畫面中間
  }) : _textDrawable = TextPaint(
    style: const TextStyle(
      fontSize: 20,
      color: Color(0xFF000000),
      fontWeight: FontWeight.w800,
    ),
  ).toTextPainter(text) {
    size = Vector2(150, 40);
    _textOffset = Offset(
      (size.x - _textDrawable.width) / 2,
      (size.y - _textDrawable.height) / 2,
    );
    _rrect = RRect.fromLTRBR(0, 0, size.x, size.y, Radius.circular(size.y / 2));
    _bgPaint = Paint()..color = color;
    _borderPaint = Paint()
      ..style = PaintingStyle.stroke
      ..strokeWidth = 2
      ..color = borderColor;
  }


  @override
  void render(Canvas canvas) {
    canvas.drawRRect(_rrect, _bgPaint);
    canvas.drawRRect(_rrect, _borderPaint);
    _textDrawable.paint(canvas, _textOffset);
  }

}
最後實作按下會有什麼反應
@override
  void onTapDown(TapDownEvent event) {
    scale = Vector2.all(1.05);  ///放大一點點
  }

  @override
  void onTapUp(TapUpEvent event) {
    scale = Vector2.all(1.0);  ///變回來,並觸發事件
    action();
  }

  @override
  void onTapCancel(TapCancelEvent event) {
    scale = Vector2.all(1.0); ///變回來
  }
這樣就完成一個按鈕的小元件了,可以任意的放在想要的畫面上。
展示:
PM視角:企劃、UI、使用者需求…好忙啊
參考:
官方文件(Component)
【Flutter&Flame游戏 - 拾壹】探索构件 | Component 使用细节

 iThome鐵人賽