Fragment通常會用在那種介面大部分都一樣,但是小部分會更改的地方,就以IT來說,你可以看到上方的
這個部分,當你點選其中一個,上面的資料不會改變,但是下方的內容卻改變了,也就是在同個Activity下使用不同的片段,這就是今天要講的Fragment的功用。

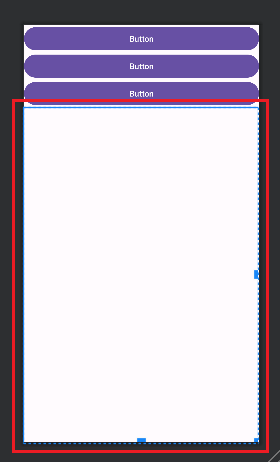
首先要設定FrameLayout在想要做到換頁效果的區塊放上FrameLayout,可以看到下圖紅色圈起來的區塊
這裡我設定要使用三個Button控制底下的Fragment,Fragment能改變的範圍就是FrameLayout的大小。
這邊附上我的布局設定:
<?xml version="1.0" encoding="utf-8"?>
<LinearLayout xmlns:android="http://schemas.android.com/apk/res/android"
    xmlns:app="http://schemas.android.com/apk/res-auto"
    xmlns:tools="http://schemas.android.com/tools"
    android:layout_width="match_parent"
    android:layout_height="match_parent"
    tools:context=".MainActivity"
    android:orientation="vertical">

    <Button
        android:id="@+id/fragment_1"
        android:layout_width="match_parent"
        android:layout_height="wrap_content"
        android:text="Button" />

    <Button
        android:id="@+id/fragment_2"
        android:layout_width="match_parent"
        android:layout_height="wrap_content"
        android:text="Button" />

    <Button
        android:id="@+id/fragment_3"
        android:layout_width="match_parent"
        android:layout_height="wrap_content"
        android:text="Button" />

    <FrameLayout
        android:id="@+id/fragmentLayout"
        android:layout_width="match_parent"
        android:layout_height="match_parent">

    </FrameLayout>
</LinearLayout>
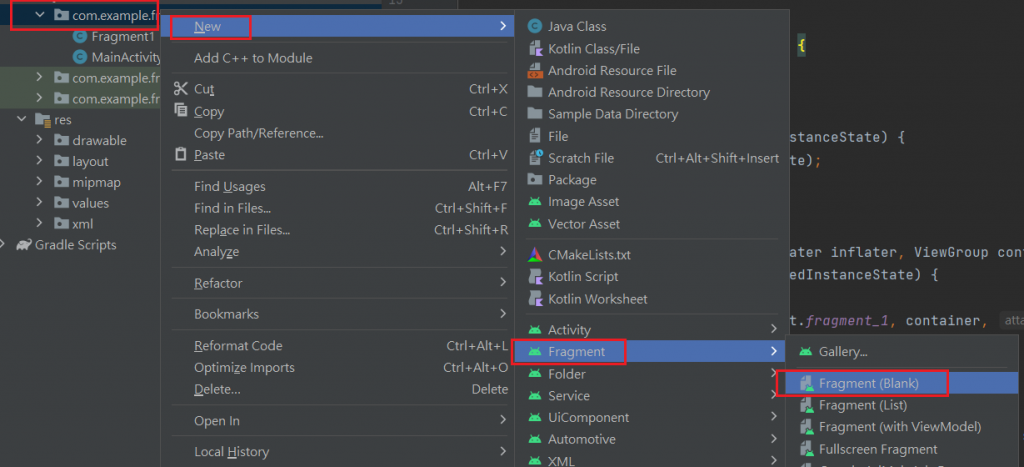
這邊要創三個Fragment,可以從專案名稱按右鍵 > New > Fragment > Fragment(Blank)
接著取完名後,就會幫你建立一個Fragment的Class跟和他綁定的介面
再來新建的Fragment的Class裡面會有很多預設幫你打好的方法,這些方法跟Fragment的生命週期有關,這次實作中大部分的方法都不會用到,因此這邊我們就先把會用到的留下來其他刪掉
public class Fragment1 extends Fragment {
    @Override
    public void onCreate(Bundle savedInstanceState) {
        super.onCreate(savedInstanceState);

    }
    @Override
    public View onCreateView(LayoutInflater inflater, ViewGroup container,
                             Bundle savedInstanceState) {
        return inflater.inflate(R.layout.fragment_1, container, false);
    }
}
可以直接複製貼上,最上面的註解也要記得刪掉~
最後還要新增一個方法
    @Override
    public void onViewCreated(@NonNull View view, @Nullable Bundle savedInstanceState) {
        super.onViewCreated(view, savedInstanceState);
    }
下面就來一一介紹他們各自的用途:
onCreate,這裡是在Fragment建立時最先執行程式的地方,因此雖然這裡可以使用物件的監聽器,但會因為剛建立的關係,所以物件或傳入的資料還沒傳到應該要傳的地方就被調用而導致報錯,所以這裡通常只會用來初始化,以及接收從別處傳來的資料。onCreateView,這裡是用來創立Fragment的View並且回傳,物件的id也可以選擇在這裡綁定,但通常還是會再下一個要介紹的方法綁定,這裡就拿來創立View而已。onViewCreated,這裡會寫跟物件有關的動作,比如:綁定物件id、物件的監聽器......。這邊附上我的Fragment的程式碼
import android.os.Bundle;

import androidx.annotation.NonNull;
import androidx.annotation.Nullable;
import androidx.fragment.app.Fragment;

import android.view.LayoutInflater;
import android.view.View;
import android.view.ViewGroup;
import android.widget.TextView;

public class Fragment1 extends Fragment {
    private TextView textView;
    @Override
    public void onCreate(Bundle savedInstanceState) {
        super.onCreate(savedInstanceState);

    }
    @Override
    public View onCreateView(LayoutInflater inflater, ViewGroup container,
                             Bundle savedInstanceState) {
        //這裡通常是用於創建Fragment的View
        return inflater.inflate(R.layout.fragment_1, container, false);
    }

    @Override
    public void onViewCreated(@NonNull View view, @Nullable Bundle savedInstanceState) {
        super.onViewCreated(view, savedInstanceState);
        textView = view.findViewById(R.id.tv_fragment_1);

        textView.setText("這裡是Fragment1");
    }
}
我設定當轉換到Fragment_1這個頁面時就讓TextView顯示這裡是Fragment1
<?xml version="1.0" encoding="utf-8"?>
<FrameLayout xmlns:android="http://schemas.android.com/apk/res/android"
    xmlns:tools="http://schemas.android.com/tools"
    android:layout_width="match_parent"
    android:layout_height="match_parent"
    tools:context=".Fragment1">

    <TextView
        android:id="@+id/tv_fragment_1"
        android:layout_width="match_parent"
        android:layout_height="match_parent"
        android:textSize="40sp"
        android:text="@string/hello_blank_fragment" />

</FrameLayout>
如果你也是用上面那種方法建立Fragment,會發現他幫你拉了一個FrameLayout,這個Layout跟之前介紹的LinearLayout最大的差別在於,前者的物件是可以彼此疊加的,後者則會分開來。
import androidx.appcompat.app.AppCompatActivity;
import androidx.fragment.app.Fragment;
import androidx.fragment.app.FragmentManager;

import android.os.Bundle;
import android.widget.Button;

public class MainActivity extends AppCompatActivity {
    private Button bt1,bt2,bt3;
    @Override
    protected void onCreate(Bundle savedInstanceState) {
        super.onCreate(savedInstanceState);
        setContentView(R.layout.activity_main);

        bt1 = findViewById(R.id.fragment_1);
        bt2 = findViewById(R.id.fragment_2);
        bt3 = findViewById(R.id.fragment_3);

        Fragment1 fragment1 = new Fragment1();
        Fragment2 fragment2 = new Fragment2();
        Fragment3 fragment3 = new Fragment3();

        bt1.setOnClickListener(view -> setFragment(fragment1));
        bt2.setOnClickListener(view -> setFragment(fragment2));
        bt3.setOnClickListener(view -> setFragment(fragment3));
    }
    void setFragment(Fragment fragment){
        FragmentManager fragmentManager = getSupportFragmentManager();
        fragmentManager.beginTransaction().replace(R.id.fragmentLayout,fragment).commit();
    }
}
要設定Fragment主要有兩種方式
兩個方法各有自己發揮的地方
replace,可以將Fragment替換掉,個人認為是比較簡單的使用方法,但也算是簡單暴力,使用replace創建Fragment的時候都是重新跑一次生命週期,雖然影響不大,但有的時候沒有必要一直創立。add+show+hide,這個的使用方式為先用add將Fragment加到一個容器內,然後將其他沒有要顯示的Fragment用hide隱藏,要顯示的用show顯示,因此就可以達到不用再跑一次生命週期的效果。這次的實作我是選擇使用replace的方法,下面就開始講解我的程式:
        Fragment1 fragment1 = new Fragment1();
        Fragment2 fragment2 = new Fragment2();
        Fragment3 fragment3 = new Fragment3();
這個部分是在將我的Fragment都先new一個出來。
        bt1.setOnClickListener(view -> setFragment(fragment1));
        bt2.setOnClickListener(view -> setFragment(fragment2));
        bt3.setOnClickListener(view -> setFragment(fragment3));
接下來這裡是button的點擊事件,可以看到當點擊按鈕時會呼叫setFragment個方法,並且把上面建立好的fragment丟進去。
    void setFragment(Fragment fragment){
        FragmentManager fragmentManager = getSupportFragmentManager();
        fragmentManager.beginTransaction().replace(R.id.fragmentLayout,fragment).commit();
    }
最後就是我寫的設定Fragment的方法
首先第一段這裡獲取了FragmentManger,第二段我使用了replace達到替換Fragment的效果,並且告知FrameLayout的id跟要轉換成的fragment,最後就是將這一串給commit。
這邊補充一下用add/show/hide大概要怎麼寫
        Fragment1 fragment1 = new Fragment1();
        Fragment2 fragment2 = new Fragment2();
        Fragment3 fragment3 = new Fragment3();
這個部分要改成
        Fragment1 fragment1 = new Fragment1();
        Fragment2 fragment2 = new Fragment2();
        Fragment3 fragment3 = new Fragment3();

        getSupportFragmentManager().beginTransaction()
        .add(R.id.fragmentLayout, fragment1, "fragment1") // 添加第一個 Fragment
        .add(R.id.fragmentLayout, fragment2, "fragment2") // 添加第二個 Fragment
        .add(R.id.fragmentLayout, fragment3, "fragment3") // 添加第三個 Fragment
        .hide(fragment2) // 隱藏第二個 Fragment
        .hide(fragment3) // 隱藏第三個 Fragment
        .commit();
這邊可以看到我在後面多了"fragment1",這個的意思是為我這個加入的fragment添加tag,這可以幫助之後的操作更加容易,接著往下看
        bt1.setOnClickListener(view -> setFragment(fragment1));
        bt2.setOnClickListener(view -> setFragment(fragment2));
        bt3.setOnClickListener(view -> setFragment(fragment3));
這裡就要改成這樣
bt1.setOnClickListener(view -> {
    FragmentManager fragmentManager = getSupportFragmentManager();
    Fragment fragment1 = fragmentManager.findFragmentByTag("fragment1");
    Fragment fragment2 = fragmentManager.findFragmentByTag("fragment2");
    Fragment fragment3 = fragmentManager.findFragmentByTag("fragment3");

    fragmentManager.beginTransaction()
        .hide(fragment2)
        .hide(fragment3)
        .show(fragment1)
        .commit();
});
每個button的形式就會長差不多這樣,可以看到簡而言之就是將其他用不到的fragment給hide起來,用到的就show出來,最後在commit就好。
而最後的方法的部分
    void setFragment(Fragment fragment){
        FragmentManager fragmentManager = getSupportFragmentManager();
        fragmentManager.beginTransaction().replace(R.id.fragmentLayout,fragment).commit();
    }
由於將顯示的方法寫在每個button裡面,所以這裡就不需要了。
