此篇已更新,歡迎到「【Spring Boot】第9.1課-準備 MySQL 資料庫與認識 Spring Data JPA」文章繼續閱讀。
筆者前公司的產品,是使用 NoSQL 資料庫(MongoDB),並非關聯式資料庫。後來偶爾看看徵才訊息,發現要求 SQL 能力的職缺還不少。但我沒有這方面的工作經驗,於是趁著鐵人賽來補一些知識。
本文將在 Spring Boot 專案透過 JPA 的介面去存取 MySQL,這會是一個 hello world 性質的範例。後面幾天的文章,才會進一步說明如何設計各種欄位,以及一對多、多對多的關係。而文末將簡介 Spring Data JPA。
筆者透過 Docker 安裝 MySQL,版本為 8.1.0。其他版本可參考它的 Docker Hub。
docker pull mysql:8.1.0
docker run -d -p 3306:3306 --name DemoMySQL -e MYSQL_ROOT_PASSWORD=123456 99afc808f15b
讀者還可另外安裝開發工具,本文使用的是 Workbench。
接著請在 MySQL 中建立一個資料庫(schema),以便在裡面存放一至多個資料表(table)。筆者取名為「demo」。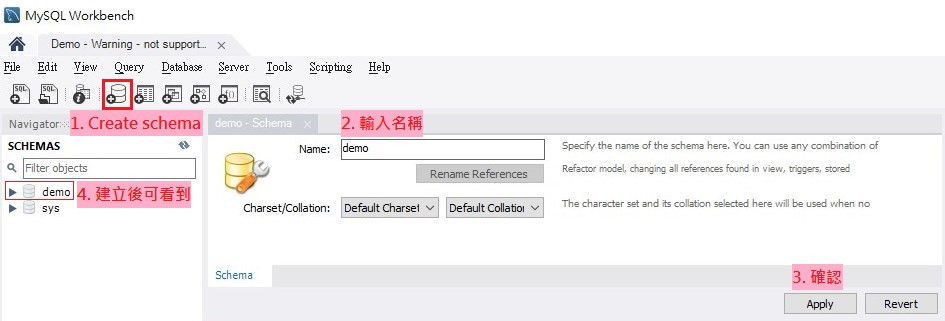
透過 Spring Initializr 工具,可輕鬆產生一個 Spring Boot 專案。本文使用的版本如下。
開啟專案後,請在 pom.xml 檔案添加串接 MySQL 時所需要的依賴。
<!-- MySQL -->
<dependency>
    <groupId>com.mysql</groupId>
    <artifactId>mysql-connector-j</artifactId>
    <scope>runtime</scope>
</dependency>

<!-- Spring Data JPA -->
<dependency>
    <groupId>org.springframework.boot</groupId>
    <artifactId>spring-boot-starter-data-jpa</artifactId>
</dependency>
在後面文章的範例,我們會在測試程式中,透過呼叫 repository bean 的做法來存取資料庫。因此請把相關的依賴添加進來。
<!-- Spring Web -->
<dependency>
    <groupId>org.springframework.boot</groupId>
    <artifactId>spring-boot-starter-web</artifactId>
</dependency>

<!-- Spring Boot 測試 -->
<dependency>
    <groupId>org.springframework.boot</groupId>
    <artifactId>spring-boot-starter-test</artifactId>
    <scope>test</scope>
</dependency>

<!-- 單元測試 -->
<dependency>
    <groupId>junit</groupId>
    <artifactId>junit</artifactId>
</dependency>
請在 application.properties 檔案,添加以下參數。
# 資料庫地址
spring.datasource.url=jdbc:mysql://localhost:3306/demo

# 資料庫帳密
spring.datasource.username=root
spring.datasource.password=123456

# Driver 的類別路徑
spring.datasource.driver-class-name=com.mysql.cj.jdbc.Driver

# 轉成 SQL 指令的翻譯器
spring.jpa.database-platform=org.hibernate.dialect.MySQL8Dialect

# 啟動 server 時,要如何配置資料表;create 是基於測試用途,正式環境別誤用
spring.jpa.hibernate.ddl-auto=create

# MySQL 的儲存引擎
spring.jpa.properties.hibernate.dialect.storage_engine=innodb

# 是否在 log 印出 SQL 指令並對其格式化;適合開發和測試期間開啟做確認
spring.jpa.properties.hibernate.show_sql=true
spring.jpa.properties.hibernate.format_sql=true
值得一提的是 spring.jpa.hibernate.ddl-auto 參數。它有五種在啟動 server 時配置 table 的選項。
若基於開發過程中的測試目的,可使用 create,畢竟 model 類別的欄位定義可能會修修改改的。而在正式環境,會選擇 update 或 validate。
Ref:
(19) 導入Spring-Data-JPA,將資料庫與物件進行綁定與 Sequence 的設定
MySQL資料庫引擎InnoDB與MyISAM有何差異
在資料庫中,每個 table 在程式中都有一個對應的 model 類別,也就是 PO(persistent object)。比方說想儲存學生資料,那就設計一個對應的類別。
import jakarta.persistence.*;

@Entity
@Table(name = "student")
public class StudentPO {
    @Id
    @GeneratedValue(strategy = GenerationType.AUTO)
    private long id;

    private String name;
    private int age;

    // getter, setter...
}
此類別就代表一個 table,除了定義欄位,也使用了一些標記(annotation)。
Repository 屬於三層式架構中,負責存取資料庫的「資料存取層」,接下來讓我們定義它。
@Repository
public interface StudentRepository extends JpaRepository<StudentPO, Long>, JpaSpecificationExecutor<StudentPO> {
    List<StudentPO> findByAge(int age);
}
這個介面繼承了 JpaRepository,並於泛型傳入 model 與主鍵的類別。也繼承 JpaSpecificationExecutor,於泛型傳入 model 類別。若點進去查看這兩個介面,可看到它們以及父介面中已經有定義一些方法了,例如 findAll、saveAll、deleteById 等。
我們甚至能在上面的 repository 中,定義自己想要的方法。只是方法名稱、參數順序等要遵循一定的規則。這部分讀者可自行 google,或參考官方文件。
此外,不需要另外準備 repository 介面的實作類別,因為 Spring Data JPA 會根據這些定義好的方法自動生成,並建立為 Spring 元件。
定義好 repository 層,也在 Docker 運行 MySQL 後,就能實際使用了。以下是透過撰寫 Spring Boot 測試的方式來進行 CRUD。
@RunWith(SpringRunner.class)
@SpringBootTest
public class ApplicationTests {

	@Autowired
	private StudentRepository studentRepository;

	@Test
	public void testCRUD() {
		// create
		StudentPO student = new StudentPO();
		student.setName("Vincent");
		student.setAge(27);
		studentRepository.save(student);

		// read
		StudentPO result = studentRepository.findById(student.getId()).orElseThrow();
		assertEquals(student.getName(), result.getName());
		assertEquals(student.getAge(), result.getAge());

		// update
		student.setAge(26);
		studentRepository.save(student);

		result = studentRepository.findByAge(student.getAge()).get(0);
		assertEquals(student.getAge(), result.getAge());

		// delete
		studentRepository.deleteById(student.getId());
		assertFalse(studentRepository.existsById(student.getId()));
	}
}
提醒一下,由於上面的測試程式,在最後有執行刪除操作,因此當測試跑完,是不會在 DB 中看到該筆資料的。讀者可利用下中斷點(break point)的方式,每做完一個操作,就去 DB 確認狀況。
最後簡介本文所接觸的 Spring Data JPA。
如果讀者有用過 JDBC,應該對存取 DB 時的程式流程還留有一點印象。包含建立資料庫連線、組合出 SQL 語句後執行、對查詢結果(Result Set)的 raw data 做迴圈,轉換成業務邏輯物件。若更換資料庫種類,SQL 語句可能也要修改。
ORM 的概念,是為了解決上述的繁瑣操作。於是一些 ORM 框架被開發出來,如 Hibernate、MyBatis。它們不但封裝了邏輯,還讓我們在下指令時能以程式語言為導向,而不必寫出 SELECT * from table WHERE ... 這種會依賴 DB 種類的原生語法。
JPA 是一個規範,它是 ORM 框架在提供 API 時,可以遵循的標準。
Spring Data JPA 也是一個框架,而它所封裝的對象為 Hibernate。它讓我們能夠像本文第三、四節那樣,透過 annotation 和定義 repository 方法名稱,更進一步地簡化存取資料庫的程式邏輯。
Ref:JDBC、ORM、JPA、Spring Data JPA,傻傻分不清楚?一文帶你釐清箇中曲直,給你個選擇SpringDataJPA的理由!
今日文章到此結束!
最後推廣一下自己的部落格,我是「新手工程師的程式教室」的作者,請多指教