在更詳細講解量子加密技術之前,補充一下更多Quantum State & Quantum Gate
之前提及Quantum state表示法如下,α和β為任意數,但須滿足平方相加為1的條件
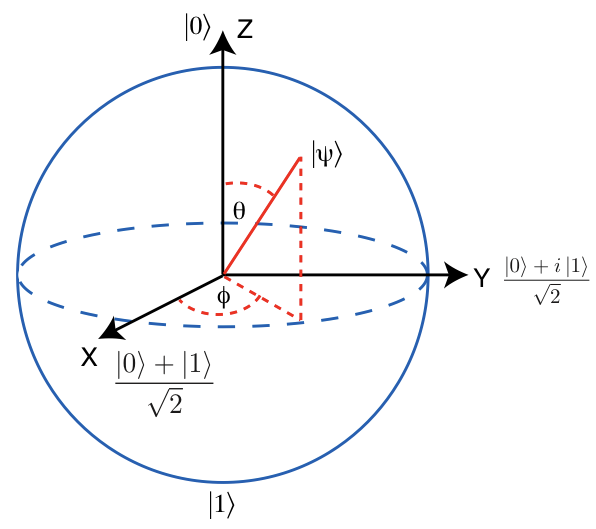
另外我們也可以使用Bloch球體更具象化的表示量子態
Z軸正與負分別代表著|0>和|1>
X軸正與負代表著|+>和|->
Y軸正與負代表著|+i>和|-i>

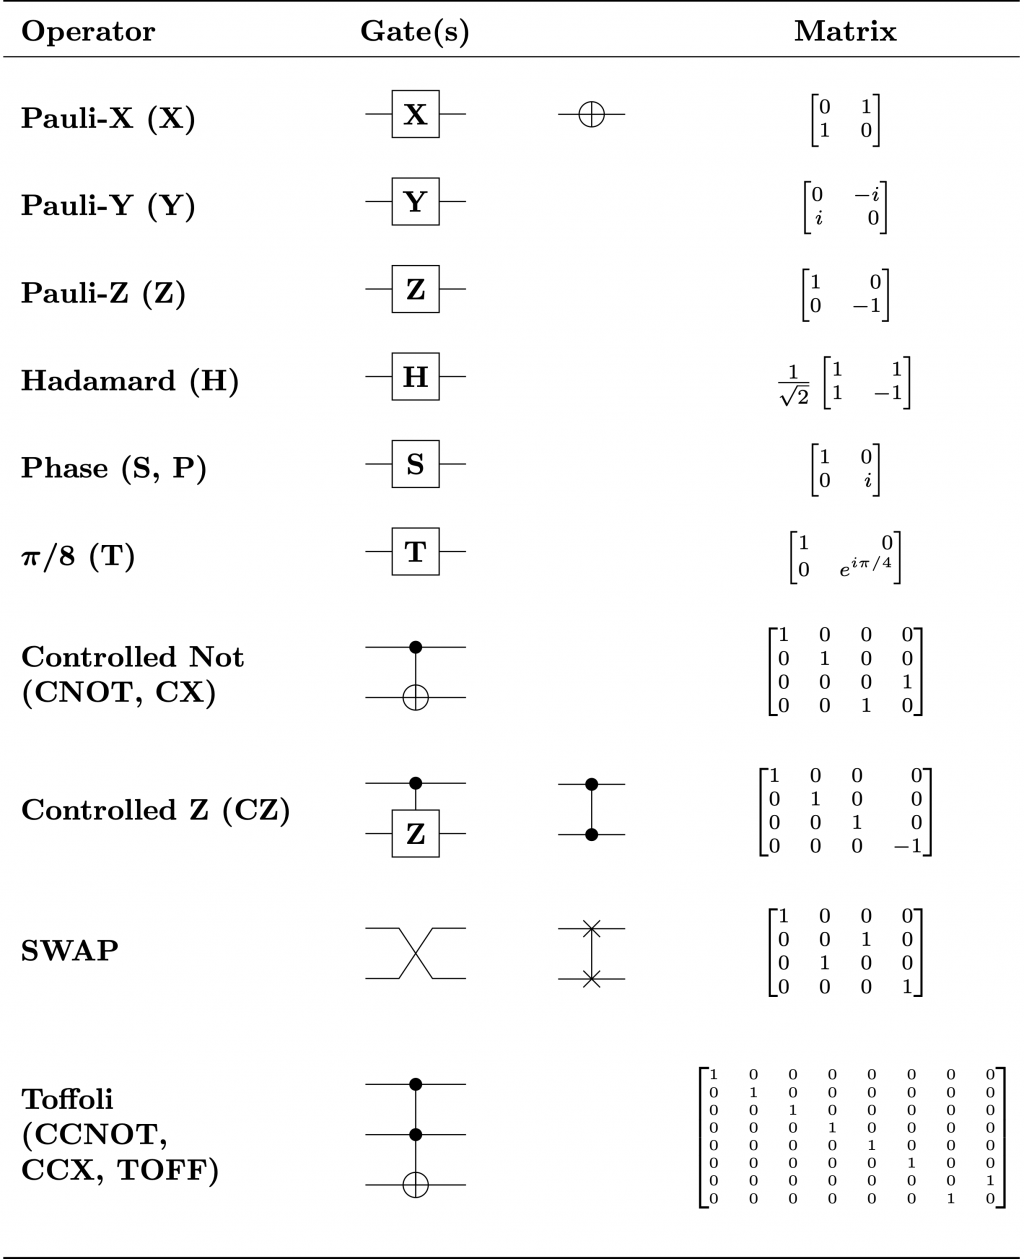
Pauli-X,Y,Z Gate分別代表著量子位對著Bloch球體的X,Y,Z軸旋轉180度
Swap Gate則可以交換兩個量子位的狀態
Phase gate(S gate)則代表著量子位對著Z軸旋轉90度
CNOT與CZ Gate相似,都是根據control bit的狀態,翻轉target bit的狀態,只是對映著Bloch球體翻轉的軸不同。
Toffoli Gate則是CNOT Gate的加強版,有著更多的control bits決定target bit的翻轉
分配量子態,這是透過量子通道進行QKD的第一步。
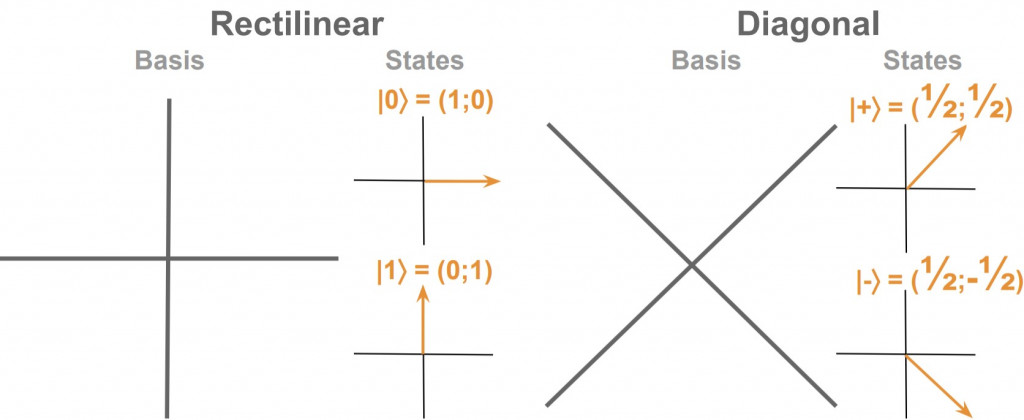
當我們談論 QKD 時,有兩個最常用的基礎
正交態|0⟩和|1⟩形成Standard Basis,也就是直線,即𝑍 basis。正交態|+⟩和|−⟩形成Hadamard Basis,也就是對角線,即𝑋 basis。
# import all necessary objects and methods for quantum circuits
from qiskit import QuantumRegister, ClassicalRegister, QuantumCircuit, execute, Aer
from random import randrange

def print_outcomes_in_reserve(counts): # takes a dictionary variable
    for outcome in counts: # for each key-value in dictionary
        reverse_outcome = ''
        for i in outcome: # each string can be considered as a list of characters
            reverse_outcome = i + reverse_outcome # each new symbol comes before the old symbol(s)
    return reverse_outcome

#Source for SendState: awards/teach_me_qiskit_2018/cryptography/Cryptography.ipynb

def SendState(qc1, qc2, qc1_name):
    ''' This function takes the output of a circuit qc1 (made up only of x and
        h gates and initializes another circuit qc2 with the same state
    '''

    # Quantum state is retrieved from qasm code of qc1
    qs = qc1.qasm().split(sep=';')[4:-1]

    # Process the code to get the instructions
    for index, instruction in enumerate(qs):
        qs[index] = instruction.lstrip()

    for instruction in qs:
        if instruction[0] == 'x':
            if instruction[5] == '[':
                old_qr = int(instruction[6:-1])
            else:
                old_qr = int(instruction[5:-1])
            qc2.x(qreg[old_qr])
        elif instruction[0] == 'h':
            if instruction[5] == '[':
                old_qr = int(instruction[6:-1])
            else:
                old_qr = int(instruction[5:-1])
            qc2.h(qreg[old_qr])
        elif instruction[0] == 'm': # exclude measuring:
            pass
        else:
            raise Exception('Unable to parse instruction')
qreg = QuantumRegister(8) # quantum register with 8 qubits
creg = ClassicalRegister(8) # classical register with 8 bits

# Quantum circuit for Asja state
asja = QuantumCircuit(qreg, creg, name='Asja')

send=[] #Initial bit string to send

#Creating random bit string
for i in range(8):
    bit = randrange(2)
    send.append(bit)

#Apply X gate if bit is equal to 1
for i, n in enumerate(send):
    if n==1:
        asja.x(qreg[i]) # apply x-gate

send_str = ''.join(str(e) for e in send)
目前量子位都初始化成|0>和|1>
asja.h(qreg)
asja.draw()
透過這兩行轉換成X-basis
balvis = QuantumCircuit(qreg, creg, name='Balvis') #Defining Balvis circuit
SendState(asja, balvis, 'Asja') #Asja sends states to Balvis
balvis.draw()
然後將量子態傳送給Balvis
Balvis需要轉換成Z-basis才能夠測量
balvis.h(qreg) #Applying H gate first
balvis.measure(qreg,creg) #then continue with regular measurement

job = execute(balvis,Aer.get_backend('qasm_simulator'),shots=1) #Note that Balvis only has one shot to measure qubits
counts = job.result().get_counts(balvis) # counts is a dictionary object in python
received = print_outcomes_in_reserve(counts)

print("Asja sent:", send_str)
print("Balvis received:", received)
實作後可獲得
Asja sent: 10110010
Balvis received: 10110010
以上就是一個簡單的分配量子態
參考資料:wiki和Womanium 教材
