此篇已更新,歡迎到「【Spring Boot】第9.5課-使用 JPA 建立一對多關聯,並配置雙向關聯」文章繼續閱讀。
在前一天的文章,我們只設計了一張資料表(table)。而 table 之間是可以建立關聯的,故本文將會設計第二張 table,並在程式中建立一對多關係。文末也會說明「懶加載」的概念,用以增進效能。
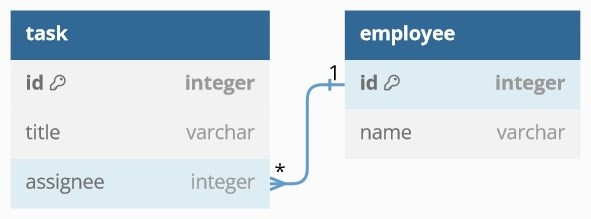
在完成資料庫的正規化後,table 之間就會產生關聯,比方說:
這些例子從字面上看起來很像是「多對一」,然而和「一對多」是一樣的,只是名詞的前後順序不同罷了。
從資料表設計來看,一對多關係就是 A 表會有個欄位去「指向」B 表。例如任務表中有個欄位是員工 id,而員工表的主鍵 id 會被任務資料指到,這樣就建立起關係了。
首先來看看本文要使用的兩個 model 類別,也就是 table 的設計。
第一個是學生資料(StudentPO)。
@Entity
@Table(name = "student")
public class StudentPO {

    @Id
    @GeneratedValue(strategy = GenerationType.AUTO)
    @Column(name = "student_id")
    private long id;

    private String name;

    public static StudentPO of(String name) {
        var student = new StudentPO();
        student.name = name;

        return student;
    }

    // getter, setter ...
}
第二個是聯繫方式(ContactPO),且覆寫了 hashCode 與 equals 方法。
@Entity
@Table(name = "contact")
public class ContactPO {

    @Id
    @GeneratedValue(strategy = GenerationType.AUTO)
    @Column(name = "contact_id")
    private long id;

    @Enumerated(EnumType.STRING)
    private ContactType type;

    private String value;

    public static ContactPO of(ContactType type, String value) {
        var phone = new ContactPO();
        phone.type = type;
        phone.value = value;

        return phone;
    }

    // hashCode, equals ...

    // getter, setter ...
}

public enum ContactType {
    PHONE, EMAIL, LINE
}
也別忘了建立 ContactPO 的 repository 層。
public interface ContactRepository extends JpaRepository<ContactPO, Long>, JpaSpecificationExecutor<ContactPO> {
    ContactPO findByValue(String value);
}
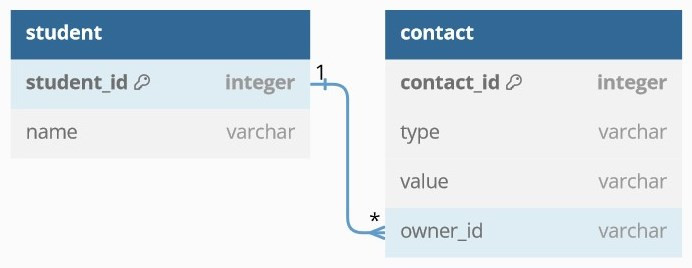
這兩張 table 的關聯,是每一位學生可具有一至多種聯繫方式。而每一筆聯繫方式的資料只隸屬於一位學生。資料表關聯的構想如下圖:
本節讓我們將「student」與「contact」這兩張 table 在程式中建立一對多關係。
由於一位學生擁有多種聯繫方式,因此在 StudentPO 添加 ContactPO 的集合欄位。此處使用 Set 是為了避免重複資料。
@Entity
@Table(name = "student")
public class StudentPO {

    @Id
    @GeneratedValue(strategy = GenerationType.AUTO)
    @Column(name = "student_id")
    private long id;

    // ...

    @OneToMany(targetEntity = ContactPO.class, fetch = FetchType.EAGER)
    @JoinColumn(name = "owner_id", referencedColumnName = "student_id")
    private Set<ContactPO> contacts = new HashSet<>();

    // ...
}
接著還需要冠上兩個標記(annotation)。
@OneToMany 標記代表一對多關係(one student to many contact)。targetEntity 參數代表要關聯的 model 類別。fetch 參數會在第六節進一步說明。
@JoinColumn 標記是用來定義外鍵(foreign key,FK)與主鍵(primary key,PK)的關係。name 參數代表要在 contact 表建立新欄位作為 FK,取名後會出現在該 table 中。而 referencedColumnName 參數代表 student 表中會被 FK 指向的 PK 欄位。
下面的測試程式,是將聯繫方式放入學生資料中,再儲存學生。最後透過查詢學生,「一併獲取」聯繫方式。
@RunWith(SpringRunner.class)
@SpringBootTest
public class ApplicationTests {

	@Autowired
	private StudentRepository studentRepository;

	@Autowired
	private ContactRepository contactRepository;

    @Before
    public void clearDB() {
        studentRepository.deleteAll();
        contactRepository.deleteAll();
    }

	@Test
	public void testOneToManyRelationship() {
		// create contact
		ContactPO contactPhone = ContactPO.of(ContactType.PHONE, "0912345678");
		ContactPO contactLine = ContactPO.of(ContactType.LINE, "vin123");
		Set<ContactPO> contacts = Set.of(contactPhone, contactLine);
		contactRepository.saveAll(contacts);

		// create student
		StudentPO student = new StudentPO();
        student.setName("Vincent");
		student.setContacts(contacts);
		studentRepository.save(student);

		// query student and get related contact info
		StudentPO dbStudent = studentRepository.findById(student.getId()).orElseThrow();
		Set<ContactPO> relatedContacts = dbStudent.getContacts();
		assertEquals(2, relatedContacts.size());
		assertTrue(relatedContacts.stream().anyMatch(x -> x.equals(contactPhone)));
		assertTrue(relatedContacts.stream().anyMatch(x -> x.equals(contactLine)));
	}
}
首先儲存兩筆聯繫資料,此時 ContactPO 的 id 欄位會被給值,接著才將它們賦予給學生資料(StudentPO)。如此一來,JPA 在儲存學生時,就知道要將學生 id 賦予給 contact 表中的哪些資料。
第四節的測試程式,在查詢到學生後,連同聯繫方式也一起得到了。相對的,我們也可能想要單獨透過聯繫方式,就找出它的擁有者。例如輸入電話就找出學生名字。
為了達到這個效果,我們還需要從 contact 表關聯到 student 表,如此便形成「雙向關聯」。
public class ContactPO {
    // ...

    @ManyToOne(targetEntity = StudentPO.class, fetch = FetchType.EAGER)
    @JoinColumn(name = "owner_id", referencedColumnName = "student_id")
    private StudentPO student;

    // ...
}
因為每個聯繫方式都對應到一位學生,所以宣告 StudentPO 的欄位。接著再冠上兩個標記。
@ManyToOne 標記在這裡意味著「many contact to one student」。而 targetEntity 參數則傳入對方的 model 類別。@JoinColumn 標記負責定義兩表之間,用來關聯的 FK 與 PK 欄位,傳入的參數與 StudentPO 相同。
由此可看出,不論在
StudentPO還是ContactPO,@JoinColumn的 name 參數值,其代表的欄位屬於 many 方;而 referencedColumnName 參數值屬於 one 方。
下面的程式,是基於第四節的測試程式做延伸。改為透過查詢聯繫方式,來一併獲取學生資料。
@Test
public void testOneToManyRelationship() {
    // ...

    // query by phone contact and get related student
    ContactPO dbContact = contactRepository.findByValue(contactPhone.getValue());
    StudentPO relatedStudent = dbContact.getStudent();
    assertEquals(student.getId(), relatedStudent.getId());

    // query by line contact and get related student
    dbContact = contactRepository.findByValue(contactLine.getValue());
    relatedStudent = dbContact.getStudent();
    assertEquals(student.getId(), relatedStudent.getId());
}
無論是 @OneToMany 還是 @ManyToOne,都有一個 fetch 參數可用。筆者在前面的範例中均傳入 FetchType.EAGER,而預設值為 FetchType.LAZY。
在前面兩段的測試程式中,不論是透過 repository 查詢出 StudentPO,還是 ContactPO,都可以透過呼叫方法來獲取另一個。
然而 fetch 參數其實決定了另一個 table 的資料何時會被取得。EAGER 代表「一起查詢回來」;而 LAZY 代表「需要時再查詢」。以第四節的查詢學生資料為例,若設為 LAZY,當我們呼叫 StudentPO.getContacts 方法,JPA 才會悄悄地到 DB 查詢。故稱之為「懶加載」。
所以,若讀者在撰寫業務邏輯時覺得:「我查詢學生只是要他的資料,大多數不是為了拿聯繫方式」,那麼不妨設為 LAZY,以減少跨表查詢造成額外的效能耗費。
public class StudentPO {
    // ...

    @OneToMany(targetEntity = ContactPO.class, fetch = FetchType.LAZY)
    @JoinColumn(name = "owner_id", referencedColumnName = "student_id")
    private Set<ContactPO> contacts = new HashSet<>();

    // ...
}
要注意的是,懶加載只在同一個交易(transaction)中有效。因此可視需要,在業務邏輯的方法上冠上 @Transactional 標記。或者直接在 application.properties 檔案中添加參數。
spring.jpa.properties.hibernate.enable_lazy_load_no_trans=true
Ref:
Spring Data JPA 11 多表操作 一對多 075 一對多:配置一對多和多對一
Spring Data JPA 11 多表操作 一對多 076 一對多:保存操作 上
今日文章到此結束!
最後推廣一下自己的部落格,我是「新手工程師的程式教室」的作者,請多指教![]()
