此篇已更新,歡迎到「【Spring Boot】第9.6課-使用 JPA 建立多對多關聯,並配置中間表」文章繼續閱讀。
在昨天的文章,我們設計出兩張資料表的一對多關係,而本文會以學生選課為情境,引進「中間表」的概念,實作出較複雜的「多對多關係」。
在完成資料庫的正規化後,我們可以思考 table 之間是否有類似下面的關係。
A 可以對應到多個 B;而 B 也可對應到多個 A,這就是「多對多」的關係。
從資料表來看,這兩張 table 乍看之下是沒有關聯的,比方說學生歸學生、課程歸課程。不過,「選修」這個使用情境讓這兩種看似獨立的資料,產生了某種關係。
「購物網站」是程式作品常見的練習主題,那麼就以此為例繼續說明。關於「下單」這個功能,會牽涉兩張表,也就是商品和訂單。前者儲存了商品資訊,後者儲存了訂單的買家、總金額和送貨地址等。
然而商品表和訂單表本身是無關的,是情境讓它們有關。因此勢必要有第三張表,用來紀錄訂單購買了什麼商品。構想大致上如下圖: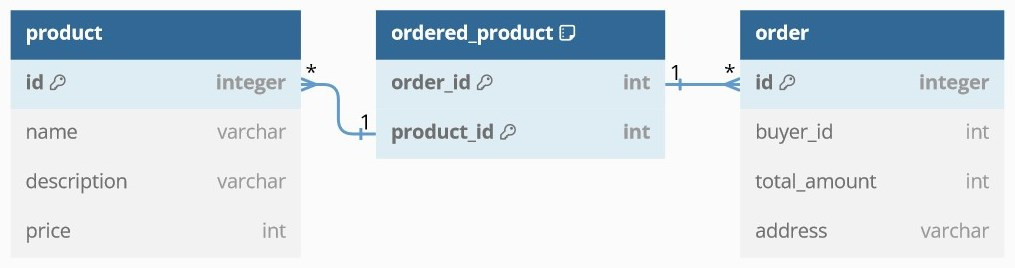
如圖,「ordered_product」紀錄了訂購的商品,並將其他表透過兩個「一對多」關係做間接關聯。在本文,我們稱它為「中間表」。
首先來看看本文要使用的兩個 model 類別,也就是 table 的設計。
第一個是學生資料(StudentPO)。
@Entity
@Table(name = "student")
public class StudentPO {

    @Id
    @GeneratedValue(strategy = GenerationType.AUTO)
    @Column(name = "student_id")
    private long id;

    private String name;

    public static StudentPO of(String name) {
        var student = new StudentPO();
        student.name = name;

        return student;
    }

    // hashCode, equals ...

    // getter, setter ...
}
第二個是課程資料(CoursePO)。
@Entity
@Table(name = "course")
public class CoursePO {

    @Id
    @GeneratedValue(strategy = GenerationType.AUTO)
    @Column(name = "course_id")
    private long id;

    private String name;

    private int point;

    public static CoursePO of(String name, int point) {
        var course = new CoursePO();
        course.name = name;
        course.point = point;

        return course;
    }

    // hashCode, equals ...

    // getter, setter ...
}
這兩者的關聯,如同第一節所提到的學生選修課程的例子。構想大致上如下圖:
其中「selected_course」為中間表。
本節會將程式中「student」與「course」這兩張表,利用「中間表」建立起多對多關係。我們先配置其中一張表,再配置另一張。由於兩表都是「多」的那方,因此順序不拘。
筆者會以「課程已經開設好了,學生可以來選課」的角度來實作。
由於一個課程可以被學生們加選,因此在 CoursePO 添加 StudentPO 的集合欄位。此處使用 Set 是為了避免發生重複資料。
@Entity
@Table(name = "course")
public class CoursePO {

    @Id
    @GeneratedValue(strategy = GenerationType.AUTO)
    @Column(name = "course_id")
    private long id;

    // ...

    @ManyToMany(targetEntity = StudentPO.class, fetch = FetchType.EAGER)
    @JoinTable(
            // 中間表名稱
            name = "selected_course",
            // 本類別與中間表的關聯
            joinColumns = @JoinColumn(name = "course", referencedColumnName = "course_id"),
            // 對方類別與中間表的關聯
            inverseJoinColumns = @JoinColumn(name = "student", referencedColumnName = "student_id")
    )
    private Set<StudentPO> students;

    // ...
}
接著還需要使用一些標記(annotation),設定上會比一對多關係複雜些。
@ManyToMany 標記代表多對多關係(many contact to many student)。targetEntity 參數代表發生關聯的 model 類別。至於 fetch 參數已在昨天文章說明。
@JoinTable 標記是用來配置「中間表」。name 參數代表中間表名稱。joinColumns 與 inverseJoinColumns 參數,則分別設置自身與對方的 model 類別要如何與中間表關聯。
@JoinColumn 標記定義了 model 表要用哪個欄位當外鍵。name 參數為中間表的欄位名;referencedColumnName 為 model 表的外鍵欄位名。
基於昨天介紹的「雙向關聯」,我們想要在查詢出一門課程後,一併獲取學生清單。而且也會想在查詢出一位學生後,一併獲取選課清單。因此接下來在另一張表進行配置。
@Entity
@Table(name = "student")
public class StudentPO {

    @Id
    @GeneratedValue(strategy = GenerationType.AUTO)
    @Column(name = "student_id")
    private long id;

    // ...

    @ManyToMany(mappedBy = "students", fetch = FetchType.EAGER)
    private Set<CoursePO> courses = new HashSet<>();

    // ...
}
同樣是使用 @ManyToMany 標記,但只要提供 mappedBy 參數即可。此處傳入的「students」指的是 CoursePO 的 students 欄位名,代表與本欄位互相關聯。
下面的測試程式,是先分別建立課程與學生資料。接著將學生加入到課程中,模擬出選課的動作後,儲存課程。最後分別從兩個面向查詢:
在測試情境中,有「英文」、「計概」和「會計」這三門課程。Vincent 加選了英文和計概,而 Ivy 加選了英文和會計。
@RunWith(SpringRunner.class)
@SpringBootTest
public class ApplicationTests {

	@Autowired
	private StudentRepository studentRepository;

	@Autowired
	private CourseRepository courseRepository;

    @Before
    public void clearDB() {
        studentRepository.deleteAll();
        courseRepository.deleteAll();
    }

	@Test
	public void testManyToManyRelation() {
		// create courses
		CoursePO course1 = CoursePO.of("英文", 3);
		CoursePO course2 = CoursePO.of("計算機概論", 4);
		CoursePO course3 = CoursePO.of("會計學", 3);
		Set<CoursePO> courses = Set.of(course1, course2, course3);
		courseRepository.saveAll(courses);

		// create students
		StudentPO student1 = StudentPO.of("Vincent");
		StudentPO student2 = StudentPO.of("Ivy");
		studentRepository.saveAll(Set.of(student1, student2));

		// select courses
		course1.setStudents(Set.of(student1, student2));
		course2.setStudents(Set.of(student1));
		course3.setStudents(Set.of(student2));
		courseRepository.saveAll(courses);

		// query student and get related courses
		StudentPO dbStudent1 = studentRepository.findById(student1.getId()).orElseThrow();
		assertEquals(Set.of(course1, course2), dbStudent1.getCourses());

		StudentPO dbStudent2 = studentRepository.findById(student2.getId()).orElseThrow();
		assertEquals(Set.of(course1, course3), dbStudent2.getCourses());

		// query course and get related students
		CoursePO dbCourse1 = courseRepository.findById(course1.getId()).orElseThrow();
		assertEquals(Set.of(student1, student2), dbCourse1.getStudents());

		CoursePO dbCourse2 = courseRepository.findById(course2.getId()).orElseThrow();
		assertEquals(Set.of(student1), dbCourse2.getStudents());

		CoursePO dbCourse3 = courseRepository.findById(course3.getId()).orElseThrow();
		assertEquals(Set.of(student2), dbCourse3.getStudents());
	}
}
Ref:Spring Data JPA 12 多表操作 多對多 081 多對多:映射配置
今日文章到此結束!
最後推廣一下自己的部落格,我是「新手工程師的程式教室」的作者,請多指教