WebView組件可以透過url展示一個網頁,或是傳入自訂的html顯示。
由於React Native不再內建WebView功能,已交給社群維護。所以首先我們需要進行安裝:
npm install --save react-native-webview
cd ios && pod install
載入網址:WebView的基本使用方式。很簡單,就是把網址放到source屬性
import React, { Component } from 'react';
import { WebView } from 'react-native-webview';

class MyWeb extends Component {
  render() {
    return <WebView source={{ uri: 'https://reactnative.dev/' }} />;
  }
}
插入HTML:
除了放網址,也支援直接渲染HTML。
import React, { Component } from 'react';
import { StyleSheet, View } from 'react-native';
import { WebView } from 'react-native-webview';

const MyHTMLComponent = () => {
  const htmlContent = `
    <html>
      <head></head>
      <body>
        <h1>Welcome to React Native WebView!</h1>
        <p>This is rendered using local HTML content.</p>
      </body>
    </html>
  `;

  return (
    <View style={{ flex: 1 }}>
      <WebView
        source={{ html: htmlContent }}
      />
    </View>
  );
}

export default MyHTMLComponent;
在某些情境,我們可能希望向 WebView 傳資料,例如傳Token,以讓 WebView 裡的網頁保持登入狀態。要注意的是,只能透過字串來傳遞。
因此,開發時APP開發和Web開發雙方需做好溝通,協議好資料格式。例如使用JSON格式來序列化和解析數據。
// WebView 中的Web
function sendDataToReactNative(data) {
    window.ReactNativeWebView.postMessage(data);
}
import { WebView } from 'react-native-webview';

function App() {
    const onReceiveMessage = (event) => {
        const data = event.nativeEvent.data;
        console.log("Received data from WebView:", data);
    };

    return (
        <WebView
            source={{ uri: 'https://your-webview-url.com' }}
            onMessage={onReceiveMessage}
        />
    );
}
React Native端:使用WebView的postMessage方法。
const webViewRef = useRef(null);

function sendDataToWebView(data) {
    webViewRef.current.postMessage(data);
}

return (
    <WebView
        ref={webViewRef}
        source={{ uri: 'https://your-webview-url.com' }}
        onMessage={onReceiveMessage}
    />
);
Web端:監聽message事件來捕獲從React Native發送過來的消息。
window.addEventListener('message', function(event) {
  const dataFromReactNative = event.data;
  console.log("Received data from React Native:", dataFromReactNative);
});
當WebView中的網頁出現問題時,我們會需要調試WebView中的網頁。記得筆者以前剛接觸React Native時,曾經有一次遇到了WebView的問題。由於當時不知道如何調試WebView,結果耗費了好幾個小時解決問題。
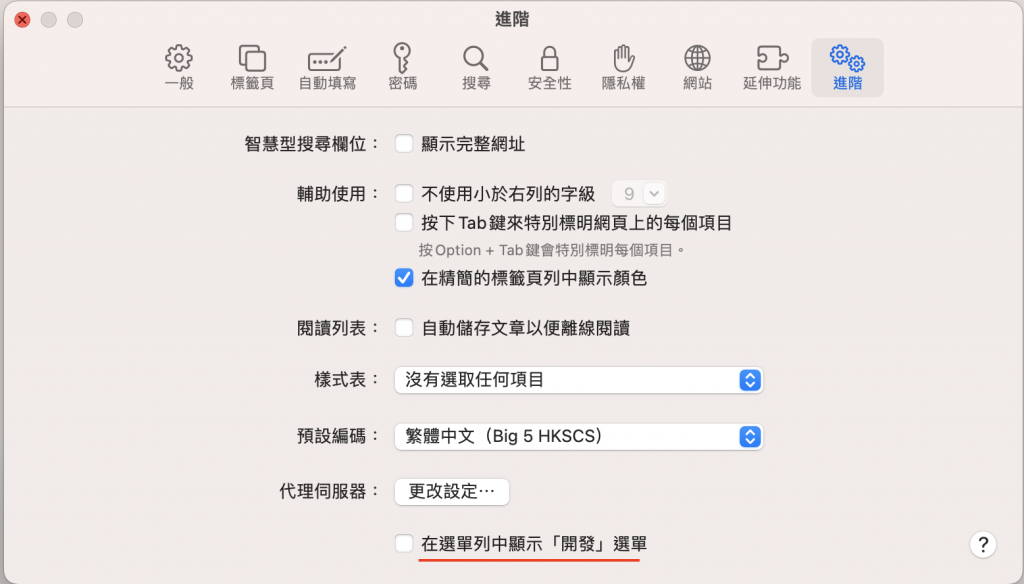
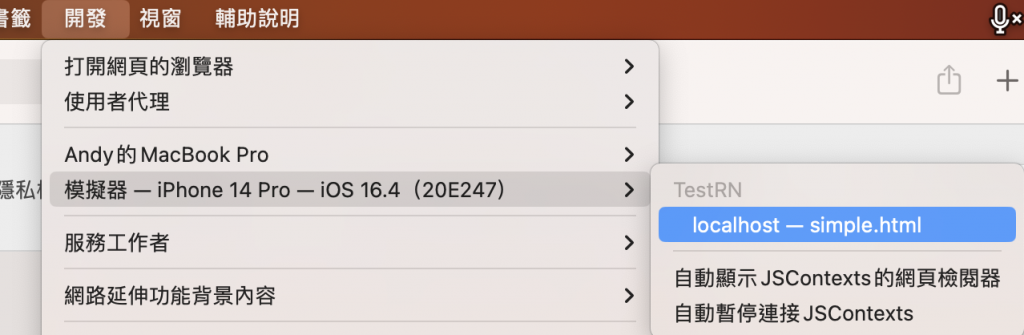
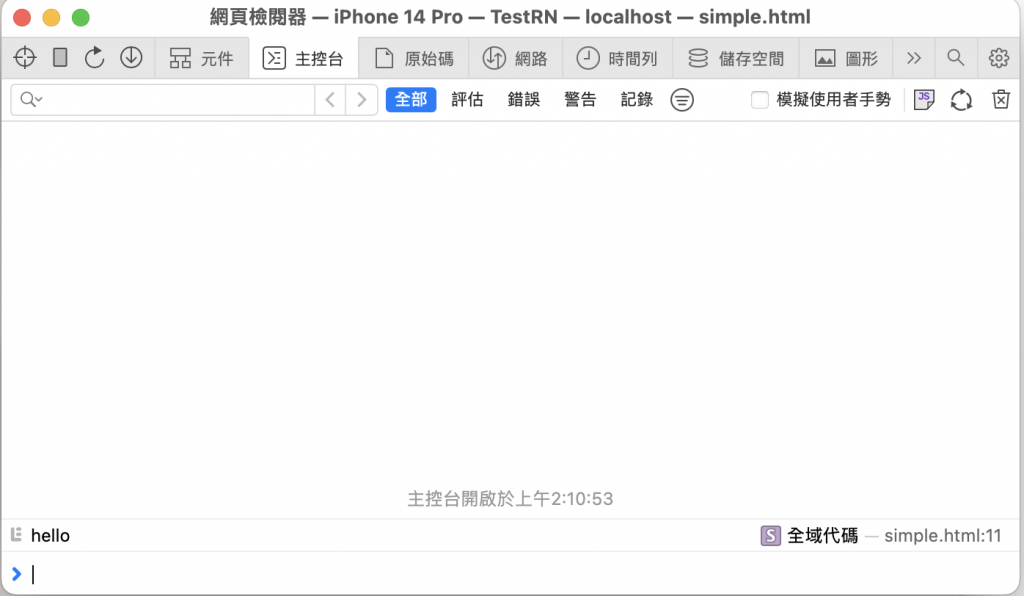
IOS調試
<WebView
    source={require('./src/simple.html')}
    webviewDebuggingEnabled={true}
/>
node_modules/react-native-webview/apple/RNCWebView.m,添加_webView.inspectable = YES,使 WebView 可被檢查;
_webView = [[WKWebView alloc] initWithFrame:self.bounds configuration: wkWebViewConfig];
_webView.inspectable = YES; // 增加這一行
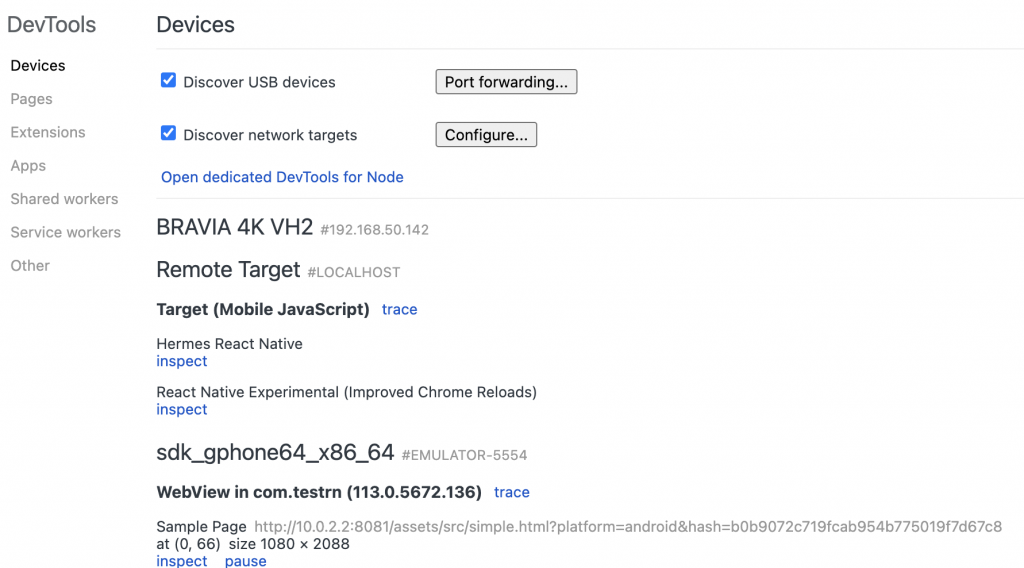
Android調試
我們做一個WebView,加載中要顯示Loading動畫,頁面加載完畢時再顯示內容。同時,還要傳送Token資料到WebView。
創建WebView
<View style={styles.container}>
   <WebView source={require('./simple.html')} />
</View>
引入加載動畫ActivityIndicator,並用useState設定Loading狀態,初始設定為true。
然後在<WebView />增加onLoadEnd屬性,這屬性是用來設定加載完畢的回調,我們將回調後Loading狀態改為false
import { ActivityIndicator } from 'react-native';

const WebExample = () => {
  const [isLoading, setLoading] = useState(true);

  return (
    <View style={styles.container}>
            {isLoading && (
        <View style={styles.overlay}>
          <ActivityIndicator size="large" color="#0000ff" />
        </View>
      )}
      <WebView
        source={require('./simple.html')}
        onLoadEnd={() => setLoading(false)}
      />
    </View>
  );
};
WebView設置useRef,並在加載完畢時執行postMessage傳送Token
 const WebExample = () => {
   const [isLoading, setLoading] = useState(true);
   const refWebView = useRef(null)

   const TOKEN = "123";

   return (
     <View style={styles.container}>
       {isLoading && <ActivityIndicator style={styles.loader} size="large" color="#0000ff" />}
       <WebView
         source={require('./simple.html')}
         onLoadEnd={() => {
           setLoading(false);
           refWebView.current?.postMessage(TOKEN);
         }}
       />
     </View>
   );
 };
處理Web端的接收,用一個彈窗測試是否接收到Token
window.addEventListener("message", function(event) {
    const tokenFromReactNative = event.data;
    alert("Received token: " + tokenFromReactNative);
});
完成!
完整代碼
 import React, { useState, useRef} from 'react';
 import { StyleSheet, View, ActivityIndicator } from 'react-native';
 import { WebView } from 'react-native-webview';

 const WebExample = () => {
   const [isLoading, setLoading] = useState(true);
   const refWebView = useRef(null)

   const TOKEN = "123";

   return (
     <View style={styles.container}>
       {isLoading && (
         <View style={styles.overlay}>
           <ActivityIndicator size="large" color="#0000ff" />
         </View>
       )}
       <WebView
         ref={refWebView}
         source={require('./simple.html')}
         style={{ flex: 1 }}
         onLoadEnd={() => {
           setLoading(false);
           refWebView.current?.postMessage(TOKEN);
         }}
       />
     </View>
   );
 };

 const styles = StyleSheet.create({
   container: {
     flex: 1,
     position: 'relative',
   },
   overlay: {
     ...StyleSheet.absoluteFillObject,
     justifyContent: 'center',
     alignItems: 'center',
     backgroundColor: 'rgba(255,255,255,0.9)'
   }
 });

 export default WebExample;
simple.html
<!DOCTYPE html>
<html lang="en">
<head>
    <meta charset="UTF-8">
    <meta name="viewport" content="width=device-width, initial-scale=1.0">
    <title>Sample Page</title>
    <style>
    </style>
</head>
<body>
    <script>
        window.addEventListener("message", function(event) {
            const tokenFromReactNative = event.data;
            alert("Received token: " + tokenFromReactNative);
        });
    </script>
</body>
</html>


 iThome鐵人賽