不廢話,直接開始試著把後端邏輯寫到前端裡。
上期我們已經在tauri專案加上service專案的參照,所以我們可以直接拿service專案裡的InMemoryTicTacToeService來用:
// app/src-tauri/src/tic_tac_toe/mod.rs
pub mod embedded;
一樣小步向前,先加一個方法試試看,因為前端是使用我們fn的名稱呼叫,為了避免和之前的撞名,我加_e的後綴,stand for embedded。
// app/src-tauri/src/tic_tac_toe/embedded.rs
use tauri::State;
use my_core::tic_tac_toe::Game;
use service::tic_tac_toe::{InMemoryTicTacToeService, TicTacToeService};
use crate::error::ErrorResponse;

#[tauri::command]
pub async fn new_game_e(srv: State<'_, InMemoryTicTacToeService>)
    -> Result<(usize, Game), ErrorResponse> {
    let game = srv.new_game()?;              // 直接把 service呼叫的結果回傳。
    Ok(game)
}
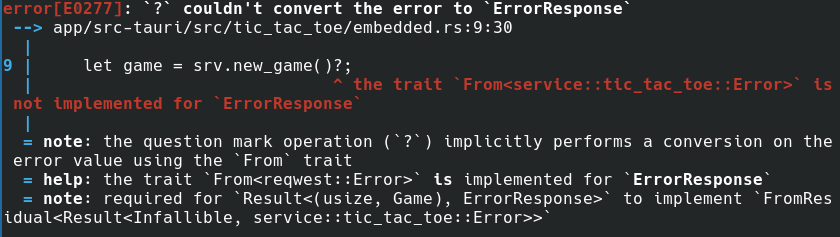
編譯器告訴我們這裡的簡寫?(之前提到Railway programming裡那條錯誤的通道)並沒有通,所以我們要mapping service裡的Error到這裡的ErrorResponse:
// app/src-tauri/src/error.rs
impl From<service::tic_tac_toe::Error> for ErrorResponse {
    fn from(value: service::tic_tac_toe::Error) -> Self {
        match value {
            service::tic_tac_toe::Error::GameRules(msg) => ErrorResponse {
                message: "遊戲規則錯誤".into(),
                details: Some(msg),
            },
            service::tic_tac_toe::Error::GameOver => ErrorResponse {
                message: "遊戲結束".into(),
                details: None,
            },
            service::tic_tac_toe::Error::NotFound => ErrorResponse {
                message: "遊戲不存在".into(),
                details: None,
            },
            service::tic_tac_toe::Error::Unknown => ErrorResponse {
                message: "未知錯誤".into(),
                details: None,
            },
        }
    }
}
編譯通過了,我們繼續把其他方法補齊:
// app/src-tauri/src/tic_tac_toe/embedded.rs
#[tauri::command]
pub async fn get_game_e(id: usize, srv: State<'_, InMemoryTicTacToeService>)
    -> Result<Game, ErrorResponse> {
    let game = srv.get(id)?;
    Ok(game)
}

#[tauri::command]
pub async fn play_game_e(id: usize, num: usize, srv: State<'_, InMemoryTicTacToeService>)
    -> Result<Game, ErrorResponse> {
    let game = srv.play(id, num)?;
    Ok(game)
}

 #[tauri::command]
 pub async fn delete_game_e(id: usize, srv: State<'_, InMemoryTicTacToeService>)
    -> Result<(), ErrorResponse> {
    srv.delete(id)?;
    Ok(())
}
這樣就好了(?),不過還差一點,我們需要在main裡註冊一下:
// app/src-tauri/src/main.rs
use service::tic_tac_toe::InMemoryTicTacToeService;
use tic_tac_toe::embedded::{get_game_e, new_game_e, play_game_e, delete_game_e};

fn main() {
    // ...略
    // 建立 在tauri執行的service
    let game_service = InMemoryTicTacToeService::new();
    tauri::Builder::default()
        .manage(context)
        .manage(game_service)        // 註冊game_service服務
        .invoke_handler(tauri::generate_handler![
            greet,
            get_game, new_game, play_game, delete_game,
            get_game_e, new_game_e, play_game_e, delete_game_e,
        ])    // ↑↑↑ 加了剛剛embedded的方法
編譯沒什麼問題,我們到前端看一下,只是要先測看看會不會work,所以不急著開新的api,直接把之前的api改掉(之後再用git還原),加了8個字元,4組_e如下:
// app/src/api/tic_tac_toe.ts
+    const game = await invoke('get_game_e', { id });
-    const game = await invoke('get_game', { id });
...
+    const gameSet = await invoke('new_game_e');
-    const gameSet = await invoke('new_game');
...
+    const game = await invoke('play_game_e', { id, num });
-    const game = await invoke('play_game', { id, num });
...
+    await invoke('delete_game_e', { id });
-    await invoke('delete_game', { id });
然後開啟tauri:
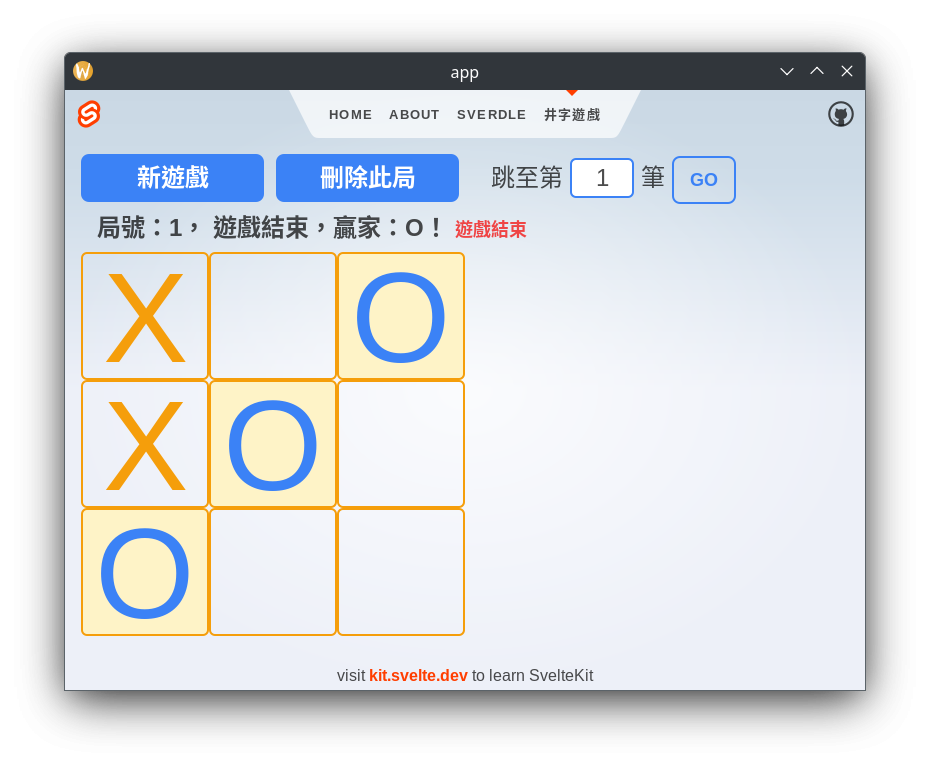
懷疑的可以只執行tauri專案,把後端的web專案關掉,就可以發現現在執行的是實實在在的純桌面應用。
手動測一下,基本上功能和訊息的提示都正確。Yes!我們成功把後端搬進前端了。今天就到此為止,打完收工(?)。
為了保留不同種類的連線方式,還是把剛剛寫的離線版另外獨立出來,所以在前端svelte中,我們做一下兼容線上版及線下版的api:
@@ app/src/api/tic_tac_toe.ts @@
+const getGameTauri = async (id: number, isOffline: boolean = false): Promise<GameSet> => {
-const getGameTauri = async (id: number): Promise<GameSet> => {
   try {
+    let method: string = isOffline ? 'get_game_e' : 'get_game';
+    const game = await invoke(method, { id });
-    const game = await invoke('get_game', { id });
...
+const newGameTauri = async (isOffline: boolean = false): Promise<GameSet> => {
-const newGameTauri = async (): Promise<GameSet> => {
   try {
+    let method: string = isOffline ? 'new_game_e' : 'new_game';
+    const gameSet = await invoke(method);
-    const gameSet = await invoke('new_game');
...
+const playGameTauri = async (
+  id: number, num: number, isOffline: boolean = false
+): Promise<GameSet> => {
-const playGameTauri = async (id: number, num: number): Promise<GameSet> => {
   try {
+    let method: string = isOffline ? 'play_game_e' : 'play_game';
+    const game = await invoke(method, { id, num });
-    const game = await invoke('play_game', { id, num });
...
+const deleteGameTauri = async (id: number, isOffline: boolean = false): Promise<void> => {
-const deleteGameTauri = async (id: number): Promise<void> => {
   try {
+    let method: string = isOffline ? 'delete_game_e' : 'delete_game';
+    await invoke(method, { id });
-    await invoke('delete_game', { id });
...
+export const ticTacToeApiTauriOffline: TicTacToeApi = {
+  deleteGame: (id) => deleteGameTauri(id, true),
+  getGame: (id) => getGameTauri(id, true),
+  newGame: () => newGameTauri(true),
+  play: (id, num) => playGameTauri(id, num, true),
+};
再調整頁面,直接到tailwind複製一個toggle過來用:
// app/src/routes/tic_tac_toe/+page.svelte
<script>
  import { ticTacToeApiTauriOffline as offlineApi } from '../../api/tic_tac_toe';

  let isOffline = false;
  $: isOffline ? (gameSet = emptyGame()) : (gameSet = emptyGame());
</script>

<label class="relative inline-flex items-end cursor-pointer">
  <input type="checkbox" value="" class="sr-only peer" bind:checked={isOffline} />
  <div
    class="w-11 h-6 bg-gray-200 rounded-full peer peer-focus:ring-4 peer-focus:ring-blue-300 dark:peer-focus:ring-blue-800 dark:bg-gray-700 peer-checked:after:translate-x-full peer-checked:after:border-white after:content-[''] after:absolute after:top-0.5 after:left-[2px] after:bg-white after:border-gray-300 after:border after:rounded-full after:h-5 after:w-5 after:transition-all dark:border-gray-600 peer-checked:bg-blue-600"
  />
  <span class="ml-3 text-sm font-medium text-gray-900 dark:text-gray-800"
    >{isOffline ? '本機' : '線上'}</span
  >
</label>
再連動 api 的切換:
@@ app/src/routes/tic_tac_toe/+page.svelte @@
 const newGame = async () => {
+  gameSet = isOffline ? await offlineApi.newGame() : await api.ticTacToe.newGame();
-  gameSet = await api.ticTacToe.newGame();
...
 const playGame = async (index: number) => {
+  gameSet = isOffline
+    ? await offlineApi.play(gameId, index)
+    : await api.ticTacToe.play(gameId, index);
-  gameSet = await api.ticTacToe.play(gameId, index);
...
 const goto = async (id: number) => {
 ...
+  gameSet = isOffline
+    ? await offlineApi.getGame(id)
+    : await api.ticTacToe.getGame(id);
-  gameSet = await api.ticTacToe.getGame(id);
...
 const deleteGame = async () => {
+  isOffline
+    ? await offlineApi.deleteGame(gameId)
+    : await api.ticTacToe.deleteGame(gameId);
-  await api.ticTacToe.deleteGame(gameId);
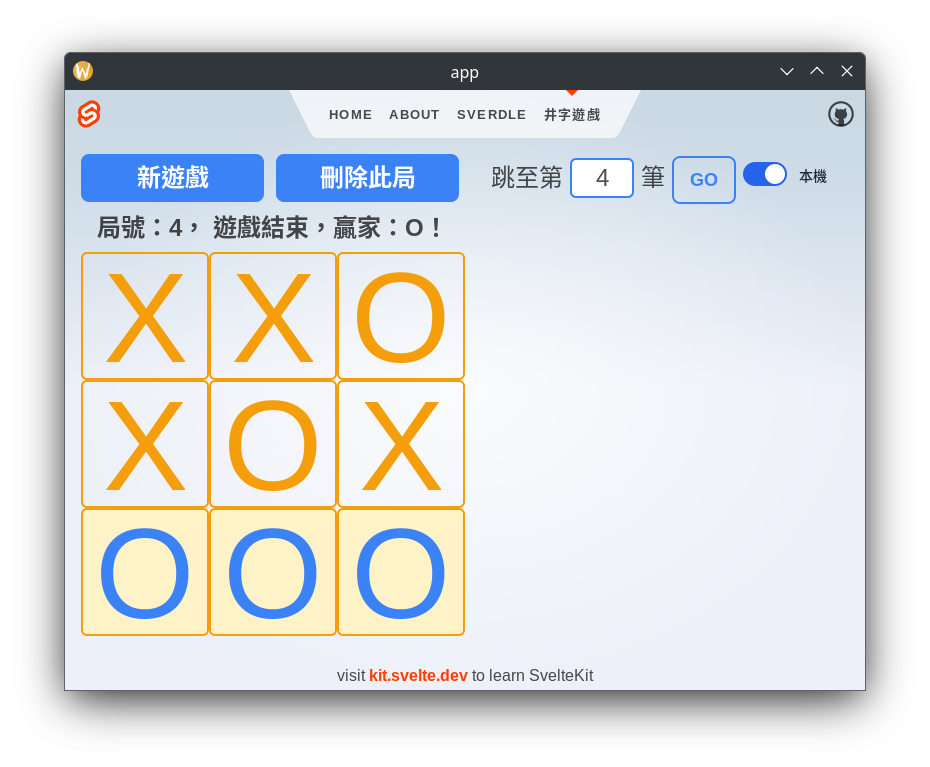
現在可以切換線上/線下版本了:
web版也有離線版嗎(?),web不是離線就不能開了還怎麼離線,別急,這裡的離線指的是離開 web api 連線。我們來試一下吧,首先要先加入一個新的專案,我這裡有做好的小抄:
首先建立以下資料夾及檔案
wasm/
├── Cargo.toml
└── src
    ├── lib.rs
    └── tic_tac_toe.rs
修改專案檔案及批次檔
@@ Cargo.toml @@
 members = [
...
+    "wasm",

@@ run.ps1 @@
+Write-Host "8) [wasm]: 建置 wasm"
...
+} elseif ($opt -eq 8) {
+    cargo watch -q -c -w ./wasm/ -w ./service/ -w ./core/ -x 'build -p wasm && wasm-pack build --target web ./wasm'
}

@@ run.sh @@
+echo 8: [wasm] build wasm
...
+  elif [[ $VAR -eq 8 ]]
+  then
+  cargo watch -q -c -w ./wasm/ -w ./service/ -w ./core/ -x 'build -p wasm && wasm-pack build --target web ./wasm'
fi
設定wasm專案Cargo.toml及使用的套件
# wasm/Cargo.toml
[package]
name = "wasm"
version = "0.1.0"
edition = "2021"

[lib]
crate-type = ["cdylib"]

[build]
target = "wasm32-unknown-unknown"

[dependencies]
my-core = { path = "../core", package = "core" }
service = { path = "../service" }

getrandom = { version = "0.2", features = ["js"] }
once_cell = { version = "1.18" }
serde = { workspace = true }
serde-wasm-bindgen = { version = "0.6" }
wasm-bindgen = { version = "0.2" }
wasm-bindgen-futures = { version = "0.4" }
以上是前置設定工作,開始寫扣了,記得先把剛設好的批次8跑起來: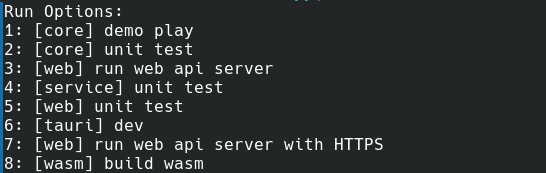
正常跑完的話應該會長得像下面這樣,如果不是的話可能要回去看一下第2篇,看是不是有東西有沒有安裝完整: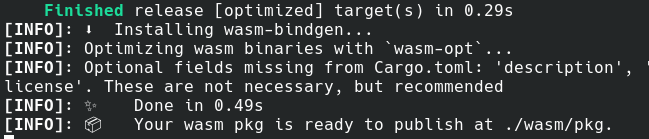
// wasm/src/lib.rs
mod tic_tac_toe;        // 照慣例加一個模組檔分類放置
因為wasm編譯完是在瀏覽器環境執行的,我們需要建一個可以一直活著的資料,也就是存活期間橫跨整個程式週期,這次我們用static,以下是官網對static的說明: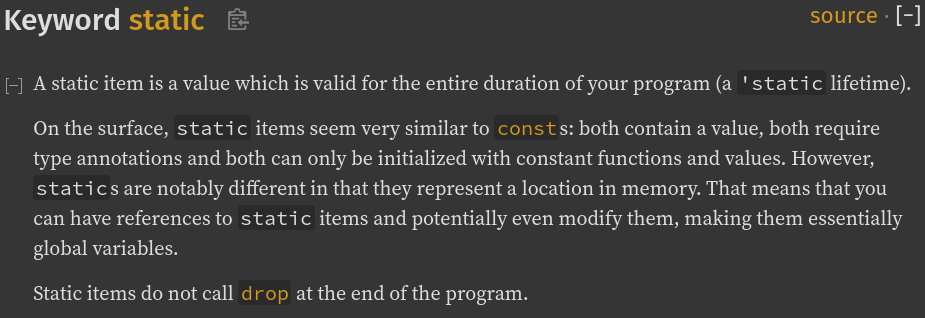
開宗明義就說,static的物件會存活整個程式週期,其生命週期參數是'static,還記得先前講生命週期有提到這個特別的生命週期參數嗎,是的,就是它;另外因為會存活整個程式,所以也不能被drop或move,(要注意一下static是宣告變數的關鍵字,'static是生命週期參數)。
// wasm/src/tic_tac_toe.rs
use service::tic_tac_toe::InMemoryTicTacToeService;
static SERVICE: InMemoryTicTacToeService = InMemoryTicTacToeService::new();
static的慣例是要大寫加底線
先試著new我們的Service,看看rust這回又要說什麼: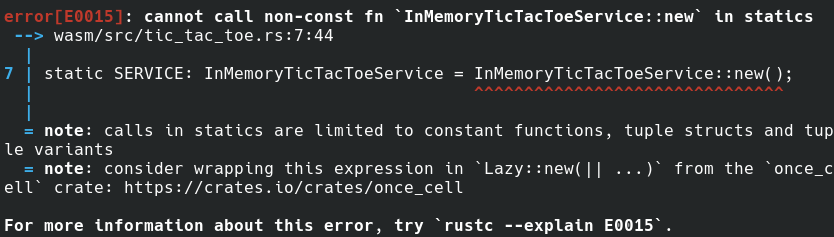
編譯器告訴我們static的物件有一些限制,建議我們用Lazy::new(|| ...)的方式包起來,而這個Lazy來自once_cell套件庫。咦,這個套件庫不是once call(一次性呼叫),而是once cell(一次性格子)?? 差點還以為我寫程次寫到眼花了,(背景音響起:老虎、老鼠、傻傻分不清楚),這個cell其實講的是rust裡一個特別的物件,有興趣的可以到這裡看看cell的說明,這裡面的第一段開頭講的太好了,請容我我直接引用:
Rust 的編譯器之嚴格,可以說是舉世無雙。特別是在所有權方面,Rust 通過嚴格的規則來保證所有權和借用的正確性,最終為程序的安全保駕護航。
看了這句 就知道這是個進階的議題,可以直接忽略無視 就可以隱約猜到這是要做一些危險的操作,可能要對rust有更高一點的熟悉度再來使用(不然可能要一直面對看到編譯器抱怨但又不知從何解起的挫折),所以我們先回來繼續我們的專案,有時間(的話)再回來討論。
有經驗的朋友應該可以猜的出來Lazy就是懶惰的意思(X),C#也有Lazy,就是程式執行的時候不預先載入,等到實際要用到的時候才載入。once_cell剛剛一開始我就已經偷偷放到Cargo.toml裡了,所以我們直接在程式裡引用就好:
// wasm/src/tic_tac_toe.rs
use service::tic_tac_toe::InMemoryTicTacToeService;
use once_cell::sync::Lazy;
static SERVICE: Lazy<InMemoryTicTacToeService> = Lazy::new(InMemoryTicTacToeService::new);
細心的朋友可能注意到了,剛剛提示Lazy::new(|| ...)有個閉包(closure),可是我這裡卻沒有使用,這個留待之後再介紹,我們先繼續往下加程式碼:
// wasm/src/tic_tac_toe.rs
use service::tic_tac_toe::{InMemoryTicTacToeService, TicTacToeService};
use wasm_bindgen::prelude::*;  // 引入wasm_bindgen的東西

use my_core::tic_tac_toe::Game;    // 下面fn回傳類別,不過等等就移除了
use service::tic_tac_toe::Error;   // 下面fn回傳類別,不過等等就移除了+1

#[wasm_bindgen]        // 幫我們整成給wasm 呼叫的api的巨集
pub fn new_game() -> Result<Game, Error> {
    SERVICE.new_game()
}
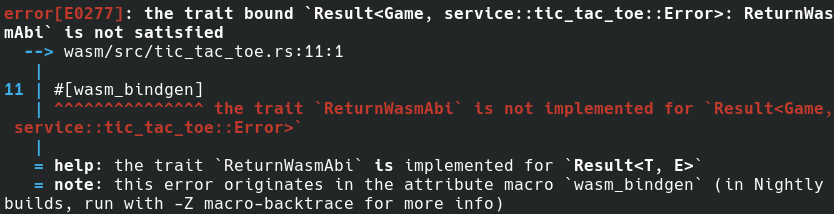
這裡說我們回傳的結果要實作ReturnWasmAbi這個tarit,那怎麼辦,直接估狗關鍵字「ReturnWasmAbi」,查到了Stackflow上有人提問,但沒看到有人解答。還好我們還仔細看了一下留言,有人留言可以利用這個解法,就可轉換任意型別的資料啦。好的我們直接用起來,相關的依賴套件剛剛也偷偷一併裝好了,直接把回傳值改成JsValue:
-use my_core::tic_tac_toe::Game;
-use service::tic_tac_toe::Error;

 #[wasm_bindgen]
+pub fn new_game() -> JsValue {
-pub fn new_game() -> Result<Game, Error> {
+    let game = SERVICE.new_game();
-    SERVICE.new_game()
+    serde_wasm_bindgen::to_value(&game).unwrap()
}
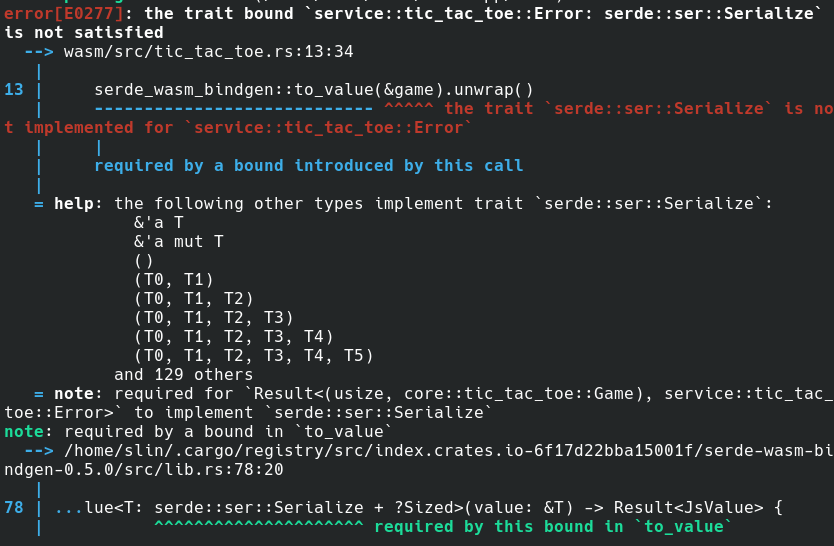
不過我們在service裡的Error物件並沒有實作Serialize,這個大家現在應該知道,直接加上#[derive(Serialize)]就好。很棒喲,越來越熟了。不過這回我們先不回去加了(!?),因為這裡的資料要拋給前端TypeScirpt接,而TS裡寫的Error物件欄位是message和details,所以這樣拋去前端的物件還要另外寫,我們在這裡處理好,讓拋到前端的規格一致,所以在wasm裡加個error:
// wasm/src/lib.rs
mod error;
// wasm/src/error.rs
#[derive(serde::Serialize)]
pub struct ErrorResponse {
    pub message: String,
    pub details: Option<String>,
}

type SrvError = service::tic_tac_toe::Error; // 簡化下面SrvError長度
// ↑不直接 use service::tic_tac_toe::Error 是怕之後要做Error會命名衝突
impl From<SrvError> for ErrorResponse {
    fn from(value: SrvError) -> Self {
        match value {
            SrvError::GameRules(msg) => ErrorResponse {
                message: "違反遊戲規則".to_string(),
                details: Some(msg),
            },
            SrvError::GameOver => ErrorResponse {
                message: "遊戲已結束".to_string(),
                details: None,
            },
            SrvError::NotFound => ErrorResponse {
                message: "遊戲不存在".to_string(),
                details: None,
            },
            SrvError::Unknown => ErrorResponse {
                message: "未知錯誤".to_string(),
                details: None,
            },
        }
    }
}
回到程式主軸,我們直接補完,結果如下:
// wasm/src/tic_tac_toe.rs
use wasm_bindgen::prelude::*;
use service::tic_tac_toe::{InMemoryTicTacToeService, TicTacToeService};
use once_cell::sync::Lazy;
use crate::error::ErrorResponse;

static SERVICE: Lazy<InMemoryTicTacToeService> = Lazy::new(InMemoryTicTacToeService::new);

#[wasm_bindgen]
pub fn new_game() -> JsValue {
    let game = SERVICE.new_game().map_err(ErrorResponse::from);
    serde_wasm_bindgen::to_value(&game).unwrap()
}

#[wasm_bindgen]
pub fn get_game(id: usize) -> JsValue {
    let game = SERVICE.get(id).map_err(ErrorResponse::from);
    serde_wasm_bindgen::to_value(&game).unwrap()
}

#[wasm_bindgen]
pub fn play_game(id: usize, num: usize) -> JsValue {
    let game = SERVICE.play(id, num).map_err(ErrorResponse::from);
    serde_wasm_bindgen::to_value(&game).unwrap()
}

#[wasm_bindgen]
pub fn delete_game(id: usize) -> JsValue {
    let game = SERVICE.delete(id).map_err(ErrorResponse::from);
    serde_wasm_bindgen::to_value(&game).unwrap()
}
map_err(fn)會在接到Result<T,E>的E時,使用參數傳入的fn處理。什麼,才30行的程式搞這麼久,把程式當作知識學習的副產品,重點是我們學習到了很多(應該吧)。
目前wasm專案應該是正確編譯的:

因為我們要測的是web,所以不用開tauri,如果開了也沒關係,但是接下來的wasm測試,要從瀏覽器開啟網頁起來看。或是沒有跑tauri的話直接進app資料夾用pnpm跑起來也可以:
~demo-app/app$ pnpm dev
因為剛剛我們在wasm的專案裡把直接把Result包成Json,所以前端接到的資料長相會變成{Ok::{...}}或{Err::{...}},我們到model裡設定這個介面:
// app/src/model/tic_tac_toe.ts
export interface WasmResponse<T> { // T 可以換成不同的類別
  Ok: T;
  Err: ErrorResponse;              // 包成我們之前的錯誤訊息格式
}
然後修改我們的CRUD api:
@@ app/src/api/tic_tac_toe.ts @@
+import type { WasmResponse, Game, GameSet } from '../model/tic_tac_toe';
-import type { Game, GameSet } from '../model/tic_tac_toe';
+import init, { new_game, get_game, play_game, delete_game } from '../../../wasm/pkg/wasm';
直接參照我們wasm剛剛建置完產出的資料檔,剛剛wasm建置的資料位在wasm/pkg的資料夾底下,這個建置的結果是在.gitignore裡,會被git忽略,所以要注意是不是有正確建置,前端nodejs專案才讀的到。另外因為我們參考到vite專案之外的目錄,所以避免接下來可能會在runtime報錯如下:

我們要在vite.config.ts裡進行設定,允許vite去讀取專案以外的檔案:
// app/vite.config.ts
server: {
  // ...
  fs: {
    allow: ['..'],
  },
接下來我們在api裡新增如下wasm版,一樣套用同一個interface:
// app/src/api/tic_tac_toe.ts
export const ticTacToeApiWasm: TicTacToeApi = {
  async newGame(): Promise<GameSet> {
    await init();                // 初始化wasm後,才可以使用wasm的fn
    let result: WasmResponse<GameSet> = new_game();
    if (result.Ok) {
      return result.Ok;
    } else {
      return Promise.reject(result.Err);
    }
  },
  async getGame(id: number): Promise<GameSet> {
    await init();
    let result: WasmResponse<Game> = get_game(id);
    if (result.Ok) {
      return [id, result.Ok];
    } else {
      return Promise.reject(result.Err);
    }
  },
  async play(id: number, num: number): Promise<GameSet> {
    await init();
    let result: WasmResponse<Game> = play_game(id, num);
    if (result.Ok) {
      return [id, result.Ok];
    } else {
      return Promise.reject(result.Err);
    }
  },
  async deleteGame(id: number): Promise<unknown> {
    await init();
    let result: WasmResponse<unknown> = delete_game(id);
    if (!result.Ok) {
      return Promise.reject(result.Err);
    }
  },
};
這裡的const我用另外一種寫法,fn可以抽出去獨立像之前寫的那樣,或是inline直接在行內寫出整個函數,只是語法上的 : => , ; 會有些不同,要注意一下,寫好API後,我們直接把之前tauriOffline的API整合在一起:
// app/src/api/index.ts
import {
  ticTacToeApi,
  ticTacToeApiTauri,
  ticTacToeApiTauriOffline,    // 加這個
  ticTacToeApiWasm,            // 加這個
} from './tic_tac_toe';

export interface Api {
  ticTacToe: TicTacToeApi;
  ticTacToeOffline: TicTacToeApi;    // 加這個
}

export const httpApi: Api = {
  ticTacToe: ticTacToeApi,
  ticTacToeOffline: ticTacToeApiWasm, // 加這個
};

export const tauriApi: Api = {
  ticTacToe: ticTacToeApiTauri,
  ticTacToeOffline: ticTacToeApiTauriOffline, // 加這個
};
接著改我們的頁面:
@@ app/src/routes/tic_tac_toe/+page.svelte @@
-import { ticTacToeApiTauriOffline as offlineApi } from '../../api/tic_tac_toe';
...
+  gameSet = isOffline ? await api.ticTacToeOffline.newGame() : await api.ticTacToe.newGame();
-  gameSet = isOffline ? await offlineApi.newGame() : await api.ticTacToe.newGame();
...
+  ? await api.ticTacToeOffline.play(gameId, index)
-  ? await offlineApi.play(gameId, index)
...
+  ? await api.ticTacToeOffline.getGame(id)
-  ? await offlineApi.getGame(id)
...
+  ? await api.ticTacToeOffline.deleteGame(gameId)
-  ? await offlineApi.deleteGame(gameId)
把tauri專屬的api換成通用的api,我們在外層載入的時候,如果是離線版本,就會看環境,在tauri就呼叫tauri裡的rust程式,如果在web裡就呼叫wasm的功能。
在Chrome中執行離線版本(WebAssembly):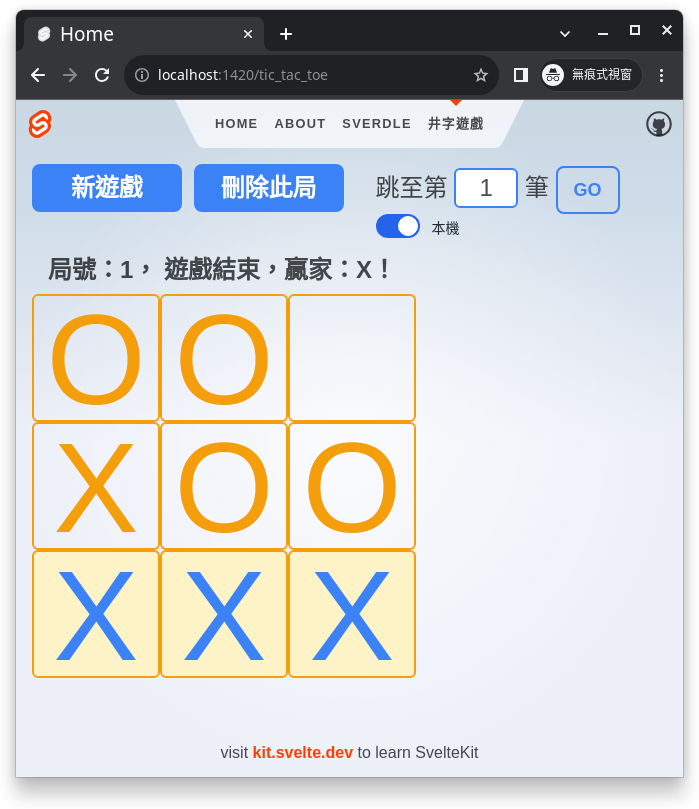
在Tauri中執行離線版本: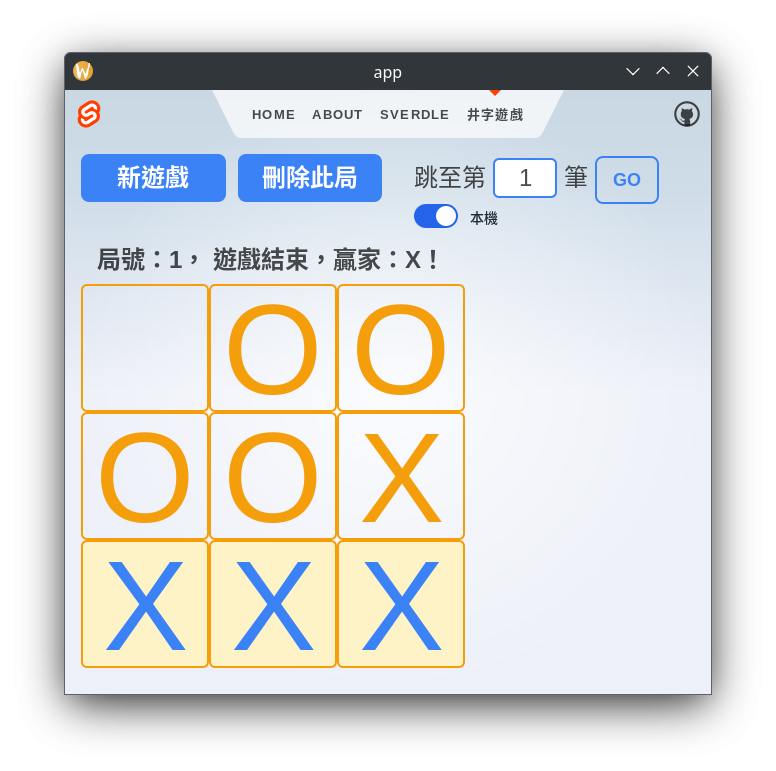
恭喜大家在不知不覺中就寫好了傳說中的WebAssembly。
其實雖然說是把後端搬到前端裡,其實只是把部分後端的業務邏輯搬到前端來使用,並不是取代後端的存在。在整體架構的考量下還是要視情況有前後端分別存在的必要。如同第14篇稍稍提及,筆者遇過一些情境,來回呼叫rest api太慢,用JavsScript複刻,又要分別在兩個地方維護業務邏輯,明顯違反了乾淨架構的概念(雖然說有時候是取捨,如果有必要,可能也要將就(?))。另外其實還可以透過gRPC呼叫會比較快一點(理論上),但是gRPC對於純前端的開發來說不是很友善,所以一直沒有比較好的solution。
到這裡算是完成了一個小里程碑(?),後面希望再試試看其他可能的技術,如gRPC、webSocket,以及開發應用上會需要的其他積木,如非同步、資料庫連接等。
本系列專案源始碼放置於 https://github.com/kenstt/demo-app