接續上一篇 DAY 27 React Native 效能優化:提升效能實戰 (一)接下來會用程式碼範例來說明如何優化 React Native 的效能~
這是一個串接 unsplash api 的照片清單,主要的功能有:
photoList.tsx
import axios from 'axios';
import {Text, Button} from 'react-native-paper';
import {useQuery} from 'react-query';
import React from 'react';
import {ActivityIndicator, ScrollView, View} from 'react-native';
import {SafeAreaView} from 'react-native-safe-area-context';
import {StyleSheet} from 'react-native';
import PhotoCard from '../componet/PhotoCard';

const PhotoList = () => {
  const fetchPhotos = async () => {
    try {
      const response = await axios.get<Photo[]>(
        `https://api.unsplash.com/photos/?client_id=${Access_Key}&per_page=30&page=1&order_by=popular`,
      );
      console.log(response.data);
      return response.data;
    } catch (error) {
      console.error(error);
    }
  };
  const {
    data: photos,
    refetch,
    isLoading,
    isRefetching,
  } = useQuery('photos', fetchPhotos);

  const loading = isLoading || isRefetching;

  return (
    <SafeAreaView style={styles.container}>
      <ScrollView>
        <View style={styles.title}>
          <Text variant="titleLarge" style={styles.titleText}>
            Photo List
          </Text>
        </View>
        <Button
          mode="outlined"
          style={styles.button}
          buttonColor="secondary"
          onPress={() => {
            refetch();
          }}
          loading={loading}
          disabled={loading}>
          refetch
        </Button>
        {loading && <ActivityIndicator size="small" color="#242424" />}
        {!loading &&
          photos?.map((photo, index) => (
            <PhotoCard
              key={`photo-${photo.id}-${index}`}
              uri={photo.urls.regular}
              username={photo.user.username}
              description={photo.description}
            />
          ))}
      </ScrollView>
    </SafeAreaView>
  );
};

const styles = StyleSheet.create({
  container: {
    backgroundColor: '#F9F9F9',
    padding: 16,
  },
  title: {
    alignItems: 'center',
    justifyContent: 'center',
    marginVertical: 36,
  },
  titleText: {
    color: '#242424',
  },
  button: {margin: 16},
});
export default PhotoList;
PhotoCard.tsx
import React, {useRef} from 'react';
import {StyleSheet, Animated, Easing} from 'react-native';
import {Card, Text} from 'react-native-paper';

const PhotoCard = ({uri, username, description}: PhotoProps) => {
  const fadeAnim = useRef(new Animated.Value(0)).current;

  Animated.timing(fadeAnim, {
    toValue: 1,
    duration: 1100,
    easing: Easing.linear,
    useNativeDriver: false,
  }).start();

  return (
    <Animated.View
      style={{
        opacity: fadeAnim,
        transform: [
          {
            translateY: fadeAnim.interpolate({
              inputRange: [0, 1],
              outputRange: [200, 0],
            }),
          },
        ],
      }}>
      <Card style={styles.cardContainer}>
        <Card.Cover source={{uri: uri}} />
        <Card.Content>
          <Text variant="bodyLarge" style={styles.userNameText}>
            {username}
          </Text>
          <Text variant="bodyMedium">{description}</Text>
        </Card.Content>
      </Card>
    </Animated.View>
  );
};

const styles = StyleSheet.create({
  cardContainer: {
    marginBottom: 16,
    backgroundColor: '#FFF',
  },
  userNameText: {
    marginVertical: 16,
    color: '#242424',
  },
});
export default PhotoCard;
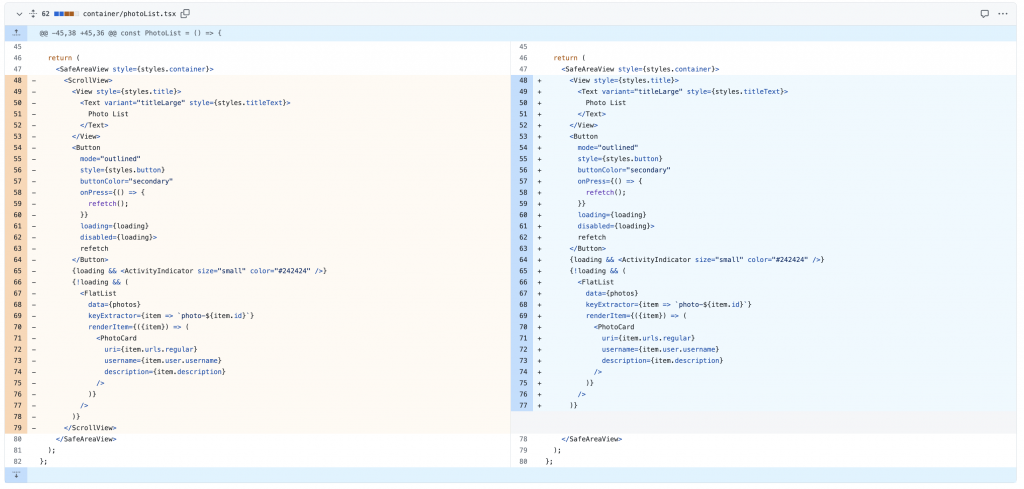
作為網頁前端工程師,在處理大量的資料時很習慣地使用 map() 方法,但是千萬別在 React Native 這樣做,當載入大量資料時每一筆資料都要由 Yoga 引擎計算佈局到視圖掛載渲染,這會導致整體效能下降,特別是在滾動或更新操作會卡頓,造成使用者體驗不佳。
React Native 針對處理大量資料列表推出了一個元件 FlatList。
FlatList 的優點在於:
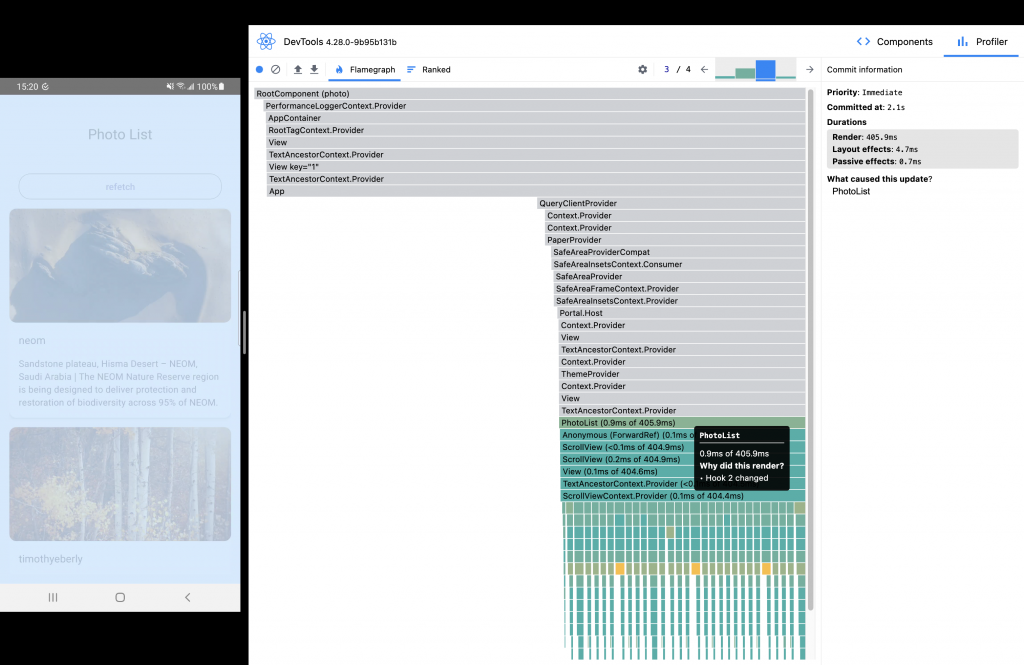
在進行優化前,先使用 react-devtools 查看 componet 渲染的情況。在右上方的柱狀圖可以看到每一個渲染的 commit,越高代表其花費的效能越大,應優先優化。可以在下方的橫的長條圖中看到 PhotoList component 花費了 405.9 ms 的時間渲染。
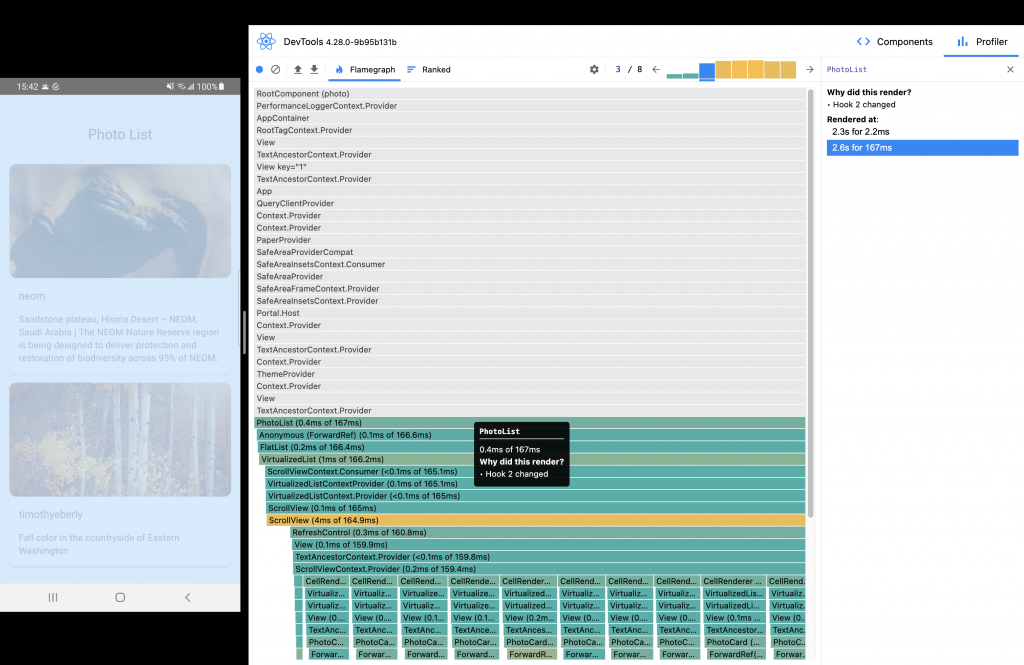
再使用 react-devtools 查看 PhotoList component 花費了 167 ms 的時間相較先前有效率多了。
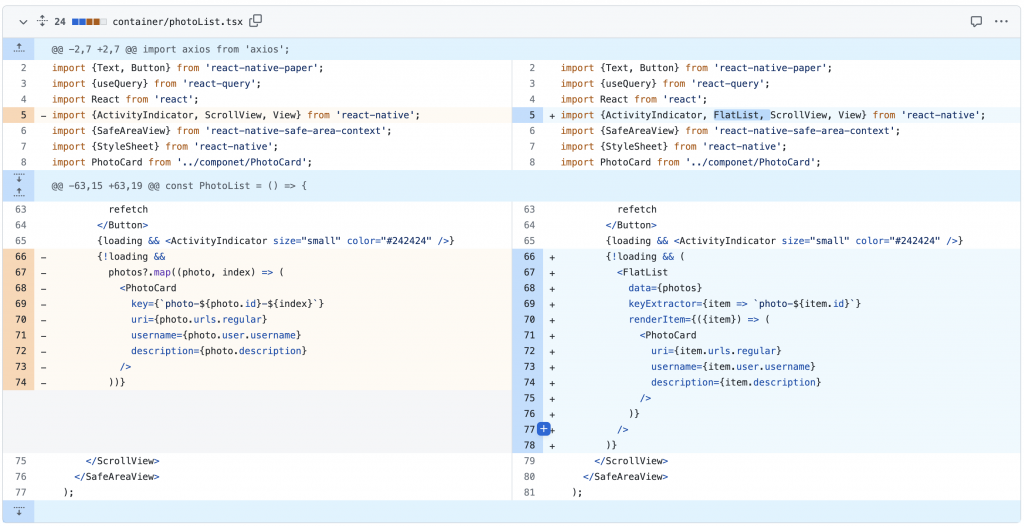
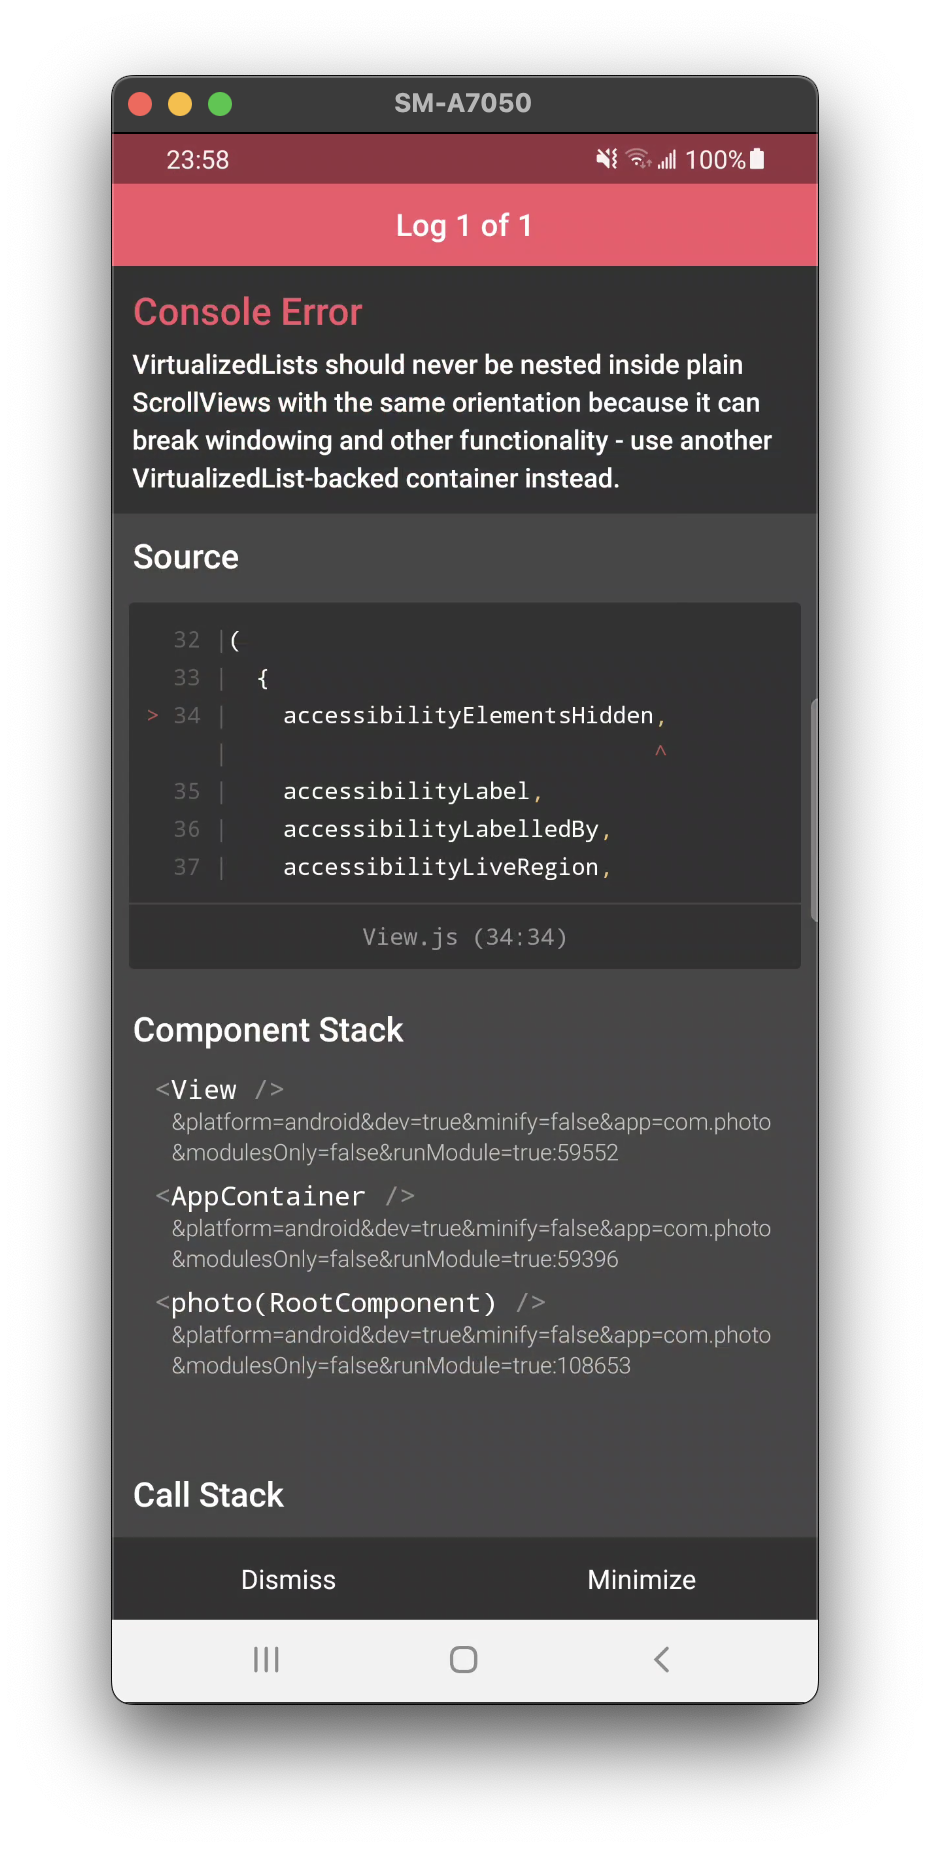
把使用 map () 的部分改成 FlatList,但是這時手機出現了 Logo box 的錯誤提示:
virtualizedLists should never be nested inside plain ScrollView with the same oriention beacause it can break windiowing and other functionality - use another virtaulizedList-backed container instead.

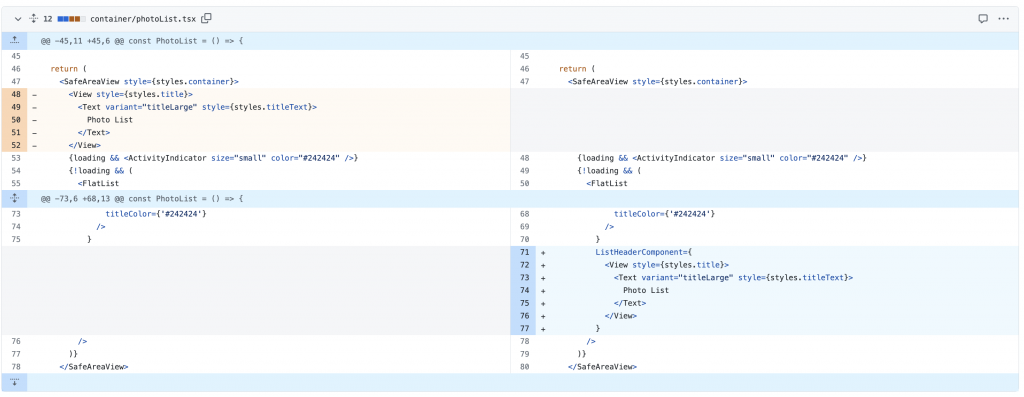
FlatList 其實有內建的 scroll 功能,於是就把在 FlatList 外層的 scrollView 拿掉,Logo box 錯誤消失了,但是發現標題 Photo List 一直固定在上方而非跟著滾動下去的。
ListHeaderComponent 是 FlatList 的其中一個屬性,用來顯示列表的 Header 元件。把標題移到 ListHeaderComponent 後終於不再固定在最上面了。
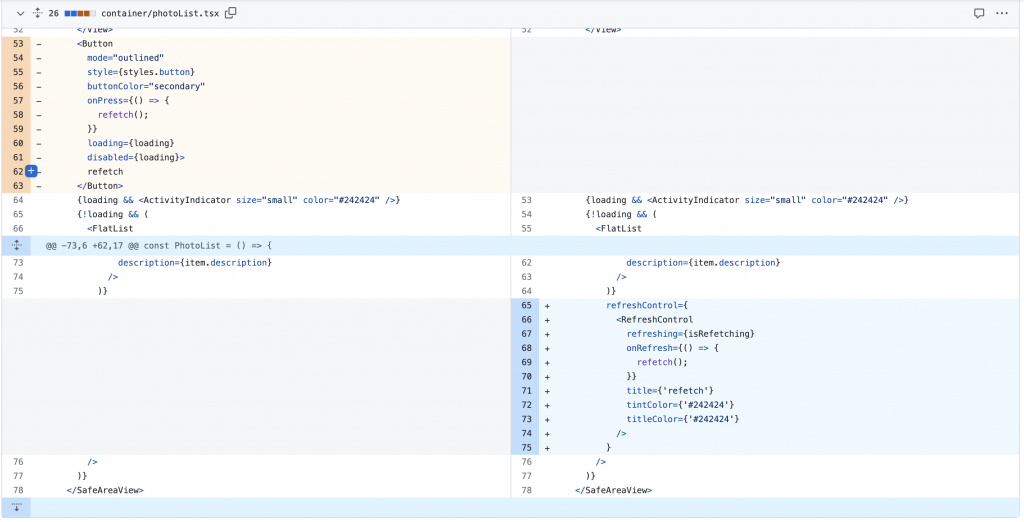
在使用 refreshControl 之前,是使用 button 控制取得新的資料的邏輯,但是在 FlatList 中的 refreshControl 的屬性可以搭配使用者向下拉的手勢整合 UI 和 event,達到重新拉取資料的功能。

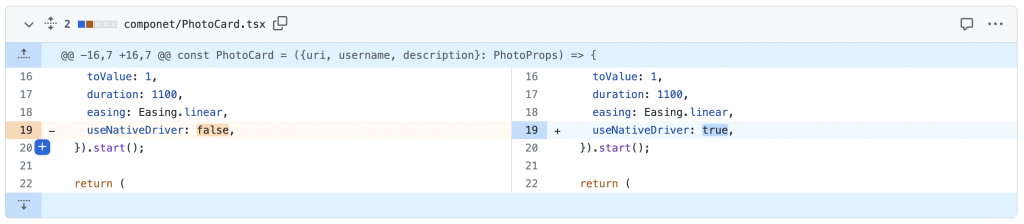
在 JavaScript thread 跑動畫很有可能因為 thread 阻塞導致動畫跑得比較慢或卡住,詳細的原因之前有在
DAY20 解析 React Native 現行架構(Current Architecture)原理談到過了,較理想的方式是在 UI thread 讓原生的程式碼執行動畫。
把 useNativeDriver 改成 true
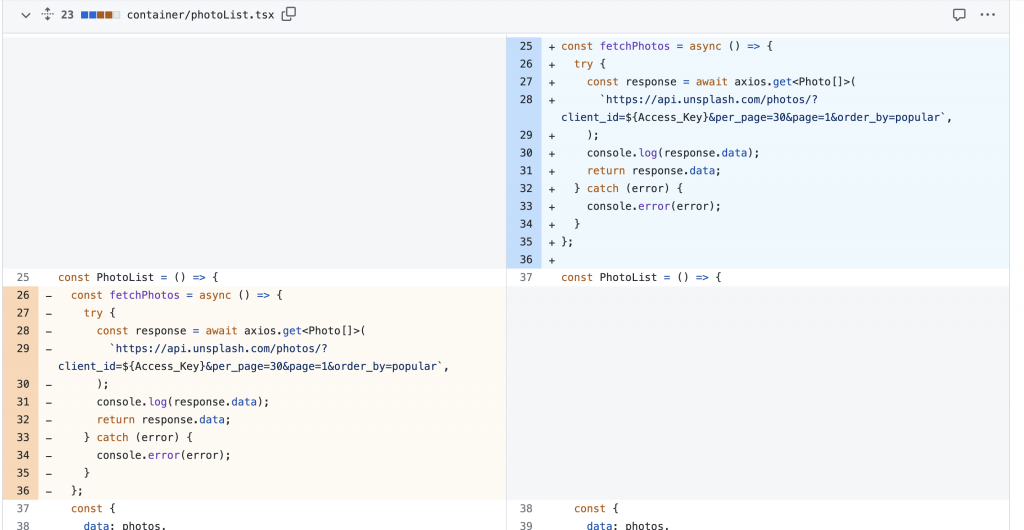
其實這兩件事的本質是一樣的 --- 避免不必要的渲染。當父元件重新渲染時 function 就會被重新建立,而重新建立的 function 會指向新的 reference ,react 的渲染機制發現 reference 改變了就會重新渲染子元件,即使傳入的 props 並沒有改變。
所以我們把 fetchPhotos 這個 function 移到元件的外面。
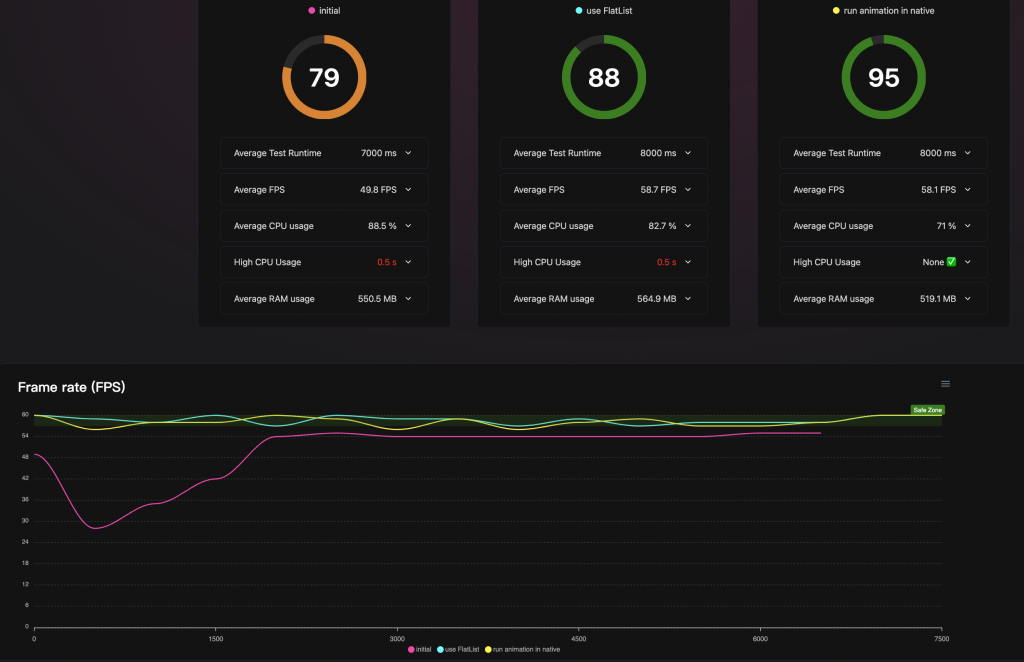
在剛剛實戰的過程成我特別針對了幾個修改後的時間點使用 Flashlight 做了效能的衡量(DAY 24 React Native 效能優化: 使用 Flashlight 衡量應用程式效能有介紹過),分別是:一開始還沒改的程式碼、把 map()方法置換成 FlatList 、將動畫的執行從 JavaScript thread 改成 UI thread。測量的方法是使用實體的手機先重新拉取資料,再往下滑到底。詳細的測量結果可以在這裡查看。
可以透過效能指標觀察得出幾個有趣的地方:
當然這樣的衡量不夠客觀,所以我們還是用 Flashlight 針對優化前跟優化後的應用程式,讓它用自動測試跑十次,取得平均後的效能指標。
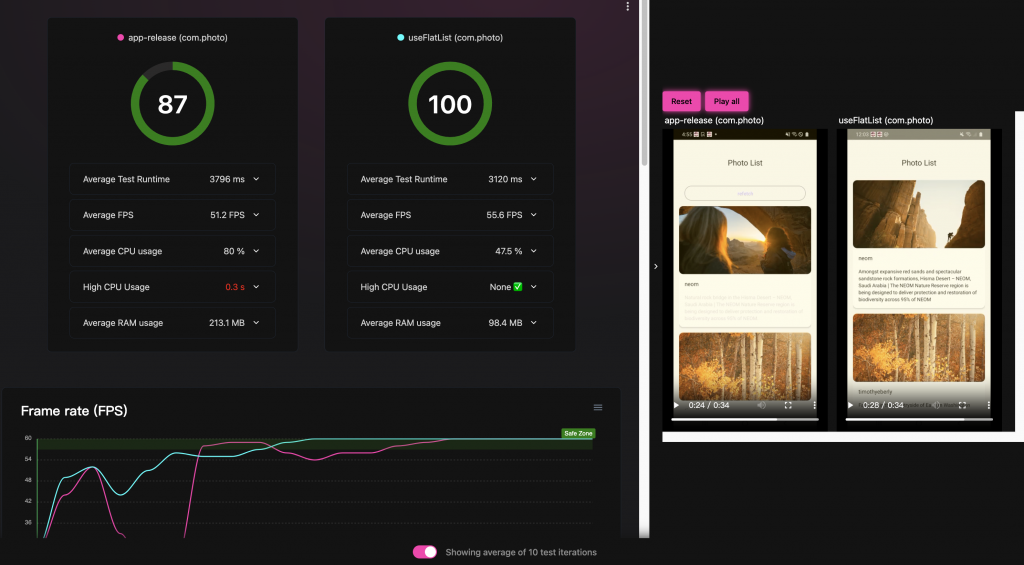
左邊粉色代表的是尚未優化的應用程式,右邊代表的是優化後的應用程式。
這份報告還有包含影片,方便跟線圖對照。
詳細的報告連結:https://wintersprouter.github.io/ironmanReactNativeCli/flatList