昨天跟各位分享了DCGAN的理論後,今天就來實作看看吧! 我們今天將用DCGAN實作MNIST圖像生成,基本上架構與幾天前的GAN是一模一樣的,所以不會很複雜~
如同名字,DCGAN主要就是將全連接層改為卷積層,在做一些小修改就好了,因此,今天的程式使引用GAN的程式去做調整
先導入所需的套件
import numpy as np
import matplotlib.pyplot as plt
from tensorflow.keras.datasets import mnist
from tensorflow.keras.layers import Input, Dense, Reshape, Flatten, Conv2D, Conv2DTranspose,LeakyReLU
from tensorflow.keras.models import Model
from tensorflow.keras.optimizers import Adam
先建立生成器:
class DCGAN:

    def build_generator(self):
        noise = Input(shape=(self.latent_dim,))
        x = Dense(7 * 7 * 128)(noise)
        x = LeakyReLU(alpha=0.2)(x)
        x = Reshape((7, 7, 128))(x)
        x = Conv2DTranspose(64, kernel_size=4, strides=2, padding="same")(x)
        x = LeakyReLU(alpha=0.2)(x)
        x = Conv2DTranspose(64, kernel_size=4, strides=1, padding="same")(x)
        x = LeakyReLU(alpha=0.2)(x)
        x = Conv2DTranspose(1, kernel_size=4, strides=2, padding="same", activation='tanh')(x)
        generator = Model(noise, x)
        return generator
這裡我先建立一個Sequential的模型,先添加一個全連接(Dense)層,這個層有 7x7x128 個神經元,並且接受一個大小為self.latent_dim的輸入向量,之後分別加上兩層反卷積,使用的激活函數為LeakyRelu
接下來是建立鑑別器:
def build_discriminator(self):
        img = Input(shape=self.img_shape)
        x = Conv2D(64, kernel_size=4, strides=2, padding="same")(img)
        x = LeakyReLU(alpha=0.2)(x)
        x = Conv2D(128, kernel_size=4, strides=2, padding="same")(x)
        x = LeakyReLU(alpha=0.2)(x)
        x = Conv2D(128, kernel_size=4, strides=1, padding="same")(x)
        x = LeakyReLU(alpha=0.2)(x)
        x = Flatten()(x)
        x = Dense(1, activation='sigmoid')(x)
        discriminator = Model(img, x)
        return discriminator
注意:最後一層的激活函數為sigmoid
以及模型合併和基本設置
def __init__(self):
        self.img_rows = 28
        self.img_cols = 28
        self.channels = 1
        self.img_shape = (self.img_rows, self.img_cols, self.channels)
        self.latent_dim = 100

        optimizer = Adam(0.0002, 0.5)

        self.discriminator = self.build_discriminator()
        self.discriminator.compile(loss='binary_crossentropy',
            optimizer=optimizer,
            metrics=['accuracy'])

        self.generator = self.build_generator()

        z = Input(shape=(self.latent_dim,))
        img = self.generator(z)
        self.discriminator.trainable = False
        validity = self.discriminator(img)
        self.combined = Model(z, validity)
        self.combined.compile(loss='binary_crossentropy', optimizer=optimizer)
這裡分別進行圖像大小設定(28281)、創建以及編譯生成器與鑑別器,並輸入噪聲
最後使用二元交叉熵作為損失函數,優化器為Adam
最後是訓練的部分:
def train(self, epochs, batch_size=128):
        (X_train, _), (_, _) = mnist.load_data()
        X_train = X_train / 127.5 - 1.
        X_train = np.expand_dims(X_train, axis=3)

        valid = np.ones((batch_size, 1))
        fake = np.zeros((batch_size, 1))

        for epoch in range(epochs):
            idx = np.random.randint(0, X_train.shape[0], batch_size)
            imgs = X_train[idx]
            noise = np.random.normal(0, 1, (batch_size, self.latent_dim))
            gen_imgs = self.generator.predict(noise)

            d_loss_real = self.discriminator.train_on_batch(imgs, valid)
            d_loss_fake = self.discriminator.train_on_batch(gen_imgs, fake)
            d_loss = 0.5 * np.add(d_loss_real, d_loss_fake)

            noise = np.random.normal(0, 1, (batch_size, self.latent_dim))
            g_loss = self.combined.train_on_batch(noise, valid)

            print ("%d [D loss: %f, acc.: %.2f%%] [G loss: %f]" % (epoch, d_loss[0], 100 * d_loss[1], g_loss))

            if epoch % 500 == 0:
                self.sample_images(epoch)
和產生圖片
def sample_images(self, epoch):
        r, c = 5, 5
        noise = np.random.normal(0, 1, (r * c, self.latent_dim))
        gen_imgs = self.generator.predict(noise)
        gen_imgs = 0.5 * gen_imgs + 0.5
        fig, axs = plt.subplots(r, c)
        cnt = 0
        for i in range(r):
            for j in range(c):
                axs[i, j].imshow(gen_imgs[cnt, :, :, 0], cmap='gray')
                axs[i, j].axis('off')
                cnt += 1
        fig.savefig("要存圖片的位置" % epoch)
        plt.close()
最後決定訓練多少次就大功告成啦
if __name__ == '__main__':
    gan = DCGAN()
    gan.train(epochs=15000, batch_size=64)
從前面可以發現,其實DCGAN與GAN 之間只在於生成器與判別器的構造不同而已,而其他參數都沒改變是為了能讓各位看出使用卷積層與全聯階層的差異


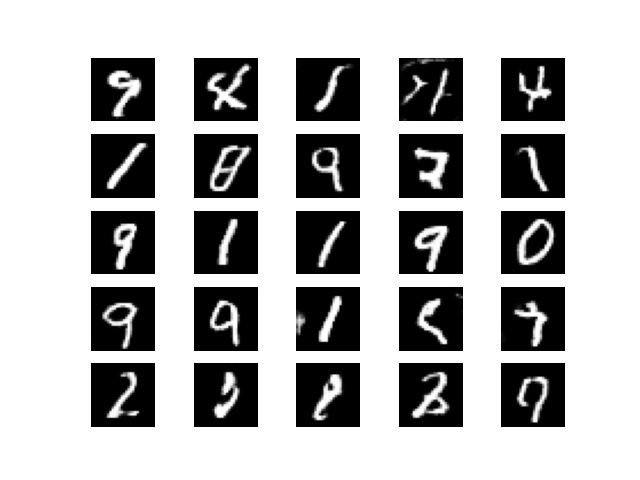
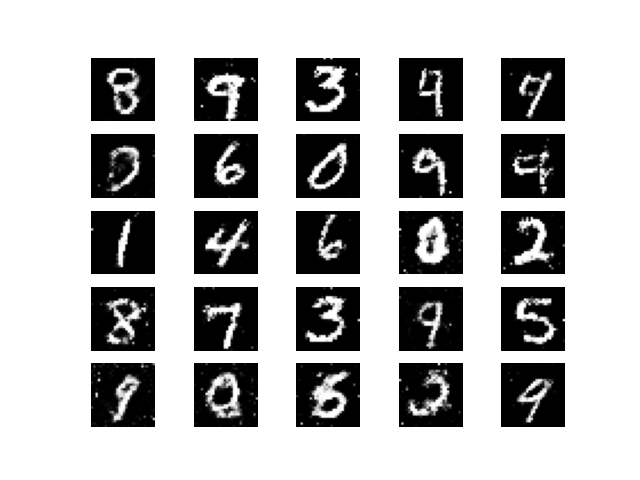
上面是DCGAN訓練後生成的結果,而下面則是一般的GAN,可以發現使用DCGAN所生出來的圖片更加清晰,圖片周圍的雜訊也比較少
參考網站:github
今天跟各位分享了DCGAN的實作,是不是很簡單呢??明天將會介紹另一個GAN的種類—CGAN,那我們明天見!
