昨天我們介紹了CGAN的原理,而今天我們就來試試使用CGAN生成圖片吧
先載入所需的套件
import tensorflow as tf
from tensorflow.keras.layers import Input, Dense, Reshape, Flatten, Dropout, multiply, Embedding
from tensorflow.keras.layers import BatchNormalization, Activation, LeakyReLU
from tensorflow.keras.layers import UpSampling2D, Conv2D
from tensorflow.keras.models import Model
from tensorflow.keras.optimizers import Adam
import matplotlib.pyplot as plt
import numpy as np
首先是生成器與鑑別器的部分
class CGAN():
	def build_generator(self):

        noise = Input(shape=(self.latent_dim,))
        label = Input(shape=(1,), dtype='int32')
        label_embedding = Embedding(self.num_classes, self.latent_dim)(label)

        model_input = multiply([noise, label_embedding])

        x = Dense(256)(model_input)
        x = LeakyReLU(alpha=0.2)(x)
        x = BatchNormalization(momentum=0.8)(x)
        x = Dense(512)(x)
        x = LeakyReLU(alpha=0.2)(x)
        x = BatchNormalization(momentum=0.8)(x)
        x = Dense(1024)(x)
        x = LeakyReLU(alpha=0.2)(x)
        x = BatchNormalization(momentum=0.8)(x)
        x = Dense(np.prod(self.img_shape), activation='tanh')(x)
        x = Reshape(self.img_shape)(x)

        model = Model([noise, label], x)

        model.summary()

        return model

    def build_discriminator(self):

        img = Input(shape=self.img_shape)
        label = Input(shape=(1,), dtype='int32')

        label_embedding = Embedding(self.num_classes, np.prod(self.img_shape))(label)
        flat_img = Flatten()(img)

        model_input = multiply([flat_img, label_embedding])

        x = Dense(512)(model_input)
        x = LeakyReLU(alpha=0.2)(x)
        x = Dense(512)(x)
        x = LeakyReLU(alpha=0.2)(x)
        x = Dropout(0.4)(x)
        x = Dense(512)(x)
        x = LeakyReLU(alpha=0.2)(x)
        x = Dropout(0.4)(x)
        x = Dense(1, activation='sigmoid')(x)

        model = Model([img, label], x)

        model.summary()

        return model
這裡除了在前面使用了embedding層來讓我們的生成器與鑑別器參入標籤,基本上構造都一樣
中間使用全連階層,激活函數為LeakyRelu
接下來是基本設置
def __init__(self):
        self.img_rows = 28
        self.img_cols = 28
        self.channels = 1
        self.img_shape = (self.img_rows, self.img_cols, self.channels)
        self.num_classes = 10
        self.latent_dim = 100

        optimizer = Adam(0.0002, 0.5)

        self.discriminator = self.build_discriminator()
        self.discriminator.compile(loss=['binary_crossentropy'],
                                   optimizer=optimizer,
                                   metrics=['accuracy'])

        self.generator = self.build_generator()

        noise = Input(shape=(self.latent_dim,))
        label = Input(shape=(1,))
        img = self.generator([noise, label])

        self.discriminator.trainable = False

        valid = self.discriminator([img, label])

        self.combined = Model([noise, label], valid)
        self.combined.compile(loss=['binary_crossentropy'],
                              optimizer=optimizer)
這裡設置了圖片的大小與色彩通道、優化器Adam、損失函數等
訓練的部分
def train(self, epochs, batch_size=128):

    (X_train, y_train), (_, _) = tf.keras.datasets.mnist.load_data()

    X_train = (X_train.astype(np.float32) - 127.5) / 127.5
    X_train = np.expand_dims(X_train, axis=3)
    y_train = y_train.reshape(-1, 1)

    valid = np.ones((batch_size, 1))
    fake = np.zeros((batch_size, 1))

    for epoch in range(epochs):

        idx = np.random.randint(0, X_train.shape[0], batch_size)
        imgs, labels = X_train[idx], y_train[idx]

        noise = np.random.normal(0, 1, (batch_size, 100))

        gen_imgs = self.generator.predict([noise, labels])
        d_loss_real = self.discriminator.train_on_batch([imgs, labels], valid)
        d_loss_fake = self.discriminator.train_on_batch([gen_imgs, labels], fake)
        d_loss = 0.5 * np.add(d_loss_real, d_loss_fake)

        sampled_labels = np.random.randint(0, 10, batch_size).reshape(-1, 1)
        g_loss = self.combined.train_on_batch([noise, sampled_labels], valid)
        print("%d [D loss: %f, acc.: %.2f%%] [G loss: %f]" % (epoch, d_loss[0], 100 * d_loss[1], g_loss))

        if epoch % 500 == 0 or epoch==0:
            self.sample_images(epoch)
    self.sample_images(epoch)
注意!在訓練生成器與鑑別器中,我們需要多輸入一個標籤,剩下的都一樣
最後是生成圖片以及訓練啦
 def sample_images(self, epoch):
        r, c = 2, 5
        noise = np.random.normal(0, 1, (r * c, 100))
        sampled_labels = np.random.randint(0, 10, r * c).reshape(-1, 1)

        gen_imgs = self.generator.predict([noise, sampled_labels])
        gen_imgs = 0.5 * gen_imgs + 0.5

        fig, axs = plt.subplots(r, c)
        cnt = 0
        for i in range(r):
            for j in range(c):
                axs[i, j].imshow(gen_imgs[cnt, :, :, 0], cmap='gray')
                axs[i, j].set_title("num: %d" % sampled_labels[cnt])
                axs[i, j].axis('off')
                cnt += 1
        fig.suptitle("generate (Epoch %d)" % epoch)
        plt.savefig("你要存圖片的位置" % epoch)
        plt.close()

if __name__ == '__main__':
    cgan = CGAN()
    cgan.train(epochs=50000, batch_size=32)
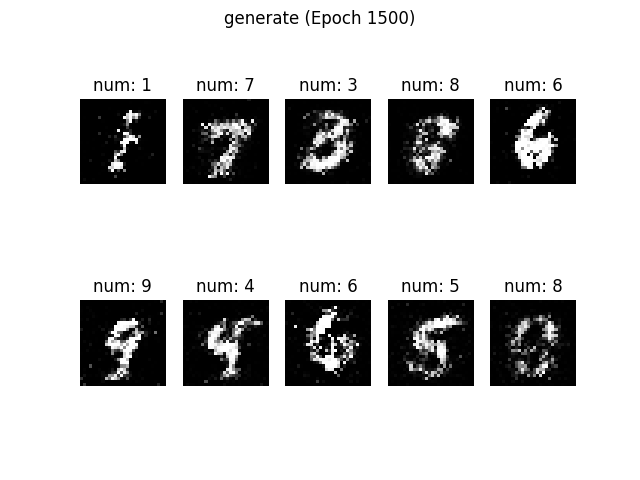
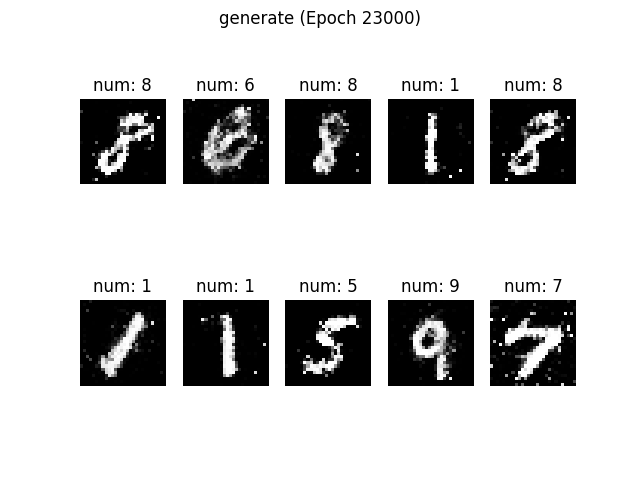
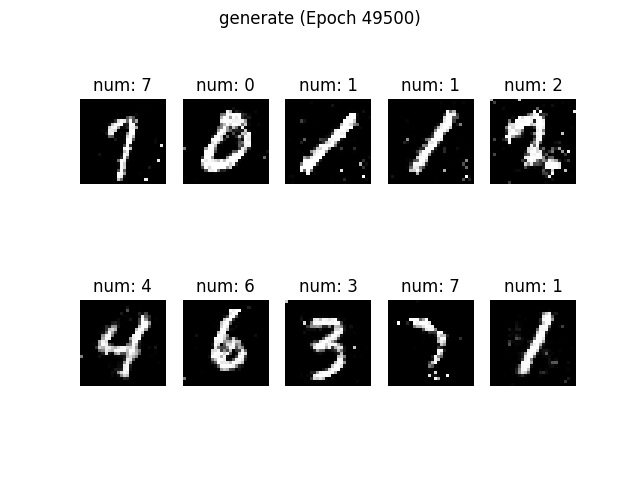
在這裡每次都會生成10張照片,並且在圖片下方會標示正確的標籤來分析是否生成錯誤
最後設定訓練50000次、批次量為32
以下是生成的結果:


以上就今天CGAN的實作啦,小弟我的自我挑戰也來到尾聲了,明天將會介紹一些優化GAN的方法,那我們明天見!
