在實作上傳檔案的功能之前,我們先幫文章模型加上封面圖片的欄位:
# server/app/blog/models.py
# ... 省略
class Post(BaseModel):
    # ... 省略
+   cover_image = models.ImageField(
+       "封面圖片",
+       upload_to="post/cover_image/%Y%m%d/",
+       null=True,
+       blank=True,
+   )
		# ... 省略

# ... 省略
上面我們設定一個圖片欄位,所以需要再安裝處理圖片的套件:
$ poetry add Pillow
產生新的資料庫遷移檔:
$ poetry shell
$ python manage.py makemigrations
Migrations for 'blog':
  server/app/blog/migrations/0002_post_cover_image.py
    - Add field cover_image to post
更新資料庫 Schema:
$ python manage.py migrate
Operations to perform:
  Apply all migrations: admin, auth, blog, contenttypes, sessions
Running migrations:
  Applying blog.0002_post_cover_image... OK
設定 Django 上傳檔案路徑:
# server/settings.py
STATIC_URL = "static/"

+MEDIA_URL = "media/"

+MEDIA_ROOT = BASE_DIR / "media"
圖片或是檔案都是 Binary 形式的資料,前面所做的 GraphQL 都是文字形式的資料,那麼在 GraphQL 該如何做到上傳檔案呢?
其實就跟傳統的 API 一樣是 HTTP Post,並使用Content-Type: multipart/form-data;,只是我個人覺得用起來麻煩許多。
下面我們先新增上傳文章封面的功能:
# server/app/blog/graph/types.py
# ... 省略
@strawberry_django.type(blog_models.Post)
class Post:
    # ... 省略
+   cover_image: strawberry.auto
		# ... 省略

# ... 省略
# server/app/blog/graph/mutations.py
# ... 省略
import strawberry
import strawberry_django
from django.core.exceptions import ValidationError
from django.utils import timezone
+from strawberry.file_uploads import Upload
from strawberry.utils.str_converters import to_camel_case
from strawberry_django import mutations

# ... 省略

@strawberry.type
class Mutation:
		# ... 省略
+   @strawberry_django.mutation(handle_django_errors=True)
+   def upload_post_cover_image(
+       self,
+       post_id: uuid.UUID,
+       file: Upload,
+   ) -> blog_types.Post:
+       post = blog_models.Post.objects.get(pk=post_id)
+       post.cover_image = file  # type: ignore
+       post.save()
+       return typing.cast(blog_types.Post, post)
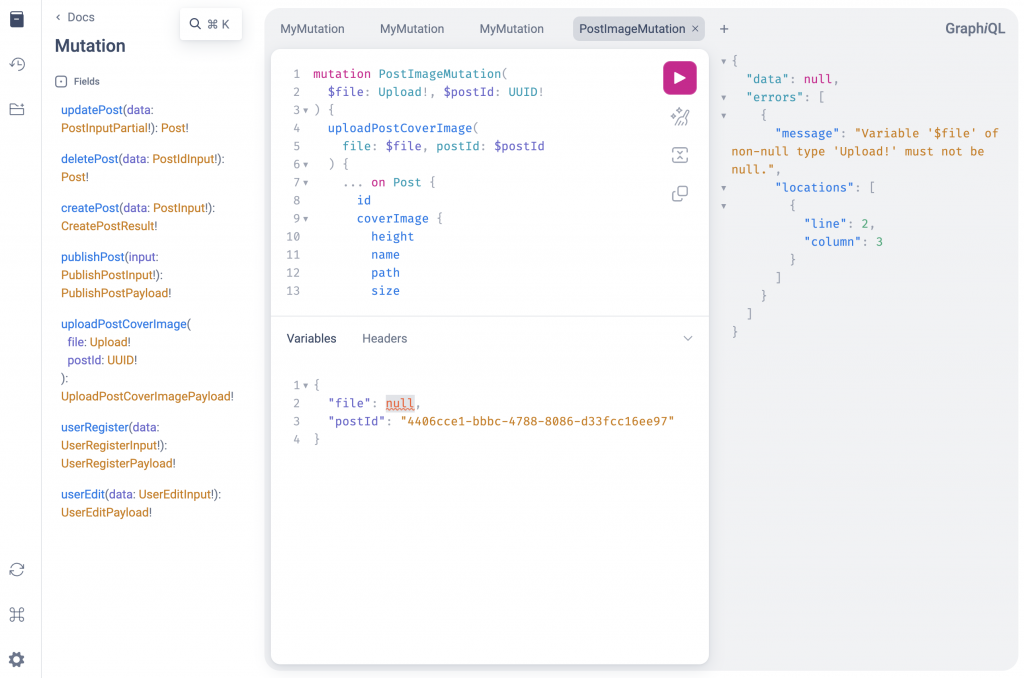
接著到 GraphiQL 頁面設定格式:

mutation PostImageMutation(
  $file: Upload!, $postId: UUID!
) {
  uploadPostCoverImage(
    file: $file, postId: $postId
  ) {
    ... on Post {
      id
      coverImage {
        height
        name
        path
        size
        url
        width
      }
    }
    ... on OperationInfo {
      __typename
      messages {
        code
        field
        kind
        message
      }
    }
  }
}
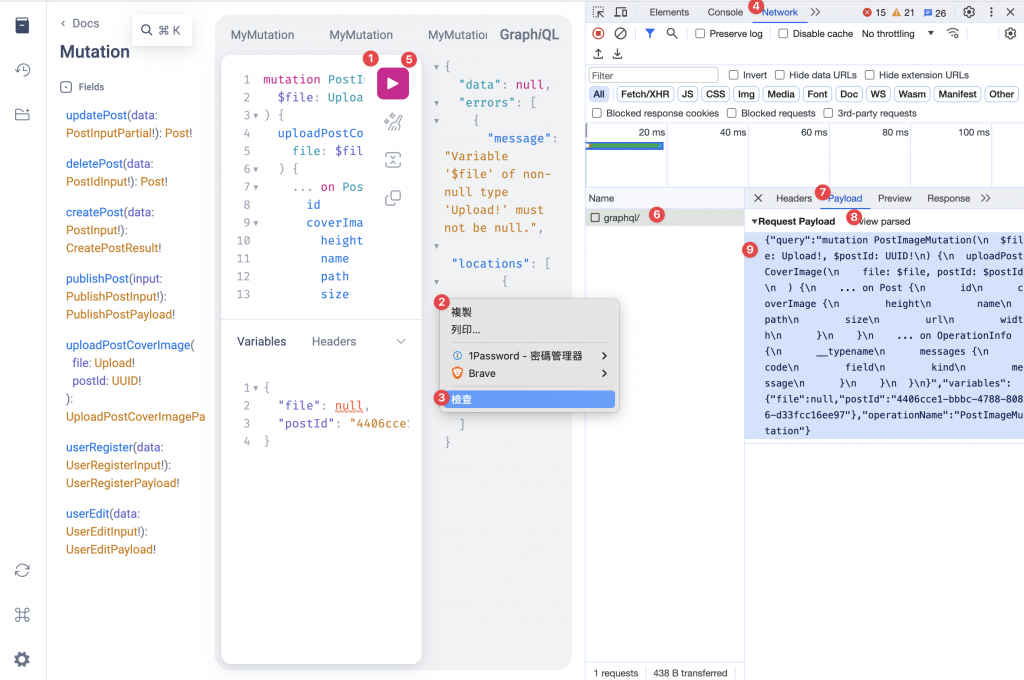
然後會發現沒辦法測試,但是沒關係,我們打開瀏覽器(我是使用 Brave)的檢查,選到Network的頁籤,接著再執行一次 GraphQL 操作,就會看請求的紀錄,點開 GraphQL 請求紀錄,選到 Payload,點擊view source,最後將 Request Payload 的字串內容複製起來。

{"query":"mutation PostImageMutation(\n $file: Upload!, $postId: UUID!\n) {\n uploadPostCoverImage(\n file: $file, postId: $postId\n ) {\n ... on Post {\n id\n coverImage {\n height\n name\n path\n size\n url\n width\n }\n }\n ... on OperationInfo {\n __typename\n messages {\n code\n field\n kind\n message\n }\n }\n }\n}","variables":{"file":null,"postId":"4406cce1-bbbc-4788-8086-d33fcc16ee97"},"operationName":"PostImageMutation"}
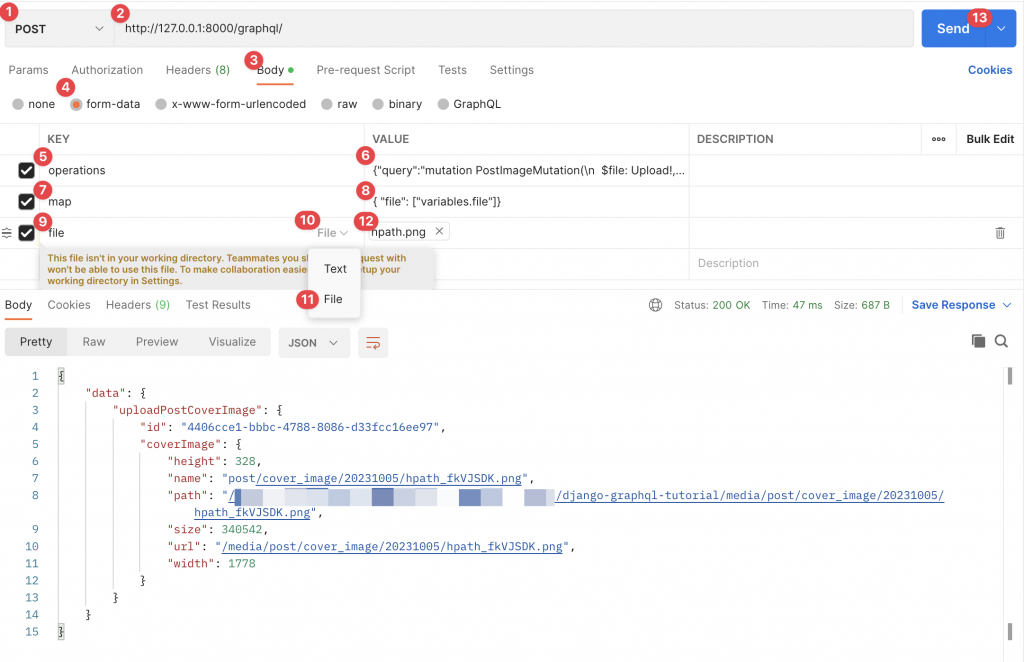
GraphQL 使用multipart/form-data主要會有三個部分:
operations:GraphQL 操作格式,如上面複製的 Request Payload 的字串內容。map:GraphQL 變數與表單檔案欄位的對應。下面使用 Postman 來測試文章上傳封面圖片:

在 Postman 的介面上有 12 個步驟,打開新的請求畫面做以下操作:
POST。http://127.0.0.1:8000/graphql/。Body 頁籤。form-data,Postman 會自動幫我們設定 Headers 裡加上Content-Type: multipart/form-data;。operations。map。{ "file": ["variables.file"]},代表下面要設定一個file欄位,它對應到 GraphQL 變數 file(variables.file)。file,是根據上面map的值所定義的欄位新增的。Postman 可以看到回應的 JSON 資料。
最後回到 Django 專案目錄下看:
├── media
│   └── post
│       └── cover_image
│           └── 20231005
│               └── hpath.png
確認圖片有存在我們指定的路徑下。
上傳多個檔案的範例可以參考 Strawberry 官方文件 [1]。
雖然 GraphQL 有支援multipart/form-data,我自己還是比較喜歡另外寫檔案相關處理的 REST API。
這次修改內容可以參考 Git commit:https://github.com/JiaWeiXie/django-graphql-tutorial/commit/c1c9394128fab8b97c752138ff04cbcbbaf97f9f
